Happy New Year everyone! Carol Ponsford here showing you how I used the January StencilClub set
to create a journal page. This wonderful set was a mash-up designed by Seth Apter and MaryBeth Shaw.
I grew up in Southern Indiana overlooking the Ohio River Valley which included the metro
area of Louisville, KY. I always loved the bird's-eye view of the twinkling city lights we
had from our home which is what inspired this journal page.
I began by placing the building stencil on my gel plate and randomly sponging areas with acrylic paint. The colors I used on this first layer were Master's Touch - Violet, Paynes Grey, Rouge, and Cobalt Blue.
Next, I grabbed the second stencil and sponged acrylic paint through some of the larger patterns overlapping the areas from the previous stencil using some of the same colors listed above
with the addition of Master's Touch Yellow Deep and a mixture of the Yellow Deep with
Amsterdam's Reflex Rose which makes a beautiful orange color.
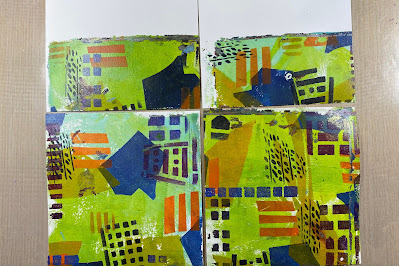
After the layers were fully dry, I blended a thin layer of Master's Touch Ocean Green and Light Olive Green acrylic paint (I started with each color in opposite corners of the gel plate and worked the colors to the center with the brayer) and quickly put sheets of white card stock down pressing firmly and letting it set on the plate for several minutes to help get a even pull.
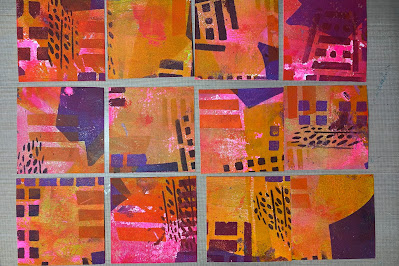
After I removed the paper from the gel plate, I measured to see how many small squares I would need to fit my particular journal. (My journal needed 12 pieces each being a little smaller than 2 1/2" square)
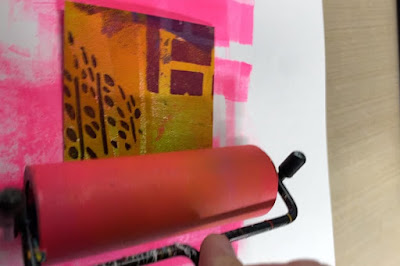
Once I laid out the squares I decided I wasn't really happy with my color choices so, when that happens I add a layer of Amsterdam Reflex Rose acrylic paint. I used a brayer to add a thin layer to cover the existing colors and it changed the colors more to my liking. Reflex Rose is such a great color to add if you are ever not happy with your color choices as it can make a huge change.
I painted my journal pages with black gesso before adhering the squares onto the page in a grid
format. After adhering them in place I took my white Posca paint pen and doodled on the shapes
adding marks that I use frequently. I apologize that I did not get a photo of this stage but if you look closely at the finished page, you can see how I added this to add interest to the background.
I took a sheet of black copy paper and traced the stencil building shapes with my white
Posca paint pen and cut out the building shapes to get my skyline to add on top of the squares.
After laying them on the page to figure out placement I realized I wanted the window shapes to
show more so I took each building and laid the stencil back on top, lined it up, and sponged
white acrylic paint into the window openings.
Once I had everything glued in place I used my black Posca paint pen
to add the window frames of each window.
I also cut out small squares to add the words I wanted and glued them in place
and then used the white Posca pen to add the lettering on each square to finish the page.
I had so much fun creating this page and hope that you enjoyed following my play. I encourage
you to always look at your stencils with a sense of play and think outside of the box with what you
can do with every part of them. Even though the focal point of this journal spread was the
building stencil, I think the parts I used from the other stencil added interest to my background.
I could have reversed their use and would have come out with an entirely different outcome.
Until February, where I will show you what I do with the February StencilClub set.
Have a wonderful January full of playtime with your stencils from StencilGirl@!
Join StencilClub by January 15 to receive these exclusive stencils and accompanying video
tutorial with PDF (both downloadable!), and 20% OFF STENCILS EVERY DAY!!
Happy Creating!
To see more of my work please visit my Instagram page.


I love how this project turned out, Carol, and am going to remember your tip about Reflex Rose - thank you!
ReplyDeleteThank you so much Terry for your kind comment. That Reflux Rose is such a great color! Happy creating!
DeleteI love this page and your technique with the gelli print was wonderful I haven't seen that before and can't wait to give it a try!
ReplyDeleteThank you for checking this out.I hope you do give it a try and I would love to see what you do. Knowing you can add layer upon layer on the gel plate before getting a pull is a game changer.
ReplyDeleteLove this, Carol! And of course I love Reflex Rose, too. It’s a great color to use for all sorts or reasons. One of my go-to favorites.
ReplyDeleteThank you for checking it out. Glad you had found Reflux Rose, it is a must!
ReplyDeleteThis is an epic demo Carol and such a unique way to create. Loved the artwork in the end and watching you take us through the steps!
ReplyDelete