Everyone has a favorite bird that comes to their backyard feeder. What’s yours? Here are nine of my favorites: Cardinal, Carolina Wren, Sparrow, Chipping Sparrow, Goldfinch, Junco, Eastern Bluebird, Tufted Titmouse, and the Ruby-Crested Kinglet. These can be used as a printed pattern, but I think they are most fun cut into nine individual bird stencils. Use them for ATCs or to add a bird to a landscape, to a journal, or to make cards or prints for family and friends.
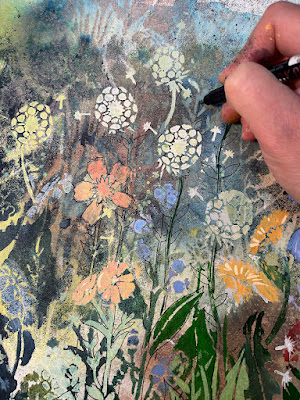
A friend showed me a dandelion blossom gone to seed and asked, “Do you see the end of a flower or a potential wish?” This stencil is inspired, like my Tall Flowers stencil and Marsh Flowers, by the flowers I grew up picking along the fence row in Ohio: mallow, flax, painted daisies, and dandelions. This makes a good border in a journal, a cheerful edge along a tablecloth, and is varied enough to make a tangled meadow painting.
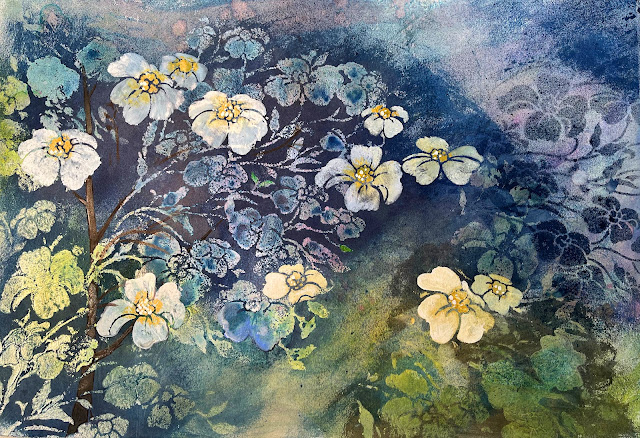
These Dogwood Blossoms are in full bloom on delicate branches with small spring leaves just starting. This stencil is inspired by the dogwood trees that have bloomed lavishly this spring in New York after being frozen out last year. I love the way the petals are shaped, and that the flowers face up towards the sky.
Bees as pollinators are so important in our lives. This stencil was inspired by seeing an open glass hive at the NY Botanical Garden’s Bee Festival. The stencil is a combination of different bees, as well as tiny flowers and graphic honeycomb-like designs. The bees can be used individually, or the stencil can be used to print an allover pattern on a tea towel or perhaps a gardener’s apron.
Learn the steps Margaret took to make this below.
Dandelions and Lilies Tutorial
I want to use the 9 x 12 Dandelions and Lilies stencil to create a painting that would look like the tangled meadow where I might have picked flowers as a kid. You can use these same techniques to create a moody journal page. I started by using ink, Ranger sprays and some spattered rubbing alcohol to make a textured background on a half-sheet of Rives BFK paper.
I added a paper horizon mask and sprayed a dark teal ink through the Dandelions and Lilies stencil, and let this dry.
Then I used semi-opaque Kuretake watercolors and a brush to add some colored flowers and foliage to the foreground.
I removed the horizon mask and added a couple more flowers to the foreground, and some more bright cream dandelion fluff here and there.
I drew into the painting with a Kuretake fine line pen and added iridescent green to finish the scene.
I want to use the 9 x 12 Dogwood Blossom stencil to create a painting that would look like dogwood blossoms by streetlight—the way the flowers seem to glow in the night. I started by using ink and Ranger sprays to make a textured background on a half-sheet of Rives BFK paper.
Then I sprayed Ranger Distress Resist Spray through the Dogwood Blossom stencil, and let that dry.
After the Resist Spray dried, I sprayed it with a deep blue-black water based ink, and wiped the resist areas clean with a paper towel.
Using that same dark blue ink, I added some branches with a brush and the Dogwood Blossom stencil.
Then, I added some shadow branches and flowers with the dark blue ink spray.
Now for the fun part—adding the glowing white flowers! Using white and gold gouache, I added white and cream-colored flowers with gold centers to my nighttime scene
And some more flowers as well as a delicate branch.
I wanted to use the 9x12 Bee stencil to create a stand-alone artwork. I started by using ink and Ranger sprays to make a textured background on a half-sheet of Rives BFK paper.
I cut a sunflower stencil with scissors and used it with Ranger Distress Resist Spray as well as a Ranger Spray Ink to lay in some sunflower blossom shapes. I unscrewed the top of the Resist spray and sprinkled some resist stuff across the surface of the paper, and let this dry before proceeding.
Using Kuretake watercolors, I added black, raw umber and gold through the Bee stencil.
And then with a small brush, painted some additional yellow and gold into the bee body stripes.
I decided to draw into the painting, using a Kuretake fine line pen to add detail to the sunflowers, as well as some vertical stems and leaves.
And then using a cerulean blue Prismacolor pencil, pushed and pulled the warm background of the bee painting.
I cut a little texture stencil to add some iridescent blue texture to the background, and also some gold texture to the sunflowers.


Love these new stencils - beautiful, complex, and versatile! Thanks for the tutorials, too!
ReplyDelete