Showing posts with label gift. Show all posts

Monday, December 5, 2022

Buy the PERFECT Gift!


Tired of getting gifts you don't like?
Why not tell them you want a 
StencilGirl Gift Certificate??
It is easy!
Just click HERE.

Friday, August 19, 2022

Trena Brannon: Ideas for Journal Pages and Bookmarks

Hello Beautiful People! Today, I'm sharing a couple of ideas for how to use stencils to bring some colorful joy to yourself and to others. 

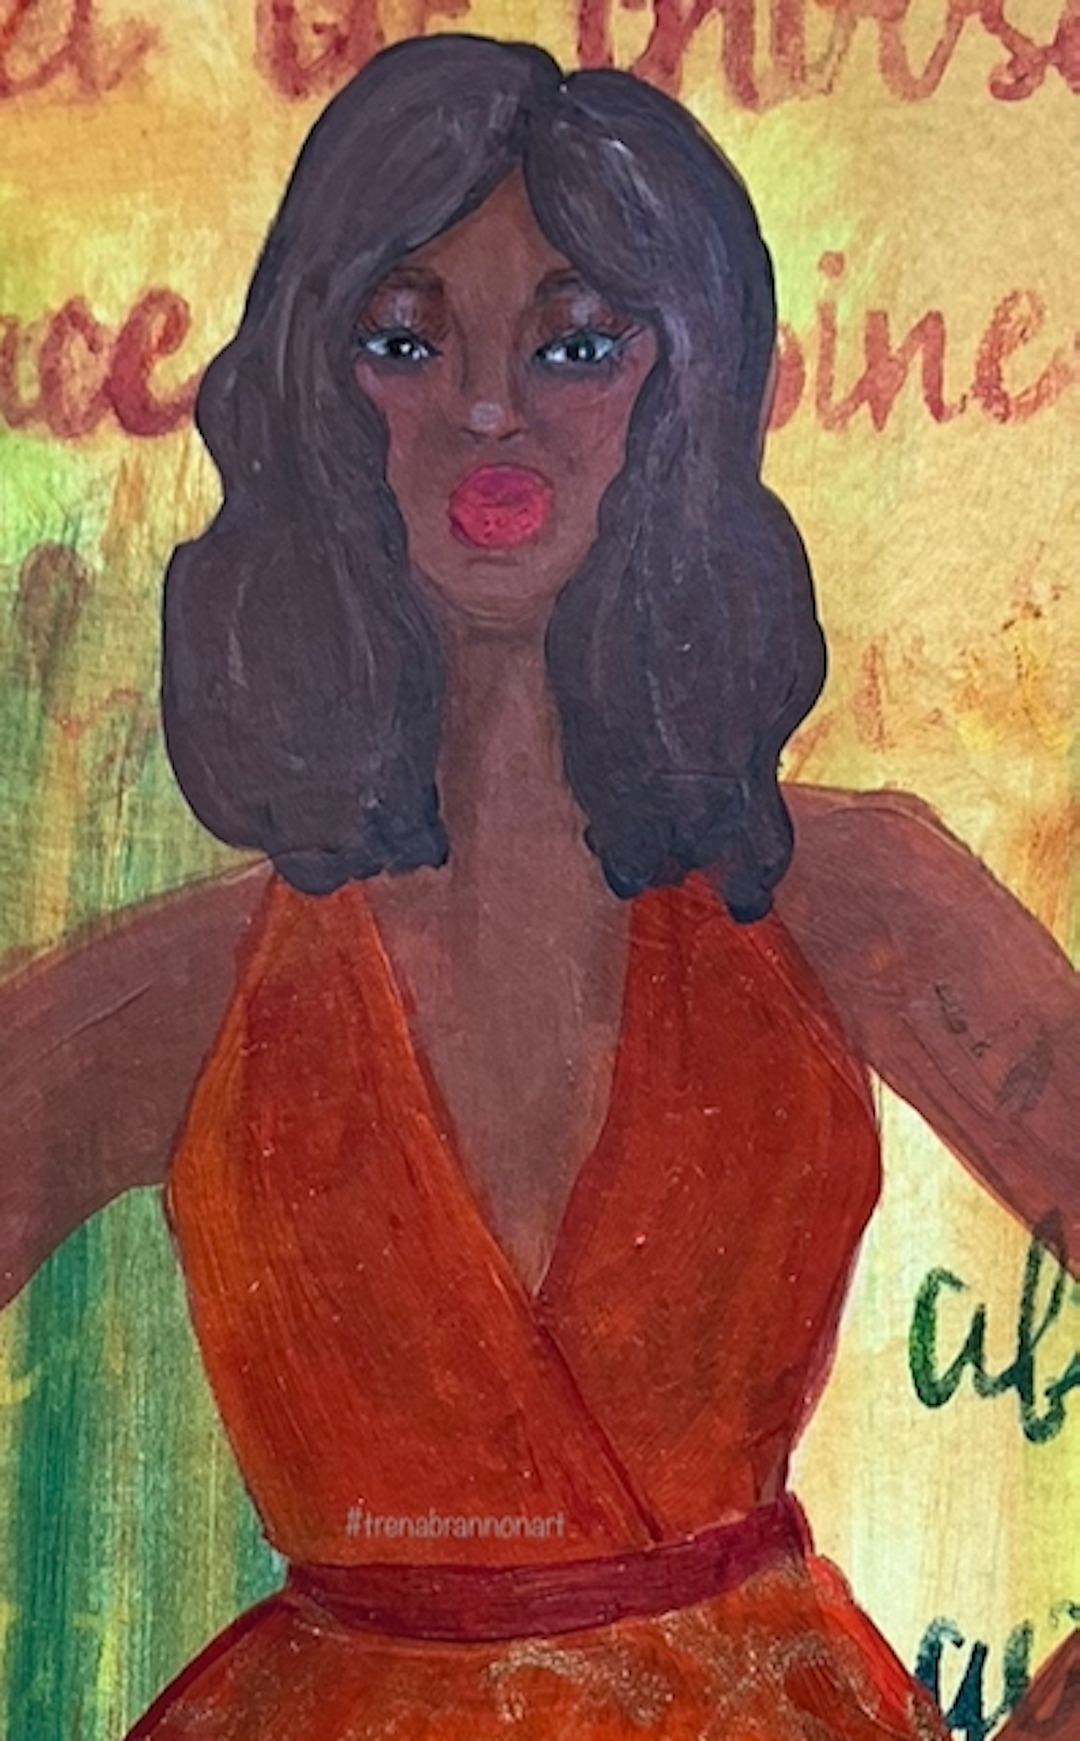
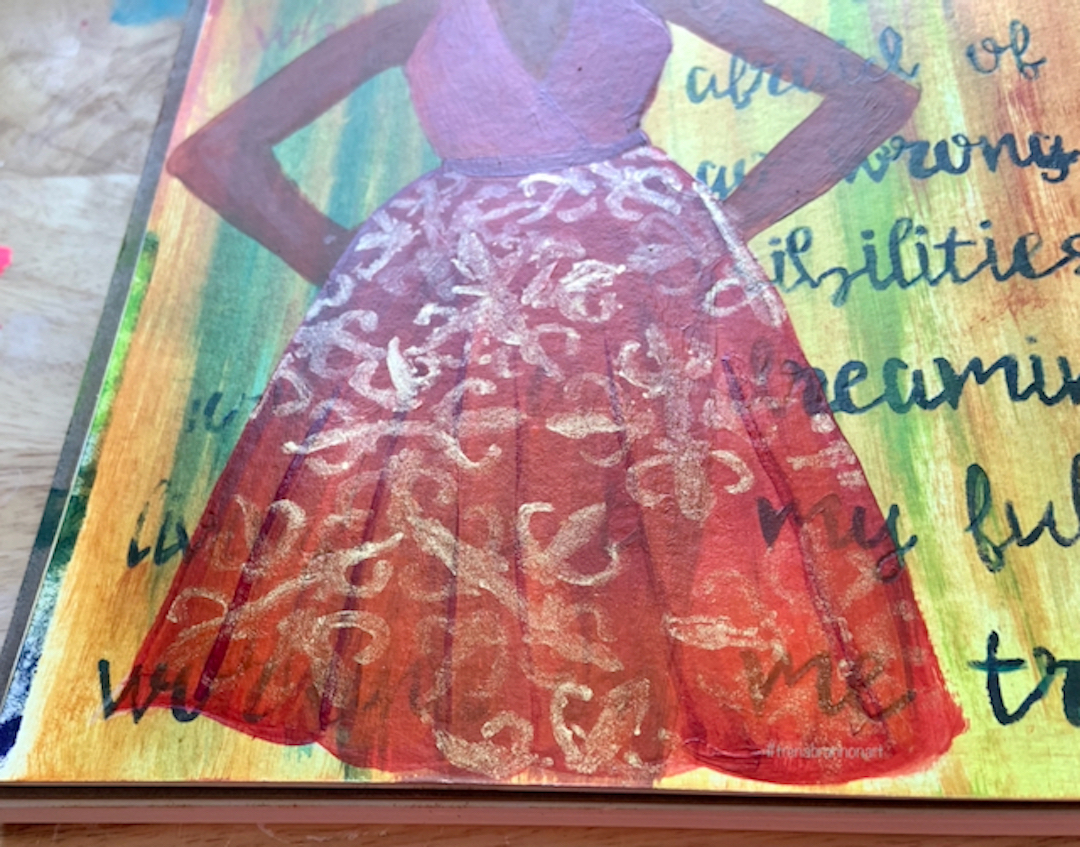
IDEA 1: Starting with colorful joy for you, an idea for your art journal. I chose fashion for the focal point in the example below, you can choose a focal point that brings you joy. 

In my 9x12 Canson XL watercolor journal, I selected my word stencil I Get to Choose for my background. I believe the words are empowering.  I used a dry dauber sponge so the words would be crisp and dabbed acrylic paint in a diagonal pattern using my favorite color - the rainbow. :) Of course, you use your favorite color(s).  Some of the words were smeared because I had a little too much paint, which is ok. It's the background.
 

After the paint dried, I used the same dauber sponge and a few of the same colors to create vertical streaks.  To warm up the page, I used a larger sponge to apply a thin coat of Golden Quinacridone Nickel Azo Gold - I  learned that from Mary Beth!


After the layer dried, I painted my model form and let her dry.  


Next, it was time to dress her! I painted her dress using magenta and bright orange, trying not to blend too much - I dig the painterly look.  I used acrylic paint, pencils, gouache, and pens to draw her features, her hair, and make-up.  One of the reasons I really like using acrylic paint is that you can easily fix any boo-boos. I had to redo her make-up and hair a few times, and also her chin. LOL! In the end, I dig how she turned out.  That’s the most important thing - when you look through your journal, you dig the art!


For the design in the lower part of her dress, I used the symbol for Democracy, Unity in Diversity from West African Symbols ATC Mixup 4, one of the stencils in a collection of symbol stencils that Wendy Featherston and I collaborated on. I painted a metallic watercolor through the stencil using a small paint brush and a small amount of water so that the color would not run under the stencil. 

Below is a photo of the supplies I used. 

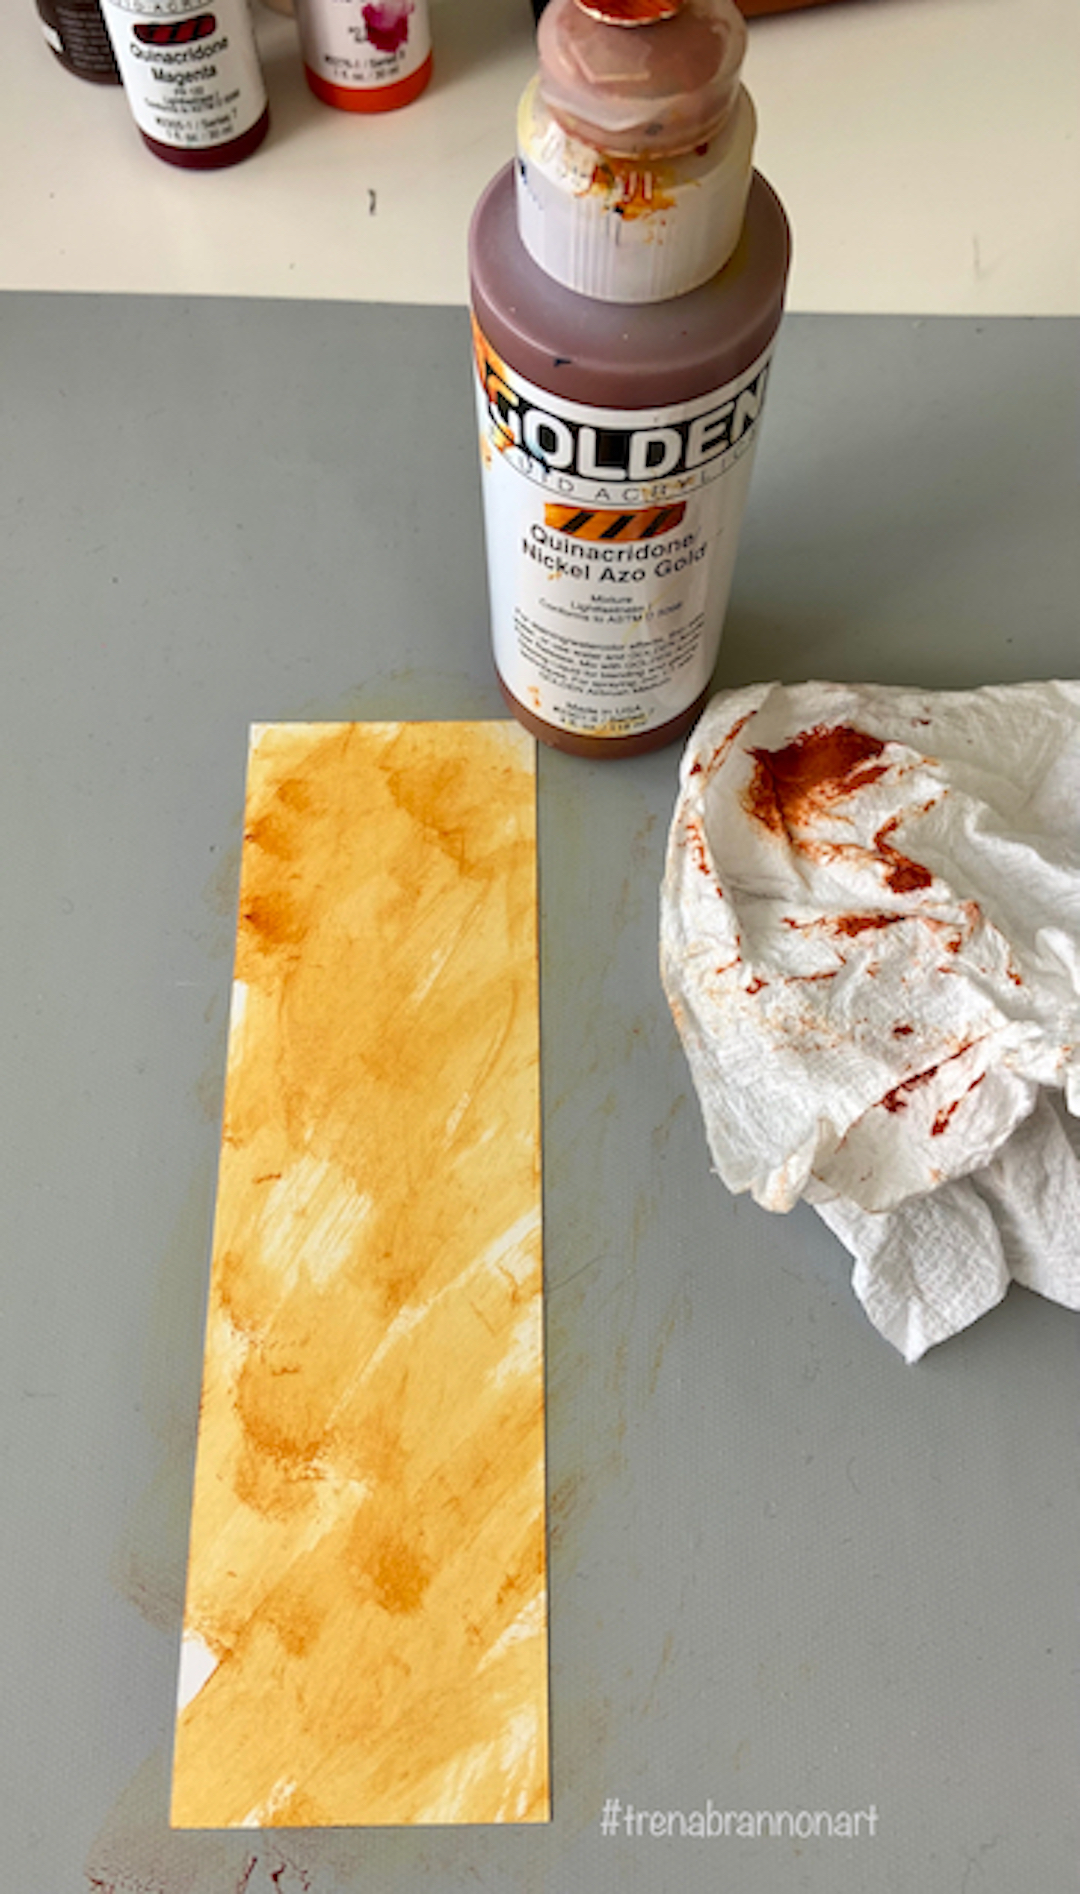
IDEA 2: Make someone smile with a customized bookmark. I like to give books as gifts - art books, self-powering, leadership, romance - all the books!! Whatever the recipient is into.  Along with the book, I give a customized bookmark.  


For this bookmark, I used Positively Positive and the August StencilClub set.  I bought this blank bookmark and sleeve pack of 5 years ago when Sunday International was a USA company. The cardstock included has a glossy coating.  I found bookmark sleeves at clearbags.com and I also found a variety on amazon USA.  Read closely to make sure you get the quantity you want, they can come in large quantities. You can use the paper of your choice and cut it to fit the sleeve.  

To make this bookmark I worked in layers, starting with rubbing Quinacridone Nickel Azo Gold using a paper towel. Because the paper is glossy, I got a ‘swish type’ texture. I left some white on purpose.

With the intention of making the gold less transparent, I added a flesh-colored mat paint to the gold, using a dauber sponge through a corner section of the 9x12 club set stencil. Had a happy accident - my sponge dauber was damp from the previous cleaning and made an interesting-looking design.


Next, I added random shapes with a dry dauber sponge and the 4x4 club stencil.

Using a dry dauber sponge, I filled in the female mask cutout stencil with flesh tone opaque paint and gold, which created the looking I was going for. :) 

I then laid the mask over the cutout shape and colored in the open sections with a pencil. I really like the scratchy pencil look. 

For the positive words, I used a sharpie to color each letter. Note: I adjusted the stencil for the second line to make sure the letters fit onto the bookmark. I then colored over the bridges to make the letters flow together.

To give a bit of a 3-D look, I laid the stencil back in place and then shifted it left ever so slightly and drew in a thin black line on the left of each letter. 

Add a ribbon and it is ready to use! I usually add their name to the tag as well.  IMPORTANT NOTE: Be sure to let your bookmark dry completely before sliding it into the sleeve.  I was excited to finish it and made a little smear. So, this one will be mine and I'll create an unsmeared one as a gift. :D

For more ideas, tips, and techniques for words and African symbol collection, check out the videos below:

Creating with word stencils.


Lots of ideas for the West African Symbols ATC Collection.

You can find all of my StencilGirl® stencil designs HERE and HERE!

Take Care and Stay Positive! 

trenabrannonart.com

Instagram: @trenabrannon

Facebook: Trena Brannon Art & Design

Friday, April 9, 2021

Gifts as easy as ABC using StencilGirl® ATC Mixup Alphabet Stencils

Hi, everyone! Ann Barnes here!

2020-2021 has been a different kind of school year for people everywhere. The educators' roles have been more important than ever. Whether tackling new methods of educating remotely, or simply connecting with students they have never met in person, teachers have dedicated their time and efforts to the cause. With the end of the school year approaching, I have been contemplating ways to show teacher appreciation. I thought it would be fun to share a couple of these ideas.

I love giving handmade gifts. To me, there is nothing better than receiving something lovingly made with the recipient in mind. The first piece I am sharing is an artsy alphabet mixup pashmina. This lightweight accessory could be used throughout the year in a wardrobe, or as a simple throw. The varied designs in StencilGirl® ATC Mixup Alphabet stencils give this piece a lot of interest and the alphabet shapes lend themselves perfectly to a teacher gift. 

For this project, I use a recycled pashmina scarf. I want the piece to be monochromatic, and this silver grey color provided the perfect base. I did a bit of research before starting the project and learned that when painting on fabric with acrylic paints, it is best to mix your paint with a textile/fabric medium. There are many manufacturers that make this product, and it is simply mixed into the paint in a two to one ratio. Be sure to refer to specific product directions for best results. Painted fabric will become stiff, the fabric medium is supposed to alleviate this stiffness and allow movement.

Before working the stencils into my design, I paint each end of the scarf with an ombre effect. This helps to give a base to the design, grounding the splattering of letters. Unfortunately, this ombre paint effect also added an extra layer of "stiffness." In full disclosure, I must admit that my scarf is fairly stiff. I would recommend using an ink or high flow paint for creating the ombre, which I believe will allow the scarf to drape more freely. It's best to use a piece of cardboard underneath the fabric when painting, and securing the fabric in place will reduce the amount of stretch.

When the ombre "base" is completely dry, lay out some of the ATC Mixup Alphabet stencils in a random pattern. The letters located over the lighter section will be stenciled with darker paint, while the letters on the darker base will need to be lighter in order to stand out. I like that some letters extend beyond the painted base and onto the unpainted scarf material. (Tip: If you lightly spray the underside of the stencils with a removable adhesive spray before starting, it can help to keep them in place when stenciling.)
Using a foam wedge and very small amount of paint, pounce the paint through the stencil onto the base using an up and down motion. A few light layers of paint rather than one thick one ensures that the paint does not seep under the stencil where it shouldn't. When you are satisfied with the first end of the scarf allow it to dry completely. The second scarf edge can be completed in the same manner. 
When the scarf is finished to your liking, allow it to dry overnight then heat set the painted areas. The fabric medium directions recommend heat setting with an iron. When ironing, be sure to sandwich the scarf between an old towel so that you are not touching the paint directly with the hot iron. 
The artsy alphabet mixup pashmina is ready for gifting.

Knowing that spring brings many extracurricular and outdoor activities and there may not be much time to make gifts. A simple handmade gift enclosure with handwritten note can easily be created. You could  stick one in with a gift card or attach it to a wrapped package, these cards complete with a personalized note can mean a lot to that special teacher, colleague or friend.

 The ATC Mixup Alphabet stencils from StencilGirl® are perfect for creating a personalized gift enclosure.  The ATC size (3" x4") is just right for a small card. These cards can be as simple or complicated as you wish. I made a few different ones in a relatively short time. The first step is cutting the base cards. Since you may want some to open from the side and others to open from the bottom, its best to cut two different sizes while you have all of your tools handy. The base measurements for each directional card are 6"x4" and 8" x 3". When either of these bases are folded they will create a 3"x4" finished folded card. I cut my bases from Bristol paper; however, you can use any type of heavyweight cardstock. The bases can be cut from watercolor paper, or simply colored or patterned cardstock. It is best to consider what you will be doing to the paper and select appropriately.

Once the card bases are cut, scored and folded, choose a letter that corresponds to the recipient's name. With the stencil in hand, determine if you would prefer a top or side folding card. You will notice that for some of the cards, I cut around the letter shape. If you are making a shaped letter card, you definitely need to pay attention to the fold location. (For example: if the A is to be used as a shaped card, the fold would need to be at the top along the flat edge of the letter.) All of the ATC Mixup Alphabet Stencils will fit onto the 3"x4" card front. When you have chosen a folded base, and your stencil, there are limitless possibilities. I have shared a few different ideas to get your imagination flowing. 

The "T" card is created by tracing the stencil onto the card base with a permanent archival pen. Each of the stencil sections have been filled with doodles and then watercolor.

The "A" shaped card is created with spray inks, paint, and a gold gel pen. Ink the card cover with distress oxide spray inks and allow it to dry. Next, using a foam sponge and acrylic paint lightly pounce the paint through the stencil onto the inked background. Lift the stencil and allow to dry. Using a straight edge, draw a pencil line following the contour of the letter edges with an equal distance offset all around. Cut along the lines being sure to leave the folded top as an edge. When the excess is cut away, what remains is the  shaped "A" card that folds at the top and opens at the bottom. (You may want to experiment with this technique on scrap paper before making a final version to ensure the fold remains intact.) I also added accents with a gold pen to outline the letter and highlight the arrow design.

The "O" card is made by initially creating a splotchy watercolor background. I wet the card cover with a thin layer of water and then splatter watercolor paints onto it and set it aside to dry. Select a coordinating color of paint to stencil the letter with. When the background is dry, stencil the "O" with a pouncing motion. Lift the stencil. Use a paint pen to add details to the stenciled letter, following the pattern lines. Edge the card with the remainder of paint on your foam wedge to give it a cohesive finished look.

The "N" card is the simplest in the batch. Using a paint color of your choice, simply stencil the letter onto the card base. You can create an ombre effect with your paint color if you are looking to jazz it up a bit. This technique could be very interesting if done on a patterned base. You can also add a few additional marks or doodles to the finished design if time permits.

The "M" card combines a couple of the different techniques. This is a "shaped" card, where the stencil design is traced and then embellished with watercolor pencils. The "M" shape works best for a side folding card. Align the stencil so that the open design edge is set in from the fold. (Tip: if you cut the ATC stencils into nine separate 3"x4" sections, the edge around the letter design is sufficient offset. Simply align the stencil edge to the fold.) Using a pencil, trace the stencil design onto the folded card base. Color the design with watercolor pencils, then use a water brush to blend the coloring. Add accents to the mushrooms with a white paint pen. When completely dry, draw the offset lines around the letter design. Cut the excess off to create the letter shape, leaving the folded edge along the side.
These cards are really fun to make each one can be individualized to the personality of its recipient. 

I hope you are inspired to create something special to show someone that they are important and appreciated. It's the little things that mean the most.

Thanks so much for taking the time to stop by today, it means a lot to me.

Ann Barnes


StencilGirl® stencils used:
ATC Mixup Alphabet A through IATC Mixup Alphabet J through RATC Mixup Alphabet S through Z & 


Find Ann on Facebook: https://www.facebook.com/ann.sullivanbarnes
Find Ann on Instagram: https://www.instagram.com/aksbarchitect/
Ann's blog: https://aksbarchitectcreates.blogspot.com

Tuesday, December 24, 2019

Relax, You've Got This: Rough Day at the Office Stenciled Survival Kit

Hello!
Happy Christmas if you are reading this on the eve. Happy Day if you are reading it another time.

My job is fulfilling but there are days I wish I was retired so I would have more time to make art. This "gift it" was made with my office cohorts, near and far, in mind. Guess that's what winter vacation is for, eh?


You will need:
Stencils - Mini Buddha, Flower of Life (fast becoming a fave), small stencil from the December 2013 StencilClub set
Black paint
Sprays
White removable tape
Small plastic baggies
Bubble Wrap!
Pens
Snacks

Main card:
1. Cut cardstock to fit a small baggie - 6.5" x7"
2. Keep it simple and spray the color through the Flower of Life Stencil
3. Use black or a complementary color of paint through the Mini Buddha Stencil
4. Leave the back blank or write a personal note on the back or glue down a brief list of ways to immediately de-stress, such as:
  • Close your eyes and just breathe for a few minutes.
  • Stretch. Stretch more.
  • Get up and walk around.
  • Think of something that makes you happy.
  • Remember, I am hear for you.
5. Because your giftee is likely to repurpose your card into her art journal, use white removable tape to put a strip at the top of the card that says or "Rough Day at the Office Survival Kit."

6. Be sure to keep some paper nearby. Working with spray inks makes for excellent ghost prints!


Snacks & goodies you might include:
Candy, cookie, gum, tea, hot chocolate, nuts, fidget spinner, painted rock, stress ball, funny sticky note pad, and of course, Stenciled Scratchers, and don't forget the time tested relaxer Bubble Wrap (bubble wrap came around the peppermint candy spoons I ordered for the hot chocolate)!

You could easily make "survival kits" en masse yet customized for individual people.

You could color coordinate the main card, scratcher, and contents. If you are like me, you'd need to use an alphabet stencil to stencil on a pun, because laughter, even if it is groaning laughter, is good medicine for a crummy day.
Can you think of any others? Share them in the comments.

Wishing you a fabulous 2020!
Carol Baxter

Tuesday, November 5, 2019

Gift it or Grid it Challenge from Shel and Peg


Hello,
Peg & Shel with you today. We are so happy to share a few gift and wrapping ideas with you. This time of year we are always looking for an easy gift to take to out host/hostess and friends, so let us share with you some quick and easy ideas.


We are using L736 Leafy Doodle Border, S708 Leaf and Clover Prints and L422 Herbs stencils. StencilGirl® carries many leaves, flowers and nature stencils. Did you know you can shop by category? It is so convenient. 

Peg Robinson's Gifts, Tags, Bags, and a Dispenser


In the picture above and in my video, I'll show you how I created gift bags, a decorative journal to gift in a bag, a pleasing gift tag and a decorated soap or cream dispenser. I chose to work with Archival inks and Gina K Glitter paste. Isn't that green shimmer lovely?


The bags are inexpensive sandwich bags in a kraft brown paper and a wax paper much like glassine.

The tag can be used to adorn homemade flavored vinegar or oils recycling old wine bottles. You can purchase soap and lotion dispensers at the discount store and decorate them with glitter paste and stencils. 

Did I mention the decorated sandwich bags are great wrappers for gifting stencils to your crafty friends?

Shel's Wrapping Gifts Up!


For the November Gift It/Grid It theme I focused on up-cycling beautifully stenciled gift packaging using the three stencils. 

For the first one I used spray inks and the Leafy Doodle Border stencil to make my own gift wrapping paper our of craft paper that comes in ordered boxes as packaging. Iused the same stencil & spray to make a belly band and tag for the package.

The second project was created with a used box that some essential oils came in. As it was just plain craft colored box I stenciled it using some acrylic paints with the Leaf and Clover prints stencil. 

I like this stencil because you can use the designs on top of each other to add highlight or shadow with different colored paint. This box can be used again and again and doesn't have to be wrapped. 

I made a matching tag to tie on the ribbon.

For the final gift packaging project I used a paper sack from the grocery store produce area with oranges in it. I used a regular dye based ink pad and the Herbs Stencil to cover the bag in stenciled rosemary leaves. Then I used a piece of cardstock to create a topper for the bag to keep it closed. You can also use the stenciled topper as a tag to write a greeting or the to/from information. 

I hope you found my stenciled packaging upcycling ideas fun and useful and give them a try this gift giving season.


Well, we hope this helps you with your last-minute gifts this season. Thanks for checking us out and a big thanks from Shel and Peg at StencilGirlTalk. 
Enjoy the holidays.

Peg & Shel

Stencils used:

Leaf & Clover Prints 6" x6" Stencil by Jennifer Evans
Leafy Doodle Border 9" x 12" Stencil by Valerie Sjodin
Herbs Stencil 9" x 12" by Jessica Sporn


Thursday, December 27, 2018

Artful Celebration- Home Decor


Hello,

We're so thrilled to be on the blog today. This month the theme is Artful Celebration. Since it's December, it's the season of Christmas and then the coming New Year. 

We decided to create a few home decor products that we could use at home during this season. We chose very wintery colors- White, Blues and Purple. 

Here's a look at what we've created:


The technique to create these is super fun and easy. Hence, these things make for quick projects. They are also great gifting ideas. We began with some MDF bases and gave them all a nice coat of White Chalk Paints.


Next, was playtime with the stencils. We used stencils from the ATC Mixup- L655 designed by Andrew Borloz, L657 designed by Carolyn Dube and L 665 designed by Kristie Taylor. We began with Grey Chalk paint, adding light blue, lavender and then dark blue. 


Three steps and we have these gorgeous products to flaunt. Here are some more pictures:


Hope you're inspired!
Hugs Sunila & Aditi