Some of you may remember previous
sketchbooks I made for The
Sketchbook Project, that were also featured as tutorials on this website.
Just enter my name in the search bar and they’ll pop up. The Sketchbook also
does other projects apart from their regular sketchbooks and one of these
involves tiny sketchbooks, sized 2.5 x 2.1/4” (about 1/3 of the regular ones).
You can see just how tiny that is on this photograph.

There are themes set by The Sketchbook Project to choose from
and for mine I selected Around the
World. Here is how it came to be:
1. Start
by undoing the staples, and removing the pages. You will have 15 sheets of
paper sized 3 x 2.1/4”.
 Put the cover
aside for the time being.
Put the cover
aside for the time being.

2. Put
the pages down on your working surface and spray with water. Also spray your watercolor
set (I’m using Jane Davenport’s Tropical set of colors). Then with a wet brush
pick up colors from the palette and drip down over the pages. Continue using
the water spray at times, and let the colors run into each other. I started by
using warm colors only.


3. Repeat
step 2 using cool colors.


4. Continue
repeating step 2 and 3 till you’re happy with the results.


5. Using
StencilGirl® stencils Spider Flower, Grove Street, and Unconnected Circles and a permanent black marker
(I used Stabilo Write-4-all) mark out patterns from the stencils onto the
sheets.
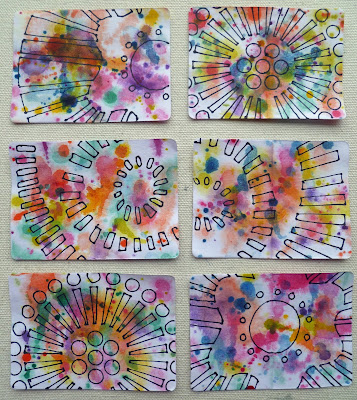

6. Color
in the marked patterns with watercolor pens of your choice. I used Jane
Davenport Mermaid Markers.


7. Put
sheets together back to back using either glue or double sided tape (that was
my preferred option. You’ll have one sheet left over. Set this aside for the
moment.
8. Edge
the pages with a permanent pink ink pad.
9. Place
the pages in an order you prefer and fold the pages well (using a bone folder
if you have one.


10. Write
appropriate texts on the pages. Mine all refer to the dictionary descriptions
of around and round. Set the pages aside
for the moment.
11. Take
out your cover. The bar-code for registering the sketchbook is on the back cover
and mustn’t be covered up so I concentrated on the front cover and only parts
of the back cover and covered with white gesso.
12. Mark
the front cover and part of the back using a permanent black marker and stencil
Central Avenue.


13. Fill
in the shapes using the same watercolor pencils as per step 6.
14. Take
the sheet left over in step 7, cut in half and using double sided tape or glue
adhere the two halves to the inside front and back covers.
15. Glue
on title to the front cover. Mine was cut from a vintage dictionary.
16. Make
a plain paper template the same height as your sketchbook and fold in half. On
the fold line mark 3 spots, one approx. ¾” from the top, one ¾” from the bottom
and one halfway. Use this to make holes
in the center of all your sheets, using a big needle or awl.


17. Using
a needle and a strong thread start in the middle of the book from the center
hole and go to the outside, leaving a long tail. Go back inside through the top
hole, back out to the bottom one, and back in through the center one. Tie the
thread and the tail left at the start, around the middle thread, with a square
knot. There are many videos available on YouTube showing you how to do this. It’s
called a pamphlet stitch with 3 holes.


I love this colorful little notebook!
ReplyDeleteFrieda, I love these and they are such a different style than your usual wonderfulness!
ReplyDeleteWonderful directions! Thank you for some great ideas, Frieda!
ReplyDeleteI had to try it! I love the results. Thank you.
ReplyDelete