WOW! That’s a lot to say in one breath!
Hello Creatives, Kim here. I am happy to be on
the StencilGirl® Blog today to share with you how I decorated these
really cool stash boxes. First of all, I was really fortunate enough to come
across them, so when the vision reveals itself, you immediately snatch them up.
I’m typically a fan of stash boxes, because I mean who doesn’t have a lot of
stuff to stash away in cute stack boxes.

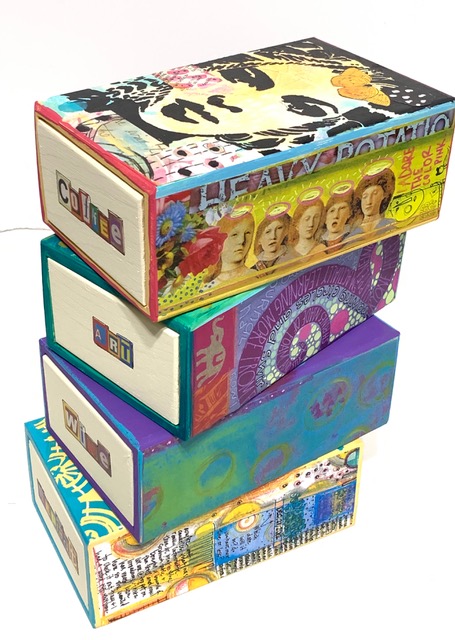
The
four boxes I used are all wood and the drawers slide open just like a paper
matchbox does. Because the drawers slide and come completely out, I created one
end of the matchbox drawer with words and the other end with numbers, so they
can easily be switched around.
I didn’t have to think twice when it came to the top of the boxes,
I went straight for my drawer of StencilGirl® Products. So if you have a box, cigar box or any other wooden box, you can
easily create your own stackable stash boxes. Assorted sizes would work great
as well.
Matchbox Number 1.
Pretty as a Peacock Stencil
by designer Andrea Matus deMeng was used on the top. Before Using the
this stencil, I painted the box, then I used a cosmetic sponge and two designs
on the stencil Wolf by designer Roxanne
Coble to add some texture and color to the background before using the
face stencil.
Next I placed the Pretty as a Peacock face stencil down and used
a cosmetic sponge to dab on some black acrylic to all the open areas. After
lifting the stencil off and a few swipes back and forth with my heat gun, I
added some collage elements to the face. To the sides and back of the box, I
added collage elements and papers from my stash. Once all sides were
completed. I lined the edges of the box with acrylic paint using my finger to
wipe the paint on, not necessarily being neat. On the edges, I prefer a little
messy look.


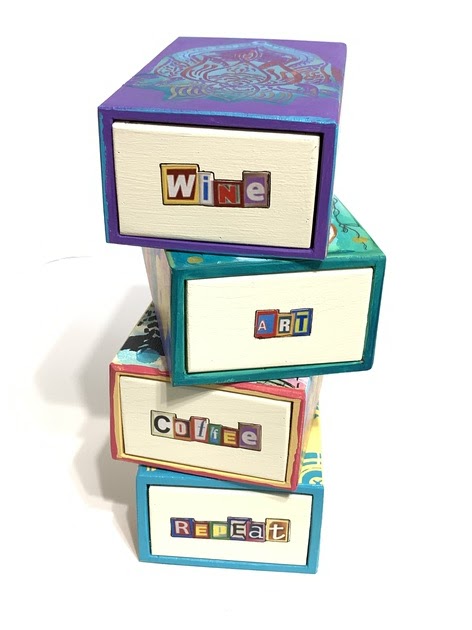
The drawer on this box reads: “COFFEE”, because
that is what I need to start my day, the inside of the drawer says “Coffee by
the Pound” and the reversible side of the drawer has the number #1 stamped on
it using a vintage label that I painted.

Matchbox
Number 2.
For Matchbox number two, I painted my box first a neutral crème
color and the top of the box blue with some green paint around the edges. Next
I added some stencil elements from Roxanne Coble’s stencil design Wolf. After
sponging on some background features to give a water effect, I used the Chinese Garden - Koi stencil
by designer Gwen Lafleur. Using a sponge in the same way as the first
one, I dabbed on some orange acrylic. This time, I got a little too much paint
and it was a bit messy underneath so I took a brush and spread the orange
acrylic paint on the fish. I did lose some of the white stencil marks, but that
was okay as I filled it in with my design and it was still an easy peasy way to
add the Koi. Lastly, I added some pen doodling on the fish and the
background.

Next, I collaged the sides and the back and lined
the box edges again with acrylic paint using my finger.

The drawer
on one side of this box says “ART” because that is what I love to do every day.
The inside of the drawer says “Always” and the reversible side of the drawer is
stamped #2 on a vintage label that I painted first before gluing.
Matchbox
Number 3.
For this Matchbox, I painted the top of the box blue and used
Thanks A Lotus by
designer Andrea Matus deMeng. I placed the stencil on top of the box holding it
down with my hand and dabbed on red, gold, teal and purple, extending the
purple out over the top of the box. I used a thin brush to fill in any
areas that I wanted more color. After adding collage papers to the sides and
back of the box, I lined the edges with a coordinating paint color.

For the word on this drawer, I used the word,
“WINE”, because some days just call for wine, especially during this crazy
time we have all been experiencing. The inside of the drawer has a
stamped label that reads: “By the Bottle”. The reversible end of the
drawer has the #3 stamped on a vintage label that I painted with acrylic
paint.


Matchbox
Number 4.
For Matchbox number four, I used a stencil by
designer Gwen Lafleur called Collage Textures and Patterns,
Circles. I love all the designs on this stencil and I used the
center one to have a focal point to add an elephant collage piece. Elephants
always seem to find a place in my art and my heart.

To
start with this box, I painted it yellow, and blended the background with a few
darker hues. Next I placed the stencil on top and again used a cosmetic sponge
to dab on some teal acrylic paint and some gold in the center. Once lifting it
off and using my heat gun to dry, I added a little black with a brush and a
couple more elements from the same stencil at the top. Lastly for the top I
added my Ellie collage paper in the center.
Once adding collage papers to the sides and the
back, I lined the edges with paint using my finger. This also helps to seal the
edges of your collage papers and give your box a more cohesive look.


For
Matchbox #4, on the drawer I collaged the words, “REPEAT”, because it is
something I feel very blessed in my life that I get to do over and over again.
The inside of the drawer has the word “Daily” stamped on a vintage painted
label. The reverse side of the drawer has the #4 stamped on a
vintage painted label.
So there you have 4 Stackable Stash Boxes, all
easy to do using StencilGirl® Products and
with so many possibilities. Thank you for viewing my post today. I hope
this will inspire you to grab some stencils and get creative!

The colorful words on the box drawers are from MischiefCircus, a great place for Collage
images and words.

Kim Collister is a Mixed Media Artist, a Design
Team Member for Retro Cafe Art Gallery and a regular contributor to Stampington
and Company. You can connect with her by visiting her website and blog
at: KimCollister.com , KimCollisterArt.Etsy.com and social media found on her website.
These are really wonderful! I love Kim’s art and these are such an amazing display of design! The stencils were the perfect fit!
ReplyDeleteWhat a delightful set! Thanks for sharing your ideas.
ReplyDeleteI'm in love with these, especially no. 1 - I just love Kim's art so much, the creativity just spills from her daily!
ReplyDeleteI really like these! I love the face stencil. I think all of these look fantastic and would love to try this myself. I just need to find some boxes.
ReplyDeleteThese are really so Wonderful! Love that they are wooden! ♥️
ReplyDeletehi
ReplyDeleteLovely project – those wooden matchbox stash boxes are so charming and functional! For anyone looking to add a shining accent or protective layer, Kingchuan Packaging offers premium Metalized Bopp Film. Their film delivers stunning metallic sheen, excellent moisture resistance, and strong seal integrity—perfect for lining or finishing handcrafted boxes. Pairing your stash box project with Kingchuan’s Metalized BOPP Film adds both elegance and durability!
ReplyDelete