


The Rooted in Nature Butterflies Mask is a combination of many butterflies and flowers. Just when you think you are sure what you are looking at, your vision shifts, and you see something completely different.
This was a new technique for Dave. He placed the mask on
card stock, and spread “light dimensional ground” (a
Golden product) through the mask
openings with a palette knife. When the ground was dry, he flooded the surface with watercolor. after
the watercolor dried, he lightly sanded the surface, revealing the image.

Dave used Izink Ice (by Seth Apter). He applied the paint with a palette knife through the openings in the mask, then turned the mask 180 degrees and again applied paint with a palette knife creating a double exposure.

 |
| Rooted in Nature: Caladium |
The intricate patterns on the Caladium leaves have always fascinated Dave. Not quite random, not entirely predictable. He captured the delicate nature of these intricate patterns in this Rooted in Nature Caladium Mask.
This was another new technique for Dave. He placed the mask on Yupo
paper and sprayed it with clear water. He then grated watercolor crayons using a
“micro grater” (kitchen utensil) into the openings of the mask.

Dave applied Izink Ice paint with a
soft sponge roller through the openings in the mask.

 |
| Rooted in Nature: Begonia |
Big
bold and very structured. This begonia caught stencil designer Dave's eye because of its repetition of bold patterns. Rooted in Nature Begonia Mask is ready for your watercolors.
Using a natural sponge, Dave stamped acrylic paint through the openings of the mask.

Dave placed the mask on Yupo paper, sprayed it with clear
water then dropped watercolor paint into the opening of the mask.

 |
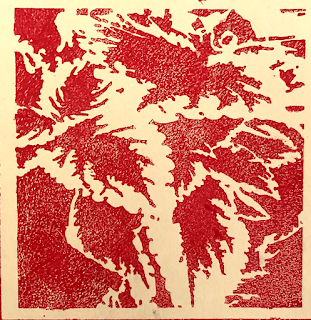
| Rooted in Nature: Monarchs |
In
this Rooted in Nature Monarch Mask, Dave tried to capture the
thousands of upon thousands of Monarch Butterflies that migrate each year.
Separately they are beautiful, but collectively they create textures and
beautiful patterns.
Using a brayer, Dave rolled Izink Ice directly onto the mask placed on watercolor paper making a print.

Dave placed the mask on 140lb watercolor paper and sprayed it with clear water. He dropped watercolors into the opening of the mask.

 |
| Rooted in Nature: Coleus |
Dave used a soft sponge roller filled with acrylic paint over the mask.
Dave placed the mask on Yupo paper, sprayed it with clear water. He dropped watercolors in the mask openings and allowed the colors to mingle.

 |
| Rooted in Nature: Window |
Are
we looking in or looking out through the window? You are probably familiar with
this everyday scene. The combination of architecture and organic plants makes a great mix of shapes in this Rooted in Nature Window Mask.
As mentioned earlier, whether you call it a "stencil" or "mask" the white part is the mylar and the black part is where the paint goes.
Dave placed the on Yupo
paper and sprayed it with clear water. He then graded watercolor crayons using a
“micro grater” (kitchen utensil) into the openings of the mask.


Butterfly Window (the painting at the beginning of this post and the Two Crows painting (below) were created using several different stencils.
- Place the masks on Yupo paper and pour liquid watercolor though the openings.
- Wipe out the butterfly shape and repaint. (Yupo paper is a synthetic paper, actually, it is plastic. You can remove the paint completely by wiping it with a wet sponge.)
- Make a butterfly stencil out of cardboard.
- Place it over the now dry stencil painting.
- Wipe it clean and sponge “white absorbent ground” through the opening.
- Remove the cardboard and let dry.
- Paint the butterfly.

Dave used a similar technique for Two Crows.
The branches upon which the hand-painted crows are perched were created using frisket. Here is an example of frisket branches:


Wow! These are wonderful, Dave! I love your techniques and stencils!
ReplyDeleteWhat fabulous designs - thank you!
ReplyDeleteThese are just incredible stencils. Love all these new techniques!
ReplyDeleteEnamored.
ReplyDeletereally really beautiful!
ReplyDeleteDave knows his stuff! Beautiful work and stencils.
ReplyDeleteDave, this is impressive and wonderful.
ReplyDeleteThese are wonderful techniques I would never have thought of on my own. Thanks so much for sharing!!!
ReplyDeleteThank you for your sharing of these beautiful pieces.
ReplyDeleteWow
ReplyDeleteInspired to spend some play time in the studio. Thanks for the inspiration.
ReplyDelete