How Trish McKinney Brings An Old Painting Back To Life
Using Her StencilGirl Stencils!
Hey Everyone! Trish McKinney here today to share with you a fun process using my stencils and ask an important question - Are you like me and have thousands of half-finished, tired, and broken down paintings?!

One of my
favorite things to do is to go when things are slow in the studio, is to go
through my stacks of old paintings that for whatever reason are not quite
working. I lovingly refer to this area in my studio as, where these
paintings rest, as “the dead zone”! This is where paintings go to die - @ left below.

I love this process of bringing a painting back to life as it causes me to think outside of the box and shake things up! This is because I have no commitment to these old paintings and I am not afraid to risk doing something new - something different- something unexpected - experiment, asking "what if?"! Often, I learn more and discover new techniques from this exercise than taking a 3 day workshop!
One way I like to revamp, rejuvenate, and restore my unfinished paintings is by using my stencils. And for the painting I selected, I used my newly released StencilGirl stencil designs - Lacey Leaves and Leafy Weaves (gosh, I love those names! :) - and my Branches Giant stencil. Here is my process...
Supplies…

-GOLDEN Fluid Acrylics
– Quin Burnt Orange, Permanent Violet Dark, Turquoise Phthalo, & Quin Nickel Azo Gold
-Gesso
-Favorite Mixed Media Brush – I used Talkon Brushes - 1” - Flat & #8 Round
-1” Sponge Rollers – I like to have at least 6-8 on hand in case I need them
- Sponge “Pouncers” – I like to have at least 4 on hand for smaller areas
- StencilGirl
Stencils [see links below]
– 9” x 12” Lacey Leaves & Leafy Weaves stencil masks w/bump outs
– 12” x 24” Branch Giant stencil mask
Selecting The Painting...
I began by going through my many stacks of paintings, but because the leaves were probably on my mind, I gravitated towards the many unfinished paintings from my Nature’s Palette Collection. This is a painting process where I use real leaves, and many other natural, nature-inspired materials to create a painting. So my leaf and branch StencilGirl stencils were a perfect fit!

Assessing The Painting...
Once I settled on a painting, I began the assessment part. I started by picking out the areas of the painting I loved which leads me to selecting my focal area - the area I want to emphasize. This will help me to not get lost once I begin to stencil.

I began this part of the process, by remembering what my dad always told me - “before you can fix something you first need figure out what is broke!”. Even though he was talking about cars, it is a profound but simple truth about how to fix a painting! So I looked for all of the areas that were not working in this painting and why they did not work. I always go down my checklist of principles of design to figure out what is “broke” and usually find many - ie, value, negative spaces, color harmony, line quality, etc... - this gives me a direction and road map that gets me to the next step.
Selecting The Stencils...
Since I already had my newly released leaf stencils on my mind and the painting was nature-inspired, the stencils I used were easy to select. However, I often love to use stencils to fix paintings that are not as literal or predictable. Like the paintings below.


Many of my stencils are designed without framed edges for this purpose - to give artists the option to use them either in a more abstract way - creating rhythm and movement through varying line and shapes - or a more literal interpretation.
Time To Start Stenciling!
I like to get 2 palettes going with sponge rollers to apply the paint. One palette is for gesso and the other is for dark values these are always colors already in the painting - 2 cool darks – Permanent Violet Dark and Turquoise Phthalo - and 1 warm neutralizer color - Quin. Burnt Orange. I also have Quin Nickel Azo Gold to tint gesso areas once it dries.
Since I had lost some of the edges of the leaves, I begin by using the “bump outs” for the leaf stencils switching between light & dark – ie, light edges against dark backgrounds and dark edges against light backgrounds. Then I use my brush to refine them out even more. I tint the white gesso once it is dry, with thin glazes of warm & cool colors.


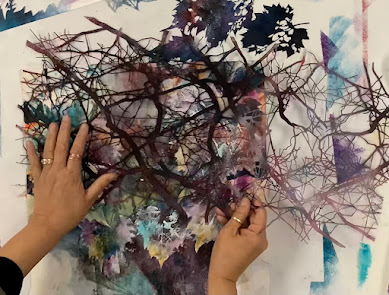
Then I begin to connect the leaf shapes with my Giant Branch stencil – 12” x 24” which will give harmony and added texture. I move all around the painting, making sure I place the stencil in impact areas leading the eye towards the focal point leaf in the lower right quadrant. This will also give added depth too.

Finishing…
I knew I was finished when all of the “broken” problem areas were fixed and the problems were resolved.

Here is my final painting alive & restored! And I am very pleased how it turned out!

This process is so satisfying to complete and I hope you will be inspired to try it yourself! Solving the problems of an unfinished painting by making it new again, teaches us all so much and you will learn so much about design along the way! The joy of this project is that you will have no commitment since you are not in love with the painting to begin with – so a perfect atmosphere is set up for bold, wild creativity! In other words - what have you got to lose?!
I hope you have fun trying this technique!
To learn about
Trish McKinney - the paintings she creates and workshops where she teaches
these techniques and more - go to her website @ trishmckinney.com
Follow Trish’s shenanigans on FaceBook, Instagram, & her YouTube Channel to be inspired…& sometimes laugh! (find links on her website home page)

Stencil Links...
Stencils Used are designed by Trish McKinney and sold online @ StencilGirlproducts.com
-Lacey Leaves - 9”x12 StencilGirl Stencil Mask with Bump Out
-LeafyWeaves - 9”x12 StencilGirl Stencil Mask with Bump Out
-BranchesGiant - 12” x 24” StencilGirl Stencil Mask
No comments:
Post a Comment
If you are entering a GIVEAWAY, please add your email address in the event we need to contact you.
To avoid SPAM, please write it like this:
marybeth (at) stencilgirltalk (dot com)
Thank You!