Showing posts with label #AnneMarieFowler. Show all posts

Monday, March 15, 2021

Kau Chim for Art Making


Having moved from one state to the next recently, I have been in the process of re-establishing my art workshop. Interestingly, what seemed to fit just fine at the old house now seems to be bursting from the seams in the new one despite having more room to put things. However, the joy of the re-establishment is that I am again seeing art that I made years ago and reveling in how far I have come. As I was moving things around yet again to get just the right placement, I came across some early journal pages that I had created from prompts I was given. It occurred to me that just like writers, artists sometimes need prompts to help them move forward in their art.

Late one night, having slipped into bed but not yet ready to turn the light out, I stared at my tube of fortune telling sticks, or what is known as Kau Chim, that I had bought years ago. These sticks tell what one's fortune will be for the day, and I pondered on how I could create something similar but focus it on art making. The result is a modified Kau Chim that can help an artist determine what the immediate future of their art will be.

The idea is that the sticks will provide color options that can be used singularly or together, as well as a word prompt that can be used in collaboration with or independent of the color options. In this project, I created 52 sticks, one for each week of the year. However, more sticks can be made. The exciting aspect of this project is that the sticks can be used over and over again or they can be easily replaced at a low cost. I found the process of making the 52 sticks relaxing and pensive. 

For my choice of stencils for this project, I thought it would be great to use some of the stencils that only Stencil Club members can get. Not a Stencil Club member? You should be! Join StencilClub here! 
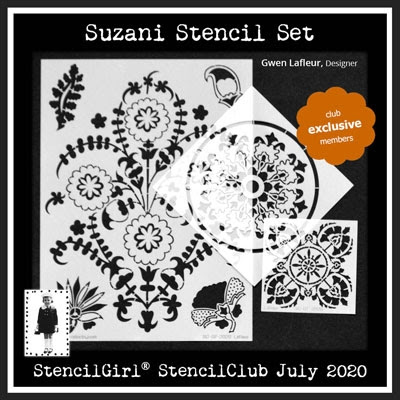


Here's what else you will need to make the project:

Paper maché round wine box
Wavy Jumbo Wood Craft Sticks
Dried Flowers
I-Zink Dye Spray in Coffee 
Accent Piece
Green Jade Table Poem Stamp by Rubbernecker Stamps
Gesso
Paint in colors of your choice (for the container and the sticks)
White Gel Pen
Metallic Silver Gel Pen
VersaFine Stamp Pad in Vintage Sepia
Sharpie or Similar Permanent Marker
Mod Podge or similar adhesive for decoupage
Spray fixative (optional)
Paint brushes
Box cutter
Sand block or sand paper

TO MAKE THE BOX


STEP 1: Measure the sticks against the wine box and mark so you know where to cut. 


STEP 2: Cut the box to size so that it is about 1/4 to 1/2 and inch taller than the sticks.


STEP 3: Use a sand block or sandpaper to smooth the edges of the wine box and to even it out.

STEP 4: Gesso the exterior of both the box and the top. Let dry completely.

STEP 5: Paint the box and top the color of your choice. Consider the stencils you plan to use and be sure to use complementary colors. For example, if you wanted to use Gothic stencils, you wouldn't want to use pink and orange as your color choice. Allow to dry.


STEP 6: Add stenciling to the body of the box and the top. I used Suzani by Gwen Lafluer.


STEP 7: Using the I-Zink Dye Spray, spray some on a small paper plate. With a pointed round brush, dip into the spray then flick onto the box and top. These splatters should infer age. Allow to dry.


STEP 8: Use the stamp to stamp around the top and the around the box. 


STEP 9: Glue dried flowers to the box using adhesive. Allow to dry.


STEP 10: Draw edge lines at the bottom of the box and the top. Paint the space between the line and the edge of the box and the top with your choice of color. Allow to slightly dry, then use a stencil and a baby wipe to remove some of the paint.


STEP 11: Add markings using the gel pens to create interest and depth.


STEP 12: Create the accent piece and glue it to the top of the box. You can see a video here showing how to create one. 


STEP 13: (Optional). You can use a fixative or the adhesive to cover the box and top if you wish so that you don't have what looks like shadows on the box from adhering the flowers. However, I like the shadows, so I leave it as is.

TO MAKE THE STICKS

STEP 1: Line about eleven sticks up together. Using the 9 x 12 stencil from Block Prints by Jill McDowell, stencil all at the same time. You can also opt to use many different stencils.


STEP 2: Paint each edge a different color. It doesn't matter if you want to use complementary colors or if you just paint colors in general. 


STEP 3: Add a word or phrase to the middle of each stick. These should be words that will prompt you toward creating. Try to avoid specific words like bee or animal. Instead, use words that can have multiple meanings or that might convey a specific form of art making that you haven't tried before. Your job is to interpret the word as best fits the day you use it.  


HOW TO USE THE KAU CHIM FOR ART MAKING

Each week, pull one of the sticks. Decide if you want to use one color, both colors, the word, or a combination of them. Be open to numerous interpretations so that even if you draw the stick again the next week, you still create something entirely new.

While I only created 52 sticks, you can certainly make more. This will allow you to "retire" some of them in favor of adding some of the new ones. You can also finish the back side of the sticks so that you have more options to choose from.


Anne Marie

WANT TO CONNECT WITH ME? CLICK ON THE LINKS BELOW. 👇
MSS Blog 
Twitter 
Pinterest

or email me at annemarie.mysticspring@gmail.com.


Monday, September 21, 2020

Art Stones for the Garden (and Inside!)


In this current chaos with world events, I am spending more time working inward. I am working on the inner me and helping my home lose the weight of its years carrying its humans' stuff. I've also been spending more time outside in my back yard. I haven't worked in the garden over the last few years but find that having to stay home has forced me back out into it again. My garden is full of beautiful hostas but, while they are beautiful alone, there is too much of a green wash alongside the grass covered yard. It needs a sporadic hint of color. Too late in the summer for me to plant flowers, and now working with a garden that is struggling under the heat of the sun--in July, we had the trees topped because they had grown too tall for safety--I wanted to add an element that I could reclaim every winter by bringing it back indoors. 

Terry Stegmiller has some really quaint and whimsical stencils that are super for creating art stones for the garden. In this project, I chose my favorite three but there are others that would work just as well! There are so many options for creating these art stones. Keep in mind that some options work great in the garden while others may need to stay in the house next to the fireplace or to be used as door stoppers. While I used 6 x 6 stencils for these larger stones, you could also use many of the 4 x 4 stencils for smaller rocks that you give away to friends and family, or secretly hide for strangers to find.

Whatever you create, be sure to share it with us!

STENCILS

Heart Flower 6 Stencil (S103) by Terry Stegmiller


Floral Swirl Stencil (S106) by Terry Stegmiller


Stepping Stone #3 Stencil (S164) by Terry Stegmiller


OTHER MATERIALS
  • Large river rocks
  • Colored glass or beads (You can purchase these precut.)
  • Ball chain
  • Seed beads in varying sizes and colors
  • Rhinestone Cup Chain
  • Acrylic Paint
  • Metallique Art Alchemy Paint
  • Weldbond Glue
  • Grout in black*
  • Water
  • Spoon to mix grout*
  • Measuring cup (use for crafting only)*
  • Paper towels
  • Sponges
  • Gloves
  • Grout Sealer
  • Painter's Tape
  • Glass Tile Nippers
  • Clear gesso
  • White gel pen (for outlining and drawing on the Leaf Border Stone (optional)
  • Stickles for the middle of the flowers on the Leaf Border Stone (optional)
  • Sharpies (optional)
  • Pencil
  • Wooden skewer
*Note: Do not rinse anything that has grout on it in your sink. Wipe it out completely with paper towels and throw away. Grout is essentially cement and will clog up your drain.


STEP ONE


  STEP TWO


 STEP THREE


 STEP FOUR


 STEP FIVE


STEP SIX


AND THE FINISHED ART!


Anne Marie

WANT TO CONNECT WITH ME? CLICK ON THE LINKS BELOW. 👇
MSS Blog 
Twitter 
Pinterest
or email me at annemarie.mysticspring@gmail.com.

Monday, June 15, 2020

Balance


As we enter the second half of 2020, it doesn't appear that life is going to switch back to the "before" that we are all more comfortable with. In fact, it seems that a huge reckoning is in action at the moment and Mother Nature is at the helm of it all. The theme for June is typography and I wanted to create a project that best represented where I believe I need to focus and how I suspect everyone wants to feel. The project evolved considerably but it always revolved around the idea of creating balance. The world is navigating disease, political strife, unnecessary deaths, racism, gender bias, and so many other oppositional areas that it has become difficult to remain balanced. So, my desire was to create a piece that I could use to become more mindful, focus on what I can personally achieve, and balance my part in the world. 

You will find that the project begins with a very linear piece of board and then is cut away to reveal only the part that will best serve me. I hope that the idea of cutting away the unnecessary and striving to reveal the inner truths of yourself is compelling enough for you to make your own piece, whether a personalized version of my piece or an entirely alternative piece that serves you in your own need. Remember that the intent is to create a vintage arched piece that has a homey and handmade feeling to it--one that reveals the "getting back" to a simpler time, one that allows us to represent ourselves through natural tendencies. Resist the urge to make your lines precise. Instead, embrace the wholeness of existing in the space and time in which you create. While the project is titled Balance, the intent is to create inner balance not the outward type that requires linear acts and thoughts. And isn't that what art asks of us anyway?

Stencils:


S710-Chinese Garden-Lotus (Gwen Lafleur)


L169-Crackle Stencil (Nathalie Kahlbach)

L758-Kyoto (Nathalie Kahlbach)

L696-Floral Waterfall (Kate Thompson)

L636-Fly Away Home (Roxanne Evans Stout)


Craft Materials:

MDF Board or similar (18 x 24 to make this project but you can use a smaller size)
Paper Clay
Acrylic Paints (Anita's: Classic Gold, White, Hot Pink, Bark Brown, Espresso Bean, Hunter Green, Heather Gray, Rivera Tan, Antique Nickel, Crocus, Medium Blue, Sunshine Yellow, Taffeta Pink; Paper Artsy: Cerise, Slimed; Golden: Iridescent Pearl, Permanent Violet Dark)
Glitter Glue (Stickles: Grape Crush or Nuvo: Orange Soda)
Brass Shapes (Vintaj)
Large Open Jumprings (Vintaj)
Recycled Silk Sari Ribbon (Check with Ephemera Paducah)
Wax (I used  Finnabair's White Gold, Mint Sparkle, and Vintage Silk)
Embossing Powder (Seth Apter's Baked Texture in Chunky Rust and Ancient Amber)
White Gesso
Uniball White Pen
VersaMark Clear
Distress Mini Stamp Pad in Black Soot
Marker (Tombow)
Rice Paper or Tissue Paper
Brushes
Xacto Knife
Clay Roller or Small PVC Pipe
Pencil
Aleene's Tacky Glue
Weldbond
Sanding Block
Baby wipes
Heat tool
7/8 Spade bit and drill
Jute Twine that is 1/4 inch to 3/8 inch in diameter

Let's get creating!

Start by applying gesso to an 18 x 24 MDF board on front and back. Stencil using the Kyoto stencil randomly all over the board and then the Plum Blossom stencil in the lower left and right corners.

Next, prepare the paper clay and roll out flat to about 1/8 inch. You can, of course, make it thicker if you desire. Lay the Buddha stencil on top and press the stencil into the clay using the clay roller. Use the Xacto knife to cut around the impression. Complete the same process with the Lotus stencil and the dragonfly element on the Fly Away Home stencil. While the paper clay dries, return to the MDF board and paint in the flowers and leaves with the acrylic paint.

Note that the edges of the clay may lift a bit as it dries. To help prevent this, as one side starts to dry on the edges, turn the piece over and continue this throughout the drying process. When you are gone from the piece for more than an hour, place something light and flat like a notebook on top. However, I like the slightly lifted look and find it more visually appealing. The thickness of the piece and the humidity in the air will determine drying time, which can be as long as several days or as short as overnight.
After the flowers have dried, sketch out the arch top on the left side. Place a piece of rice or tissue paper over the sketch and copy it. Cut the edge out, flip it over, then lay that piece on the right side and draw the line to create the other part of the arching top. Use a jigsaw or a sabre saw to cut the non-usable side pieces off and smooth the edges with a sanding block.


Lots of fun coming up!


Using the acrylic paints colors, paint the lotus so that you have an ombre effect from darkest to lightest. Use wax to highlight the piece. Use glitter glue to enhance your piece, especially the dots and the veins.
You will want to do the same thing with the dragonfly and the Buddha. The dragonfly is developed more by using layers of acrylic paint to denote its body sections. Use the wax and the glitter glue to further enhance it. Paint the Buddha antique gold, add the wax, then add the glitter glue. Allow to dry overnight. For the Buddha, use acrylic paint to more fully develop the eyes, nose, and mouth areas. Use a Tombow marker in dark grey to highlight shadows.
For the bottom of the final piece, you want to include something that jingles. While I used jewelry components in this project, you could also use Noah bells and highlight them in pretty much the same way. Take the sanding block and lightly brush it over the brass pieces to highlight the design. Emboss the inner areas of the medium and large pieces. Glue the pieces together with Aleene's Tacky Glue and allow to dry overnight completely.

Drill a 7/8 inch hole at the top and three at the bottom using a spade bit. Stencil the word "balance" using green acrylic paint and the Chinese Garden-Buddha stencil. Dry with a heat tool. Take the new arch piece and place a glaze on top of it using dark brown acrylic paint and a bit of water. Mix the paint and water then liberally apply the glaze to the piece. Allow the glaze to sit on top of the arch piece for about a couple of minutes. Use baby wipes to remove the excess glaze. Your piece should be browned with no white showing. Dry with a heat tool. Using either the same glaze or a new glaze made of a slightly darker brown, flick droplets of various sizes onto the arch piece. Allow to dry naturally or by using a heat tool.
On the bottom right, you will see a set of sketch lines that mimic what a window or an arch might have. Remember, avoid linear drawing. Freehand this! Use various acrylic paints to create depth and design. Using a variety of colors will give the appearance of a well-used arch or window. Use the Floral Waterfall and Crackle stencils to create an aged design around the edges and at the bottom. Lay the stencils down and use a baby wipe to wipe away the design from the slightly wet paint.

Once this is all dry, take your paper clay pieces and lay them out on the arch piece to get a sense of how the piece is coming together.
While you have your paper clay pieces on the board, determine where the Chinese characters from the Chinese Garden-Buddha stencil best fit. Use the dark gray Tombow marker to stencil these characters; paint may be too thick and opaque for this. The marker will create a softer more vintage mark. Create detail and highlights with the Uniball White Gel Pen.

Take the sari silk ribbon and wrap it around the arch piece at the bottom. Alternatively, you can wrap the ribbon in and around the holes. Tie the ribbon through the holes and on top of the other ribbon piece. Place the metal bits onto the large open jump rings then attach them to the ribbon. Loosely wrap the sari ribbon around a piece of twine about a foot long and then tie to the top hole. Glue additional metal pieces at the top using Weldbond. One dry, use the Distress ink pad to run along the outer edges of the piece and give them a "sooty" look.

~

Hang your piece outside, in your reflection room, or as the backdrop of an altar.
Just remember that the piece is wood and paper clay and should not be left in wet conditions.


It's all ZEN in the garden!

Anne Marie

WANT TO CONNECT WITH ME? CLICK ON THE LINKS BELOW. 👇
MSS Blog 
Twitter 
Pinterest
or email me at annemarie.mysticspring@gmail.com.