Showing posts with label #symbols. Show all posts

Thursday, September 14, 2023

Earthy New Designs from Pam Beer and Roxanne Evans Stout!


Pam's inspiration comes from making shapes as she meditates on the beauty where she lives. She will often “talk to the mountains” telling them how much she appreciates being allowed to be part of the lovely place she lives.


Roxanne created Earth Layers after her inspirational adventure in Australia this last March. 

Roxanne says: "The land, the water, the trees and their roots, and the beautiful round rocks were so lovely to me. I was being filmed by the amazing team at Fibre Arts Take Two for my new, signature online course, Wilderness and Wonder, (which releases next week). During my course we went to many beautiful locations to film the landforms and layers of the earth. Then we went back to the studio where I created art pieces and shared the process with my students. This stencil design is very special to me and I love the way it turned out! You can use it to create a stand alone piece of art or use sections in your artist books or journals.  It works wonderfully on paper or on fabric as you can see in my art."


Both stencils are available today at stencilgirlproducts.com


Monday, April 6, 2020

Illuminated


I've been thinking lately about illuminated manuscripts, women in Braveheart, King Arthur's era, and lover's eyes because I just finished teaching a class on mythology. There is a charming essence to these times that makes me wonder if, perhaps, I might have been born in the wrong era. The roles of chivalry, coyness, and heroics are energizing, which is why I believe I am so drawn to these times. I remember visiting Trinity College in Dublin, being able to view the Book of Kells, and lingering as I walked through The Long Room in the Old Library. The colors, the textures, and the smells of old books, photos, and manuscripts are enticing for me. So I decided to try to incorporate some of these elements into this project. I love the finished version, and I hope that you will, too!

For the project, you will need these fabulous stencils:


You will also need these materials:
  • 1-6.5 x 6.5 inch photo frame with a 4 x 4 inch photo cutout. (1.5 inch depth)
  • 1-4 x 4 inch wood panel (1.25-1.50 inch depth)
  • Acrylic paint (I used Anita's in Black and Deep Celery, Golden's Fluid Acrylic in Quinacridone Violet and Raw Sienna, and Liquitex Basics in Raw Umber.
  • Ephemera (I used some old French script and a vintage photo of a woman.)
  • Lover's Eye Token Alterables and Eye Images
  • Jumbo Dauber
  • Paintbrush
  • Aleene's Tacky Glue
  • Mod Podge
  • Clear Gorilla Glue
  • Baby Wipes
  • Vintaj Brass Jewelry Findings and Components (Optional)


Begin by painting the picture frame on the back side (the flat side) and the wood panel in Raw Sienna. Let it dry. Paint a thin layer of Quinacridone Violet on both pieces. Allow to set for about a minute then use a baby wipe to gently blot across the wood pieces. You should pick up enough so that the Raw Sienna shows through slightly and gives the piece a slightly marbled look. Let dry completely.


Stencil sections of the tree top from the Winter Trees Bark stencil at the top left and bottom right of the picture frame. You could also wait on this step until after you have glued your ephemera down. Let dry.


Using Mod Podge, glue the vintage photo and the French script on the picture frame. Hint: Be sure to place some Mod Podge directly on to the wood before placing your ephemera down. Using a paintbrush, add another layer of Mod Podge to seal the top of the ephemera. Allow to dry completely. Glue the wood panel to the picture frame using the clear Gorilla Glue. Allow to dry at least five hours so that it sets properly but still be careful when handling it.


Using the IZink Ice in Cold Gold, stencil the top of the wood panel with the Sunburst and Earth Song Symbols stencils. Next, stencil the top left and bottom right of both the picture frame and the wood panel in black with the circle stencil from the ATC Mixup #2 stencil. Let dry completely. 


Paint what is now considered the "back" side of the project in Raw Umber. Allow to dry. Turn the project over and create a glaze using the raw umber and paint the entire project. Wait about a minute and then gently wipe away some of the glaze with the baby wipes. Allow to dry.


Glue the back of the lover's eye token using clear Gorilla glue. Glue the eye image to the back using Aleene's Tacky Glue, then glue the outer ring on top of the eye image also using Aleene's Tacky glue. Let dry. Glue the completed eye token to the small wood panel.


At this point, you can finish the painted portions by dabbing a bit of black paint onto the jumbo dauber and rubbing off most of the paint then rubbing on the edges of the frame and the panel as well as the edges of the eye token. Where you might see some areas that are too bright, you can rub the dauber over them to darken edges and allow the eye image to stand out more. I did not paint the lover's eye token but you can certainly do so, if you wish. I would suggest using Raw Sienna.


You can, at this point, decide to display your piece in several ways:

1. Glue a square dowel on to the bottom back edge and let it function as a stand.
2. Place the finished piece on a decorative easel.
3. Add a sawtooth picture hanger to the back and hang on the wall.
4. Add screw eyes, chain, and brass elements to the piece and hang on the wall. 

And the finished piece:


Anne Marie

WANT TO CONNECT WITH ME? CLICK ON THE LINKS BELOW. 👇
MSS Blog 
Twitter 
Pinterest
or email me at annemarie.mysticspring@gmail.com.


Monday, September 16, 2019

The Nicho Box


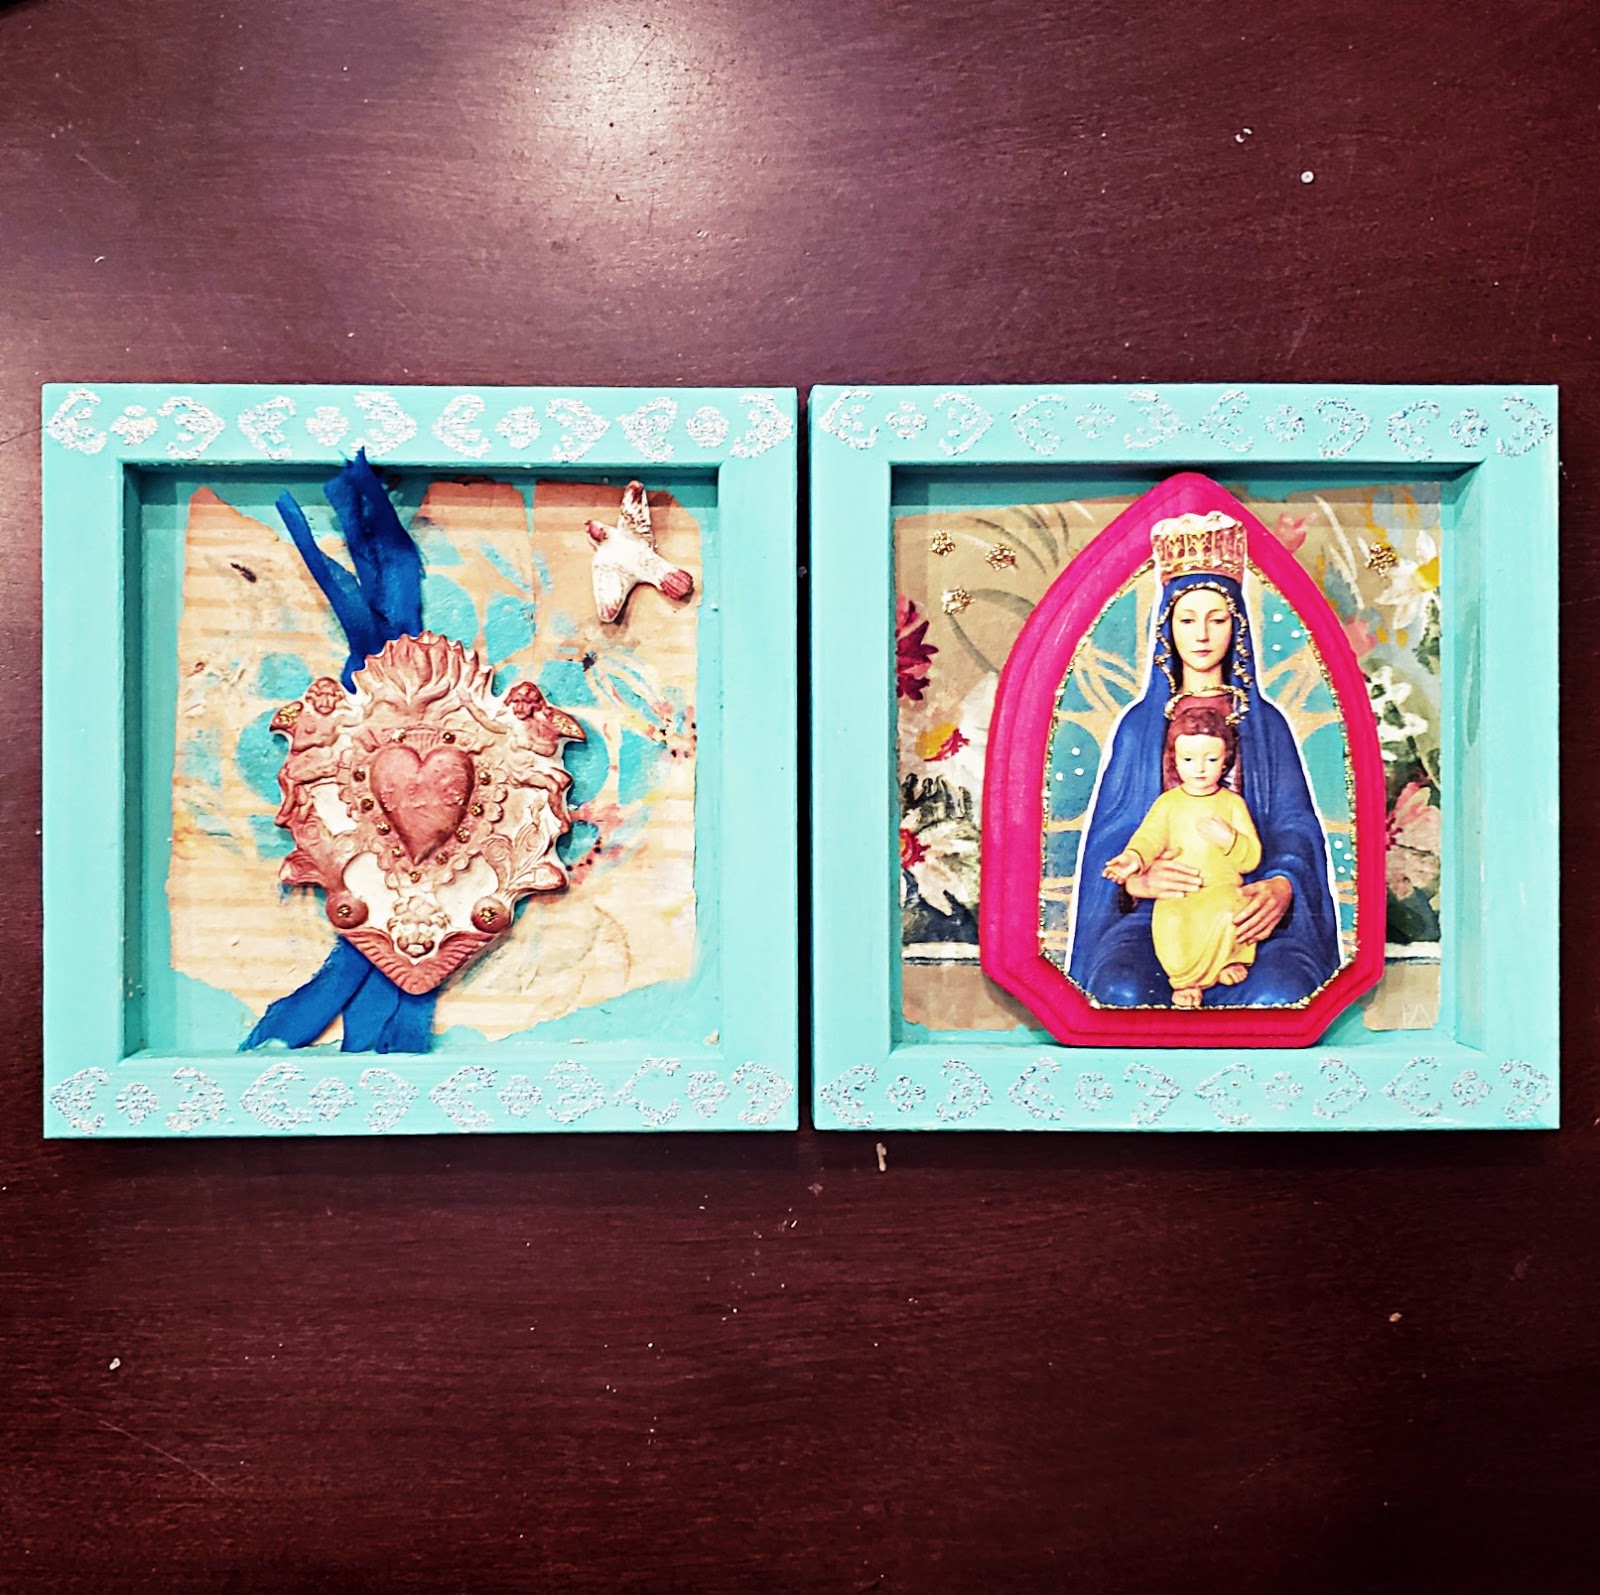
I have been fascinated lately with mixed media box arts. . .anything that you can take and dress up into something totally different. My interest in boxes led me to nicho boxes. Most people have seen them but really weren't sure what they were called. Nicho boxes are mixed media boxes that typically feature religious iconography but also feature, in modern day versions, Frida Kahlo, and anything Day of the Dead related. While these are the traditional versions, other more playful versions also exist. For this project, I decided to scavenge through my stash and I came up with some great pieces that heralded back to religious iconography.

To get started with this project, you will need:

2- 6" x 6" Gessoed wood canvases with a 4" cutout in the back
2- 5" x 5" copper sheets (36 gauge)
Stylus
Teal acrylic paint
Red Acrylic Paint
Gold Acrylic Paint
Teal and red embossing powder
Dark Brown Distress Embossing Powder
Versamark Pen
Resin pieces (I used the heart and the dove)
Wooden Arch Block (About 4")
Virgin Mary Clip Art
Floral decorative paper (or vintage wallpaper)
Silk sari ribbon
Large Dauber
Teal and Navy Blue Stamp Pad
Stickles
White Uniball Pen
Double sided tape
Clear Gorilla Glue
Finnabair Art Alchemy Waxes in Fire Ruby and Vintage Gold
Soft pad for tooling (Your mouse pad works great for this)
S654 Bent Drops Small Stencil by Andrew Borloz
S673 Tribal Birds Stencil by Andrew Borloz
 6" x 6" Maya Love Stencil July 2017 StencilClub Release by Jessica Sporn
S258 Square Dancing Stencil by Terri Stegmiller
L363 Pilgrimage to Mexico Stencil by Laurie Mika


STEP 1:

Paint the two wood canvases in teal and set aside to complete drying.


STEP 2:

Using the six-inch Maya Love stencil and two of the borders from the Pilgrimage to Mexico stencil, emboss the first copper sheet with the bird and edging designs along with any other elements that you want to add from your stencils. Be sure to place the copper on your soft padding to ensure that the design comes out crisp.


For the other copper sheet, use the Tribal Birds Stencil, Bent Drops, Pilgrimage to Mexico, and the border portion of the bird stencil from Maya Love.

Using the Versamark Pen, highlight the bird and various portions of the border and other designs. Emboss these in the colors you wish to use. Do the same with the other copper sheet design.


Stencil and emboss a design from the Pilgrimage to Mexico stencil at the top and bottom of the back portion of the canvases.


Affix the copper pieces to the front and back of the wood canvases using permanent double-sided tape or glue. The large bird piece was intended to be my front piece and the smaller one the back piece.


STEP 3:

Using decorative paper or vintage wallpaper, rip pieces that fit nicely in the open area of the back side of the wood canvases. There should be some of the teal showing. Glue these pieces down. 

Paint the arch block red along the sides and gold on the top. Allow to dry naturally or by heat setting. 

Make sure that your resin pieces and the arch block fit cleanly in the recesses of the wood canvases. If not, choose other resin pieces. Highlight the resin pieces using Finnabair's Art Alchemy Waxes in Fire Ruby and Vintage Gold.

Fuzzy cut the Virgin Mary Clip art.

Using the Square Dance Stencil, the dauber, and the ink pads, stencil a portion of the stencil on the left inner decorative paper and on top of the arch block.

STEP 4:

Lay the silk sari material down then glue the resin pieces on the left inner side using clear Gorilla Glue. Glue the arch block on the right inner side also using clear Gorilla glue. Affix the Virgin Mary clip art on top of the arch block using double sided tape.

Create a few stars around the arch block using Gold Stickles. Also use the Stickles on important elements on the Virgin Mary clip art to create interest and definition. Add some stickles to some of the raised areas on the resin pieces. 

Use the white Uniball pen to outline the Virgin Mary clip art.


STEP 5:

Attach the hinges to the connecting areas of the two wood canvases.

Attach the clasp to the front edge of the canvas.

ANNNDDD. . .the REVEAL!


Anne Marie


WANT TO CONNECT WITH ME? CLICK ON THE LINKS BELOW. 👇

Mystic Spring Studios 
Facebook
Instagram 
MSS Blog 
Twitter 
Pinterest

or email me at annemarie.mysticspring@gmail.com.

Monday, March 18, 2019

The Journey


There is great hope that Spring is just around the corner! If only we could get the winter boom out of the way! Still, we can look ahead to warmer days, and days spent on the water. To celebrate that ever-inching possibility, I have created a canoe and paddle using basswood and some fabulous stencils. The canoe is a great gift for the canoe aficionado or the outdoorsman. But, hey, don't limit it to just the men in the household. Women are aficionados and outdoorsy, as well.

Materials:

StencilGirl® Stencils:

Journey by Roxanne Evans Stout 
ATC Mixup #2 by Mary Beth Shaw 

Basswood 3/32 x 8 x 24 inch  (Balsa Wood is also fine, but it needs very gentle care as it breaks easily.) 
Box cutter
Pencil
Sanding block
Rust-Oleum® Wood Stain Tube (This is what I used) or Minwax Wood Finish
Acrylic Paint in your chosen colors
Leather Cord (about 1/8” wide or slightly smaller than the hole you punched)
Clear Gorilla Glue
Air dry clay
Crop-a-dile or other hole punch that can go through wood.


1.       Start your project by drawing the sides and bottom of your canoe on the basswood. My version has 2 inch by 13 inch sides and a 1.5 inch by 9 inch bottom. 


2.     Lightly sand the edges so that they are smooth.
3.     Mark where you want your holes for the leather insertion on the tops and edges of the canoe. Ensure that the holes are not too close to the edges to avoid forcing the edges to snap. Punch the holes.
4.    Glue the canoe together using Clear Gorilla Glue. I place a stapler on one side and a heavy item on the other side of the canoe side to keep the side in place while drying. Allow to dry at least 24 hours.
5.    Soak the entire canoe in hot water so that the wood softens. You can then tie some of the leather cord (in a color that you don’t like) around the ends and leave it to dry completely. The canoe will be easier to shape that way. Be sure to put something in the middle of the canoe to help keep it open and rounded. I used glue bottles.


6.    Remove the leather cord from the ends when the wood is completely dry. Depending on the type of wood stain you use, you will now either stain and then stencil on top of the stain (Rustoleum), or you will stencil and then stain (Minwax). Let dry completely.
7.    Place a glue bottle in the interior of the canoe (or something wide enough to prevent the canoe from folding in on the top) and lace one end of the canoe. Start at the bottom. When you get to the top, wind the leather around the tip and tie it into a knot. Lace the tie the other end. (This photo does not show the stenciling. Hang tight. . .it's coming!)


8.     Roll out enough air-dry clay to make the paddle. I suggest a piece about four inches long and one inch wide. Impress the small leaf from the ATC Mixup #2 stencil onto the bottom portion of the clay piece. Cut the paddle design out and allow to completely dry. Paint it to match the color that you used for the stencil design on the sides of the canoe. Conversely, you can paint it brown and fleck it with some patina embossing. When dry, glue the paddle in the canoe at one end or the other.

Now that you have the canoe all put together, place a complementary piece of tissue paper into the canoe and add some of your guy’s favorite candy, cookies, brownies or jerky. This is an excellent birthday, Father’s Day, or summer get-together gift.

Design tips:
·         You can change the design and color so that this same creation can be gifted to a female. Unicorn Spit would be great for this option!
·         A printout of plane tickets or vacation reservations can be rolled up and secured with a ribbon and placed inside the canoe.
·         Instead of the canoe paddle, you could add a leaf or feather.
·         Remember that although this is made from wood, it is very thin wood and can break. Handle with gentle hands.
·         For an added effect, emboss the bottom edge with embossing powder to give the canoe a “used in the water” effect. You can also emboss parts of the paddle for the same look.


Anne Marie
WANT TO CONNECT WITH ME? CLICK ON THE LINKS BELOW. 👇Mystic Spring Studios 
Facebook
Instagram 
MSS Blog 
Twitter 
Pinterest
or email me at annemarie.mysticspring@gmail.com.