Showing posts with label @jennifergallagherart. Show all posts

Tuesday, February 4, 2020

Gettin' Groovy: A Circle Themed Art Journal Spread


Hello!

Jennifer Gallagher here again with a geometric-inspired art journal spread for this month's theme of Frame It or Fill It With Circles.

When I saw the theme, it was a no-brainer. I am obsessed with geometric shapes and patterns. So, I've pulled out one of my all-time favorite StencilGirl Products® stencils and set out to create a fun technique for a spread that is full of movement and color.


This page begins with a loose background created with Marabu Art Crayons in a warm color story. The art crayons, when applied with water, give us a watercolor-like effect. Next, using the Random Circles Stencil, I applied DecoArt Americana Premium Heavy Gel Medium Gloss through the stencil. Once dry it gives us a recessed design to apply watered down India Ink in Sepia. A few finishing touches later, like paint splatters and doodling, and we have a finished journal spread full of interest.

Materials:
Dina Wakley Media Square Journal and Collage Tissue
Marabu Art Crayons: Sunshine Yellow, Caramel, Chile, Aqua Green
DecoArt Americana Premium Heavy Gel Medium Gloss
Dr. Ph Martin's Bombay India Ink in Sepia
Black Acrylic Paint
Palette Knife
Sakura Gelly Roll Pen in White


I hope you have enjoyed my video tutorial and found useful information and inspiration within. You can find more of my artwork, tutorials, and inspiration at my blog, on Instagram, or by searching "Jennifer Gallagher Art" on YouTube.

Happy Creating,

Jennifer


Thursday, January 2, 2020

Make Your Own Celtic Illuminated Art with these Stencils

Illuminated manuscripts such as the Book of Kells and Lindesfarne Gospels were the inspiration behind these Celtic stencils designed by Valerie Sjodin.

Celtic Key Step Tile Pattern, S756, and Celtic 1-2 Inchie Squares, M284, may be combined to make your own Celtic-style patterns.


Medium: Gelatos


Mediums: Gelatos and Colored Pencils

The Celtic Spirals Mask, L764, and Celtic Alphabet Stencil, L765,  coordinate nicely with the patterned stencils.


Use the Celtic Spirals Mask as a whole or ...

Mediums: Pan Pastels & Acrylics

... cut into individual spirals!

Mediums used on gel plate: Pan Pastels & Acrylics

Gel Press Celtic Spirals with Pan Pastels and Acrylics:


Using Gelatos and Pan Pastels with Celtic Spiral Stencil:


Three alphabets are included in this 9" x 12" stencil.


Three alphabets are included in this Celtic Alphabet Stencil. Of the two Uncial alphabets, the smaller one can also be used as the lowercase letters to the larger Uncial alphabet. Also included is a Celtic block style lettering style similar to those found in Celtic illuminated manuscripts such as the Book of Kells and Lindesfarne Gospels. The letters are designed to fit within the grids/dots of journals such as Moleskine and Leuchtturm journals.


Mediums: Pen, Gelatos & Pan Pastels

How to make stenciled letters not look like stencils:


Mediums: Pen & Pan Pastels

Add the beauty and mystery of Celtic style to your artwork, journaling and Bible journaling with this collection of stencils.


Tuesday, November 26, 2019

Heart and Soul: Stenciled background grids with Jennifer Gallagher


Hello! 

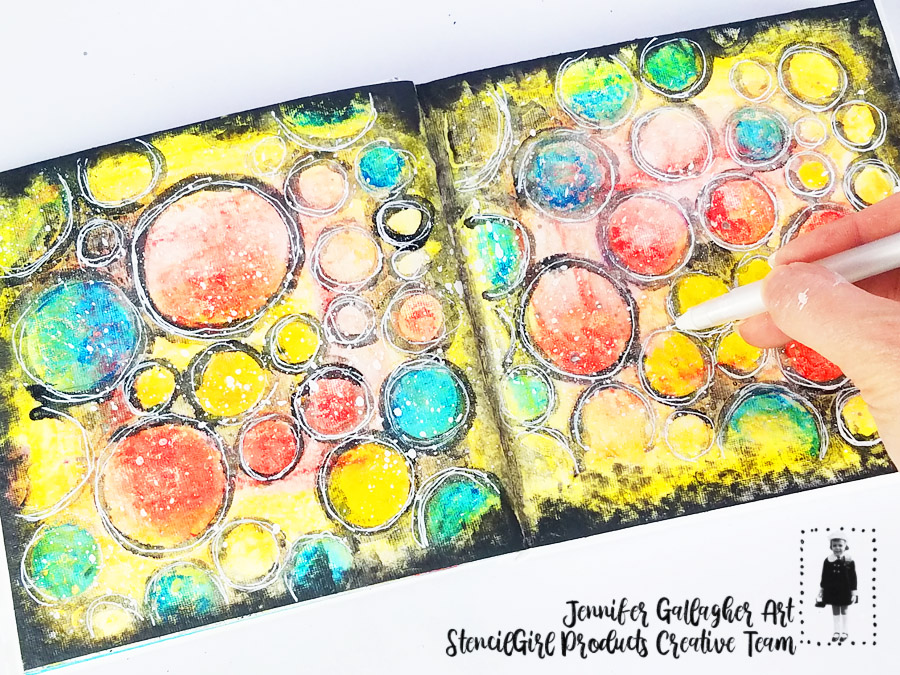
It's Jennifer Gallagher here with you again, this time with a vibrant art journal page for this month's theme of Gift it or Grid it. I love a good grid or geometric pattern. So, of course I chose to grid it. I'm popping open a brand new art journal for this spread and the pages are black. However, you could easily manipulate this technique for your art journal with white or kraft pages. It's super easy, so let's get started.


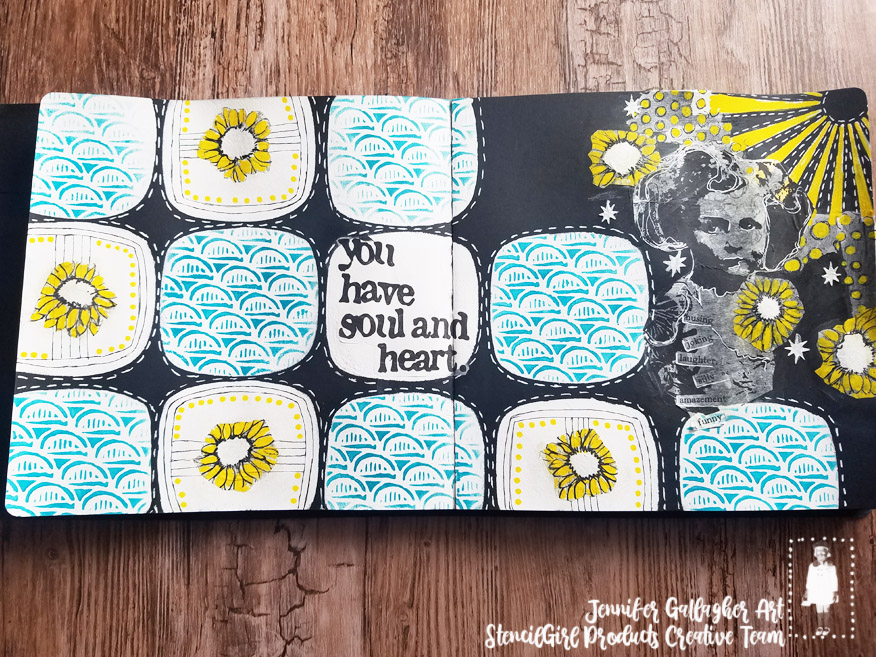
First things first! I began by finding the center of the left hand page and marking it with a small pencil mark. Then I taped off the largest shape on the stencil from StencilClub release July 2019. Using painters tape to create the exact shape I wanted helps to prevent accidentally painting through parts of the stencil that I do not want. I made sure that the pencil mark is in the center of the stencil shape. Then, using a mini blending tool, I applied white acrylic paint through the stencil. The top row is three across, the middle row is four across, and the bottom row is five across.


Next, using a few pieces of painters tape I attached the next stencil design, Union by Carolyn Dube, behind the grid stencil. I applied a shade of teal acrylic paint through the stencil with the mini blending tool. 


Using a stamping platform and archival black ink, I stamped a floral design onto deli paper. I chose to stamp on deli paper to give myself a light outline that I will follow over with paint in a future step. The deli paper is thin and I like the way it blends into the background.


In the upper right hand corner of the right page I applied white acrylic through the Circle Rays stencil by Michelle Ward. Then, using matte medium, I applied some collage tissue produced by Ranger Ink along the ends of the rays. 


Using a permanent black pen I added a little doodling in the white squares. You could also use a black acrylic marker for this step.I left one square totally white because this is where my words will go.


Now, back to those flowers! I cut out the flowers. Then using Posca Pens, I added white, yellow and black. Don't stress over perfection or realism. These sketchy elements will really pack a punch against our bold background.


Using matte medium, I adhered a sunflower to the center of each doodled square and I added the wording for the center white square. Once the matte medium was dry, I added yellow dots with my posca pen onto the doodled squares.


Next I worked on my focal image. First, I colored in my sunburst, and surrounding circles, with a yellow posca pen. Once that was dry, I adhered my largest image, the little girl, and a few flowers, with matte medium. After that dried I doodled around her with a permanent white pen. To tie in the white, I sketched around each square and in-between the sunburst rays.


All that is left is to add the final touch, a few twinkling stars, with decofoil Metallix Gel in champagne mist. I've applied it with a palette knife through the stars on the StencilClub stencil from the December 2018 release.


That is it for me this month. I hope you have enjoyed this tutorial as much as I enjoyed creating it for you. If you would like to see what else I've been up to, you can visit my blog or look me up on Instagram.


Happy Creating,

Jennifer Gallagher

Tuesday, July 30, 2019

She's like a rainbow: mark making with Jennifer Gallagher


Hello! 

Jennifer Gallagher here again with another post for StencilGirl Products®. This month we were challenged to ‘Texture It or Make a Mark on It’ and I’m doing just that with this bold art journal page. Mark-making is super easy with the right stencils. StencilGirl® has many stencils you can employ for adding marks and texture.Let's dive right in!


I decided to work in my large dylusions journal. Using just a basic mechanical pencil, I sketched out my basic layout and shapes. I knew I wanted to feature a fabulous 9x12 stencil from designer Pam Carriker. It was part of the Stencil Club set from November 2018 entitled "Her Story."


Next, using computer copy paper as masks, I followed the penciled design and painted each color of the rainbow one at a time. I used a premium acrylic paint here because I wanted vibrant colors. I started with red on the far right and worked my way across the journal spread from right to left.


I painted the face, my page focal point, through the stencil with a mini-blending tool and black acrylic paint. Once it was dry, I added a floral headdress with stencil L352, Deconstructed Floral Bouquet Stencil.


Now onto the mark-making. Using a different design for each colored section, I applied white acrylic paint through the stencils. Be sure to use a mask to prevent any unwanted cross-over of paint. I’ve picked the March 2019 Stencil Club release, Mail Art, designed by Ann Butler, the Playtime Collection, by Carolyn Dube,for Stencil Club in August 2018, and the February 2019 Stencil Club release, Mary Beth's Private Collection 19.1. I’ve left the yellow section free of marks. This is where my words will later be added. 


At this point I realized that the face would look much better if I “beat back” the colored sections that were peeking through. I used a watered down white acrylic and brushed a few layers on. Once dry, I placed the stencils back down and reapplied the black to keep those designs nice and dark and visually impactful.


With a black gelly roll pen I added doodling all around the stenciled designs. Then with a mini-blending tool, I added a rough black edge all around the art journal spread.


On my computer, I typed up a few song lyrics that I’ve had stuck in my head for a while now. I cut them out and glued them in place with a premium matte medium.


I have had so much fun on this mark-making adventure. Thank you for letting me share this art journal page spread with you. If you would like to see more of my work visit my blog or  look me up on Instagram.


Happy Creating,

Jennifer Gallagher