Showing posts with label Megan Whisner Quinlan. Show all posts

Tuesday, August 8, 2023

New Art Tutorial by Frieda Oxenham with StencilGirl® Products

Sometimes I get inspired by just going through my stencils and simply coming upon one that attracts my attention. In this case it was the text Be True to Yourself that made me think. It is at times quite hard to even know who you are, and it is also a fluid concept, as we continually change. Who I am today is more than likely not who I will be tomorrow. And I don’t know about you, but my head is always full of those sort of thoughts. Sometimes I wish there was an Off switch. That was the sort of idea I tried to capture in this spread.

Here is the tutorial:

1.     Brayer on gold gesso on a spread in an 8 x 8” art journal with black paper.

2.     Using a baby wipe and titanium white acrylic paint, stencil randomly over the pages using stencil Elizabethan Lizard.


3.     Using the top layer only, glue on flowers from a paper napkin to the spread, using matte medium.


4.     Stencil on leaves to the spread using green acrylic paint, a cosmetic wedge and stencil Kelp Mask.


5.     Stencil on flower outlines using opaque blue paint, a cosmetic wedge and stencil Boho Daisy Small.


6.     Repeat step 5 with opaque yellow and red paint.


7.     Colour in the flowers with matching colours of soft pastels (mine are by Windsor and Newton).


8.     Using stencil Elizabethan Lizard and white titanium paint, stencil on a separate black sheet.


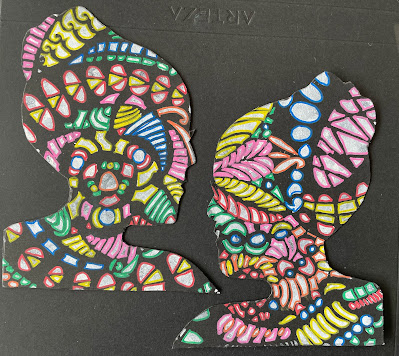
9.     Using the face mask from the B stencil of the May 2022 StencilClub, mark the face using both sides for 2 mirrored faces and cut out. Outline the patterns using with different colours of paint markers.


10.  Glue the faces to the opposite side of the pages and outline with a Stabilo All black marker.

11.  Doodle inside the background flowers with paint markers.


12.  Stencil on the text using the medium stencil from the September 2016 StencilClub

13.  Outline the text with the Stabilo All black pencil

14.  Spray on some gold mica sparkle through the same stencil as in step 2 and step 8.

© Frieda Oxenham 2023

Friday, May 6, 2022

Kirsten Varga - May 2022 StencilClub Stencils


Hello Creative Friend!

This month's exclusive StencilClub design by Megan Whisner Quinlan is a stunner! The designs are perfect for layering as well as for creating decorative bits for collage and mixed media. I was inspired to combine acrylic paint and watercolors with these stencils to create a bunch of ready-made pieces I can use for future projects. It's super easy and meditative. Plus, future-You will be thrilled to have some decorative elements ready to use when inspiration strikes! 


I started by using a make-up sponge to apply white acrylic paint with the stencil on a few sheets of student-grade watercolor paper. 


While those were drying I picked out pink, red, green, and blue acrylic paints and did the same thing on a few more sheets of paper. Make sure the acrylic paint is completely dry before you move to the next step, watercolors!


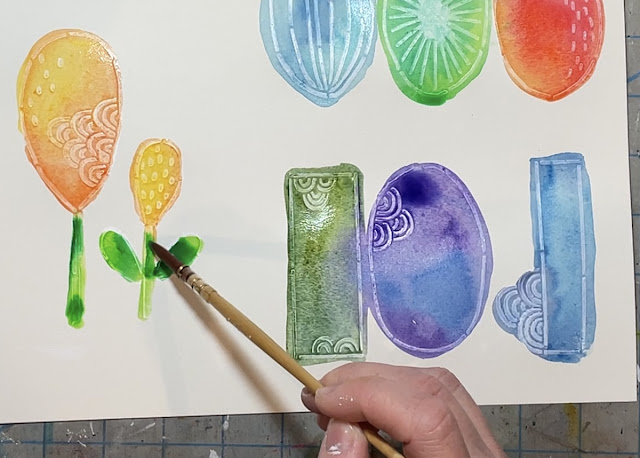
The stencil designs look great on their own but why stop there when you can add more interest by filling the shapes with color! 


The acrylic paint won't be affected by the watercolors and the contrast between the mediums is lovely! Make sure your watercolor is plenty juicy so it flows smoothly and washes over the acrylic easily. 


Let the papers dry on a flat surface so the colors don't run....unless that's the look you're going for! :)


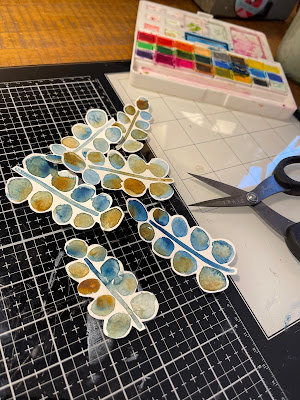
Before cutting out these whimsical pieces take a q-tip dipped in clean water and lightly wipe over the acrylic paint to remove excess watercolor and make those lines pop! A craft-grade acrylic paint might not work for this technique because it tends to be more chalky when dry and might not allow you to wipe the dried watercolor from the acrylic. However, experiment and see what happens! You never know when a happy accident will occur. :)


I created a small pocket folder to hold my decorative bits. I decided I didn't have to cut all of them out at once so the folder works great for me. This was made from a piece of kraft-colored 12x12 paper. 


(I have a short tutorial for making mini pocket folders on my Instagram feed. The same process can be applied to make any size!) I hope this inspires you to create something today! 
 
Join StencilClub by May 15 to receive these exclusive stencils and accompanying video tutorial with PDF (both downloadable!), and 20% OFF STENCILS EVERY DAY!!

Happy Creating!


Find me on Instagram: @kirstenvarga

Stencils used:


Other Supplies:
Watercolor paper
Kraft 12x12 cardstock
Acrylic Paint: White and your favorite colors
Sponges to apply paint
Watercolors
Scissors

Sunday, May 1, 2022

Your May StencilClub Reveal...

StencilGirl® Products is proud to announce Megan Whisner Quinlan a new designer for StencilClub 2022!  Many of you have seen Megan's work through social media and we're super excited to offer these exclusive designs as your May StencilClub set! 


Joining StencilClub means you have access to the coolest stencils around. Stencils that aren't sold anywhere else except to club members. Artist designs, made especially for club members. To get an idea of the past offerings, check out our website! 


Each month, you get the following:

  • Two 9" x 12" EXCLUSIVE Stencils. 

Always Artist Designed! Sometimes there will be 2 designs, other times there will be multiple designs on two stencils.

    • An EXCLUSIVE video for MEMBERS ONLY provided by the designing artist. It's a class in itself!
    • A downloadable PDF with basic instructions to go along with the video for that month.
    • Entrance into a SECRET Facebook group for MEMBERS ONLY! A place to share, inspire and talk all about stencils!
    • Plus, as a MEMBER, you are eligible to purchase ANY past month for the membership price. Email Us with a list of which previous StencilClub sets you would like to purchase and he will provide you with a bill through PayPal.
    • StencilClub members receive a loyalty coupon code each month good for 20% off stencils in the public collection. It can be used more than once.

    StencilClub is only:
    $25 USD - United States, monthly 
    $35 USD - International, monthly

    Join StencilClub by May 15th to get this exclusive stencil set from Megan Whisner Quinlan! 


    Wednesday, December 8, 2021

    Mini Journal with Stencils - Megan Quinlan

    I love making my own journals, even if it's just a small book to hold my lists. Here I made some beautiful pages and botanicals, using this month's StencilClub stencil set by Rae Missigman. Follow along to see how fun it is to create this small journal with your new stencils. 
    One of my favorite ways to use stencils, is with watercolors. You can really get some beautiful results. Here I mixed some navy blue and brown through the stencil onto some watercolor paper. 
    Next, I decided to do the same wash onto a piece of Kraft paper using the larger stencil. This yielded a more subtle color design. 
    Once dry, I used  a Ranger Mini Blending tool and some Dina Wakley Mineral acrylic paint and went over the design again to repeat the pattern. 
    I then "fussy" cut out the botanicals. For me this is a relaxing activity, and the results are always amazing. Something happens to an image or design when you cut it out. 
    Using a trimmer, I trimmed the Kraft paper and some additional yardstick pages to about 7.5" by 4.5". I used a bone folder to fold everything in half to create pamphlets. 
    Finally,  I poked some holes through all of the pages with an awl and used some vintage sari ribbon to bind my book. Here I used a pamphlet stitch, the easiest stitch to bind a small booklet. Finally I glued my flowers to the cover with some gel medium. Another fun variation is to use foam dots to adhere the flowers to your cover for more depth. When you're done, you will have a lovely little book for you or as a small gift!

    Join StencilClub by December 15 to receive these three exclusive stencils and accompanying video tutorial with PDF (both downloadable!), and 20% OFF STENCILS EVERY DAY!!

    My name is Megan Whisner Quinlan. I have been a mixed media maker and book binder for 20 years. I love to experiment and try as many techniques as possible. Art journaling is my way of unwinding and working out the daily stress of life on the page. Mixed media gives me great comfort, and I try to learn and grow as often as I can while working. I live with my family in New Jersey.  You can find me on Instagram: Megan_Whisner_Quinlan and on Youtube: Megan Whisner Quinlan and as an Instructor for the upcoming Fodder School. I love to see what you make, if I have inspired you today, tag me! 


    Friday, November 5, 2021

    Using Stencils to Doodle

    I love doodling. It is one of the easiest and most relaxing methods, when I work in my journals. This month's StencilClub stencil set by Mary Beth Shaw and Seth Apter immediately got my mind thinking of some good old doodles in my black journal. 
    I wanted to highlight the beautiful patterns of the stencils and add my own touch to the solid spaces. 
    I first stenciled the 9x12 stencil onto my black Dylusions journal with Dina Wakley Media White Gesso. 
    I then stenciled onto a separate black piece of cardstock with the 6x6 stencil. I left a 1 inch border on one side so that I could fold along that seam and use it as a tip in for extra journaling. 
    I then glued down the folded edge onto the opposite page to create my tip in. Tip ins are one of my favorite ways to add interest to my journal pages.
    All that was left was the doodling. I like to use Uni Ball Signo white pens and Posca paint pens for this as they really work well and are good quality for mixed media.
    I added some stamped images from a Lynne Perrella stamp set for Paper Artsy as well. Just such a fun way to create a page that you can use to doodle or journal on. 
    This month's StencilClub stencil set might be my favorite yet...but I do say that most months!!!

    Join StencilClub by November 15 to receive these three exclusive stencils and accompanying video tutorial with PDF, and 20% OFF STENCILS EVERY DAY!!

    My name is Megan Whisner Quinlan. I have been a mixed media maker and book binder for 20 years. I love to experiment and try as many techniques as possible. Art journaling is my way of unwinding and working out the daily stress of life on the page. Mixed media gives me great comfort, and I try to learn and grow as often as I can while working. I live with my family in New Jersey.  You can find me on Instagram: Megan_Whisner_Quinlan and on Youtube: Megan Whisner Quinlan and as an Instructor for the upcoming Fodder School. I love to see what you make, if I have inspired you today, tag me! 

    Wednesday, October 6, 2021

    Megan Whisner Quinlan: October 2021 StencilClub Stencils

    There is something about shapes that remind me of certain color combinations. For example, in this month's StencilClub stencil set, there are some very Matisse-like shapes that immediately triggered thoughts of bold contrasting colors. Follow along as I play with these themes. 
    Using Dina Wakley Turquoise paint and her 2" brush, I swathed two pages of white cardstock with swirly strokes of color. I then sprayed some water to water down the paint and give a softer look. 
    Using some Dina Wakley White Gesso I stenciled shapes randomly around my papers and allowed to dry. 
    I then repeated the same process, this time with Neon Pink acrylic paint from Lukas. 
    I found some interesting images from Tim Holtz's Ideology paper dolls to use as focal points. Next, I cut out some shapes with punches and scissors to use as my main substrate to build on. 
    Once I had some shapes and designs that worked for my focal points, I edged them in Jet Black Archival ink for more depth. I then glued them down to their backgrounds. 
    I then glued down my focal points and began to build out my assemblages with doodles. I finished off with some Dina Wakley washi tape with some inspiring phrases. I tore the strips and added them to my scraps to brighten them up for the final finish. The wonderful thing about working on this project, is I now have plenty of scraps to use for future projects. 

    Join StencilClub by October 15 to receive these three exclusive stencils and accompanying video tutorial with PDF, and 20% OFF STENCILS EVERY DAY!!
    Hello! My name is Megan Whisner Quinlan. I have been art journaling and book binding for about 20 years. However, I took a 10 year break from paper arts when I had my first 2 children. About 5 years ago, I came back into journaling after some big life changes, including 2 more children. Journaling had always been a part of my life, especially to work things out in life on paper. When I first started out, I really only focused on making books by hand and some basic collage and stamping. I was intimidated by the amazing art journaling artists out there who could create elaborate, mixed media spreads.  When I came back to journaling after such a long break, I decided that I was going to really push myself to learn all the techniques I had been too afraid to try.  Painting and drawing have really allowed me to find so much joy in my creative process, and I now almost exclusively create mixed media every day. I feel excited to have joined the art journaling community and you can find me on Instagram @Megan_Whisner_Quinlan or on Youtube: Megan Whisner Quinlan.