Showing posts with label Terry Garrett. Show all posts

Wednesday, September 7, 2016

StencilClub Voices Art Projects ~ September 20016 using Cathy Nichols' Boho Collection


Our Voices from StencilClub have it going on this September 
using Cathy Nichols' Boho stencil set to create 
jewelry that will make you want to fly, 
flash cards that will make you smile more than you ever did at flash cards in elementary school, 
and clever art journaling projects. 

Tropical Necklace ~ Lorraine Vogel

I tried for a tropical, carved wood look with this necklace. It was created with archival inks and the September stencils on polymer clay. A small flower stamp was used, and the marks were filled with white acrylic paint. Carving was done around the border and flower holes.

You can discover more about me on my Facebook page or website, WiredOrchidJewelry.

Journal Pages & Flash Cards ~ Mary Thoma


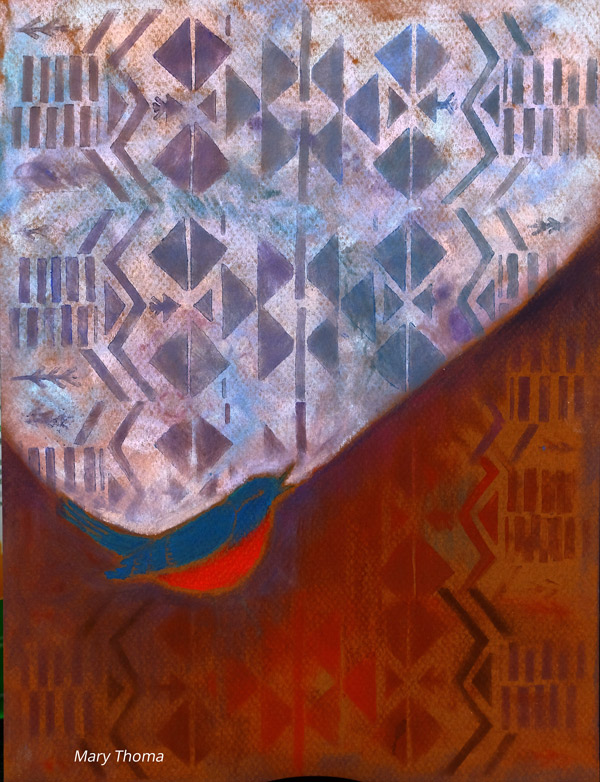
"Earth and Sky" 

Pictured above is my first attempt at utilizing this collection. I used the ethnic design to embellish the sky and ground with the little bird shape informing the landscape angle. Pan Pastels, and pastel pencils on toned Mi-Tentes pastel paper, September StencilClub designs by Cathy Nichols.

Flash Cards

These are 3 of a huge series of long division flash cards I recycled from the thrift store into art flash cards using some tricks I learned from Seth Apter. The September StencilClub designs are loaded with little jewels I applied to these designs for the collection yet not complete, 192 cards in this two ring batch. I will do a video flip through this fall so you can see some the rest.


Journal spread using: Acrylic paint, Art Foamy stamp design by Julie Fei Fan Balzer, Gelly Roll moonlight gel pens were used to embellish the September StencilClub stencils designed by Cathy Nichols. 

"Say YES to..."

Positive affirmations collage emphasize saying "YES" in this magazine cutout collage embellished with the September Bohemian designs by Cathy Nichols. You can see these and more at my blog: www.Make-it-in-Oklahoma.blogspot.com or you can visit my brand spanking new website Making Art in Oklahoma developed on a new concept A.I. (artificial intelligence) website builder that evolves as content is added. The GRID is only visible on Google Chrome at this time. The creators are working on supporting other browsers with this entirely new creature. I got into the GRID via crowd funding over a year ago and this investment was a long time coming to completion, but, I think it was worth it. Check it out. There is sound on this site.

Do-Si-Do Journal ~ Terry Garrett


I stenciled on top of paper I painted.
Closed:
Within:
Back:

You can discover more about me on my website, Whisperwood Art Works.

Cathy Nichols, Designer for Sept. 2016 StencilClub
Need the stencils that inspired the artwork by our StencilClub Voices members? Click the graphic above to join StencilClub by September 15 and they'll be shipped to your mailbox. (If it is after 9-15-16 as a member you can order previously released StencilClub stencil sets.)

Wednesday, August 3, 2016

Mixed Media Art & Jewelry by our StencilClub Voices with the August 2016 Stencils


Hi Art Lovers, Carol here, introducing our August StencilClub Voices: 

Terry Garrett, Lorraine Vogel, and Mary Thoma! 

I've been brimming with excitement over these Voices projects and sure appreciate each of them taking the time to share their talents.

Our Voices artists worked with paper, clay, and canvas to create art with the "Here, There, and Everywhere" stencil set Mary Nasser designed for August 2016 StencilClub.

Carousel Book by Terry Garrett

Terry said he had "big fun" making a variation of a carousel book.

The black silhouettes aren't stencils, they are cut out of black card stock.


You can discover more about Terry on his Whisperwood Art Works blog.

Necklace by Lorraine Vogel

Lorraine made a clay veneer (pictured below) and then cut out her pendant shapes.
Starting with the largest stencil, archival inks were applied to white polymer clay then a dark gray ink was applied with a sponge. The middle sized stencil was then laid over the first inking, where strips of aqua and lime green inks were applied overall. Dark gray was applied in the circle areas. Lastly, the smallest stencil was laid over the veneer and the same general strips of aqua and lime green inks were applied. After inking, the circles and dots were pressed into the clay and filled with white acrylics.

You can connect with more of Lorraine's work via her Wired Orchid Facebook page.

Mixed-media Watercolor Painting by Mary Thoma

Mary writes: 

Hello StencilClub members, this is my first "Voices" contribution. The artwork is mixed media on 9X12" Strathmore 140 lb. watercolor paper. I used spray inks, mini gelli plates, and acrylic paint with the August StencilClub stencils. 

For a more detailed outline of how I produced this piece please check out my Make It In Oklahoma blogspot. 

Carol again. I'm diggin' the August stencils and feeling oh-so-lucky I get to spy these works of art first. The original StencilGirl, Mary Beth Shaw, and I are thrilled to share this inspiration with you!

If you'd like to see Mary Nasser introduce her stencils, CLICK HERE.

Remember, if you are a member of StencilClub and would like to put your name "in the hat" to become one of our upcoming Voices (you'll receive the month's stencils early plus a few other perks) just contact Carol via the secret Facebook group or email.


Monday, September 28, 2015

Exploding Box by Terry Garrett!

When I was asked to be a blog guest I said yes – not knowing where I would go with this.
Then I decided I wanted to do something 3D. I don't do that often and so wanted to challenge myself.
I have long been curious about the exploding box. It's a fun way to have something be both flat and 3D.
I found a template online for the exploding box and there were several to choose from.

The photo below is of the blank pieces. I used a 140# watercolor paper for this project.
I decided I wanted to make my box look like an old city building with brick showing out from peeling paint.
This I thought was perfect to use some of Seth Apter's stencils.

So I started with a coat of some light colors put on with a credit card and then using
Carolyn Dube's Buildings stencil I stenciled on the bricks.

 Once that was dry I used a technique I learned from a friend of mine, John Arbuckle.
I put Vaseline over parts of the brick pattern and other areas and then painted a mixed gray over it. 

When that was dry I rubbed off the paint that was on top of the vaseline revealing some of the brick pattern. Then I found some windows and door online that I wanted to use and glued those down. 

Next I worked on the inside insert. The photo below is the back side of the insert. I painted the background and stenciled with some of StencilClub stencils and collaged with some things from TumbleFish Studios. 

Then I flipped it over and using my eBrush – I used Seth's stencils
and used rubber stamps for the center message. 

The next photos are of the finished exterior.
I used my eBrush with Seth's stencils for what I feel is an authentic looking graffiti.
The eBrush is an airbrush that uses art markers – it takes several different kinds – I used Copic and Spectrum Noir alcohol markers. Here is a link for the eBrush. http://www.craftwellusa.com/products/ebrush 


The photo below is of the inside of the exploding box.

This was a lot of fun!
To see more of Terry's work, please visit his BLOG at whisperwoodartworks.blogspot.com!