
Bonjour! Hello!
Cathy Ward here from Montreal, Quebec!
I
am very excited to share the process I used to create this very personal
piece. I will walk you through how I
made the textures and layers using paint, StencilGirl® stencils, and a Gelli®
printing plate.
My
supply list:
StencilGirl®
Stencils:
8" x 10" Gelli® Printing Plate, Paint (acrylic - various shades of blue, white, and
gold), 8" x 10" white watercolor paper as it can take lots of layers, Finnabair’s
Art Basics Mixed Media Silicone 2 “Brush or a brayer, Stampendous Flower Stamp
(Fresh Bloom), Ranger white embossing powder, embossing gun, Hand-dyed vintage fabric
scraps, Joss paper (or gold leafing), Self-stick rhinestones, Scissors, Sewing
Machine.
My
process:
I
enjoy building layers directly on the Gelli® plate vs. pulling a single print
on paper, drying it, then pulling another print on top of that image.
I
start by covering the Gelli® plate with a solid layer of paint. Yes, my Gelli® plate is dirty to start
off! I never clean it unless I use heavy
paste or glitter paint. I love when you
have several layers of dried paint that eventually pulls off in a print. It is like magic!
I
usually mix two or three colors directly on the Gelli® plate. My favorite way to apply paint is using Finnabair’s
Art Basics Mixed Media Silicone 2-inch brush.
I first learned of this technique from Mary Beth. If you do not have one you can use a brayer.

Your
final color tends to be richer when you mix a few colors together. I used blue and gold paint for my first
layer. As you can see in the final piece
above, very little of the gold actually shows, but it still adds depth.

Once
you have your base color down and it is dry, start adding layers using
different stencils. You do not have to
worry about working fast, before the paint dries, because you let the paint dry
between each layer. There is no magic
number to how many layers you add. I usually
put three to four.
Remember,
you do not have to use the entire stencil – you can use bits and pieces from
it.

I
love elephants, and adore my StencilGirl® Elephant Parade Stencil, designed by
Nathalie Kalbach, but you can only use a full elephant so many times. However, I like the pattern on the elephant’s
body and I use it all the time. It
really is one of my go-to patterns.

When
you are happy with your layers (remember we will be adding more later directly
to your art so it does not need to feel completely finished),

When
it is completely dry, take white paint (you can use any color, I just like
white) and cover your entire Gelli® plate.
Don't be afraid! It will not mess
up any of your image as long as it is completely dry.


Let
the white paint layer sit for a minute to soften your layers then lay your
piece of paper down. Rub it really good
with a credit card, a speedball roller or your hand. If you pick up the corner and the image is
not coming up, rub it a little more. OOPS! I forgot to take a photo of my first pull –
SORRY! The photo below basically lets
you see what it looked like. However, it
does include the next two steps.

The
face barely showed up on the print and I wanted that to be the focal point so I
stencil on top of it with direct application of acrylic paint.

I
added more texture by using a makeup sponge to apply white embossing ink directly
on the stencil, lifted up the stencil, sprinkled on embossing powder, and then
embossed the image using a heat gun.

I
also stamped and embossed one flower directly on the piece. All other flowers were cut out and glued on.
Note: I keep a piece of scrap paper on the side to
wipe off any extra paint, or to clean a stencil. I like to use an old dictionary page as it
adds text and interest.

Often
times I will use this scrap paper in my final piece. It is nice to have because when you are mixing
colors it is hard to recreate the exact color.
This way you have paper to make additional elements that will match your
colors. I made
the flowers with my scrap paper. I added
a few collage elements, used the flower stamp, embossed it, and then cut out
the flowers.

I
chose to cover the eyes because the day I was working on this piece, my mother,
who suffers from Advanced Alzheimer’s, looked me straight in the eye and asked,
“Where is my daughter?” I am her only
daughter and this is the first time she did not “see” me. It was very emotional and heartbreaking.

You
can see from the above photo that the piece is still rough and flat. I was ready to trim it
and add the final touches. I love to sew on paper so I finished it by
running a zigzag stitch around the edges.

And
added some hand-dyed vintage ribbons. I
sewed on the ribbons, but if you don’t have a sewing machine you can use clear
glue to apply the ribbons instead.

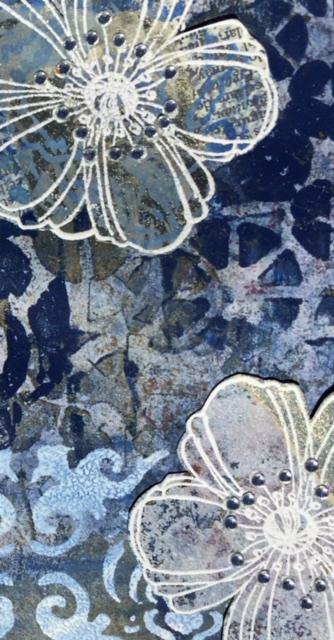
It
is hard to see in the photograph but I added rhinestones on some of the flower
stamens. It gives the final piece a
little bling and more texture.
The
fun part of a collage is that you can move things around until you are happy
with the composition. I find that if you
take a photo before gluing your final design, it gives you a different
perspective than looking at the piece in person. Many times I see a change I want to make that
for some reason I could not see when I was looking at the real piece.
Here
are two other versions – with slight variances.
One has a white wallpaper background instead of the dark blue, and one
has a flower in the lower right. I felt
the flower made the piece feel a little too cluttered and competed with the
impact of the covered eyes. But I did
not see this until I looked at the photo.
And I preferred the dark border to the light given the feeling behind
the eyes being covered. Which do you
like?


Happy
Stenciling!

What a beautiful piece! I feel sad for you for the sorrow you felt while making it, when your mother didn't recognize you. It adds depth and mystery to your piece, though. I definitely prefer the dark background, as you do. I love the embossed flowers. Beautiful work!
ReplyDeleteThank you so much Terry - xoxo
DeleteAbsolutely beautiful...tres bien! I am sorry about your mother, tha I you for sharing that 💔
ReplyDeleteI love your suggestion for using your scrap paper in the collage,a brilliant idea. Wishing you peace, 😌
Thank you for sharing... *sorry about my typos!
ReplyDelete