Join Us on Instagram! |
A blog for the StencilGirl® Product line owned by Mary Beth Shaw for people who love stencils like we love stencils.
Thursday, December 31, 2020
StencilGirl® Products Best Nine 2020
Tuesday, December 29, 2020
Pretty/Tough Mask by Linda Edkins Wyatt
 Hi!
Linda Edkins Wyatt here, with my interpretation of StencilGirl's mask
theme. I thought long and hard about what kind of mask to make: a
Halloween or Mardi Gras festive mask, a Tragedy & Comedy mask, or
maybe a medical mask, since I spent the last 10 months wearing a
medical mask daily for my job in a New York City public hospital.
 |
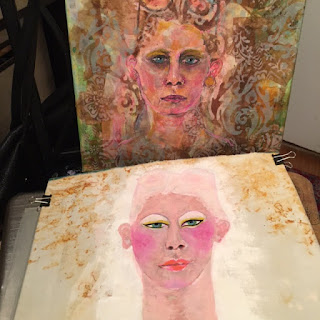
| An an oil self-portrait from around 2005 was the basis for the mask |
I
thought back to an oil self-portrait that I had painted years ago,
around 2005, when I was having some serious health issues. I looked
sullen and unhappy and painted myself exactly the way I felt.
I had been taking a medication that had the side-effect of being unable to sleep without a sleep-inducing medications. I was frustrated and bone-weary. It was a vicious cycle of exhaustion and anxiety. Fortunately, I had photographed the painting, so for this project, I
printed two copies of the painting from my inkjet printer, using one for
the canvas and saving one for the mask.
 |
| A printout of the 2005 portrait was trimmed and glued to an unfinished 12" x 12" canvas |
I took an unfinished 12"x12" canvas that hadn't turned out the way I envisioned, and glued one portrait on top using matte medium. I added recycled, empty teabags to join the printout to the canvas, then stenciled until it merged and I could no longer tell where the printout ended and the canvas began.
 | ||
| Recycled, empty teabags were glued to the canvas, uniting the background and the printout |
 |
| The printout on the canvas with all teabags added |
 |
| My Spiral from the Lemurian Garden collection was added with Speckled Egg ink to soften the darkness of the teabags |
 |
| To further lighten the teabags and unite the elements, the Tapestry stencil was added using Spun Sugar ink |
 |
| Once the background was complete, I cut out the face from the second printout |
My idea was to create a removable mask for the portrait: a tough but pretty mask. So, with the second self-portrait printout, I again used matte medium, but this time adhered it to a piece of rusted fabric. I used flesh-toned paint the way you would use a makeup base, and pinks (the way you would use blush and lipstick). The eye makeup was inspired by one of the makeup ads I saw in the drugstore.
 |
| Rusted cotton was the background for the removable mask. |
 |
| The eyes were enhanced using Posca Pens |
 |
| Paint and Posca Pens simulated foundation, blush, lipstick, and eye makeup |
 |
| A comparison of the finished background with the unfinished mask |
 |
| I gessoed over the glasses perched atop my head in the original painting, then added wild blue hair. After trying several stencils for a neck tattoo, I settled on part of a Sacred Heart by Laurie Milka |
Once I had the face and hair painted, I used a plate to draw a circular shape and added extensions at the side to attach the mask to the canvas.
I pinned the painted rusty fabric, along with some felt padding and a purple batik backing, and cut the circle, leaving strips at the sides to attach the mask to the canvas.
I lightly quilted the mask and stitched the edges closed, adding pink chalk lines and pink stitching radiating out from the face.
 |
| The pink chalk lines were intended to be guidelines for the quilting, but I decided to leave the pink chalk, and also use pink for the thread to contrast with the blue hair. |
A few spots of Velcro on
the side of the canvas and on the mask tabs made it easy to remove and
attach.
It
was pretty bizarre to try outlandish makeup, hairdos, jewelry, and tattoos on myself! I tried various crown ideas, a few different stencils to suggest a neck tattoo, and gave my mask-self wild blue hair. You can see in the photo below that the features on the mask and the canvas under-painting match exactly.
The final touches were adding a crown, made from Gwen Lafluer's Art Deco Borders stencil done with embossing powder on rusted fabric, fake blue and green gems around the edges of the mask circle, earrings of Turkmen Jewelry Parts from Gwen Lafluer's website, a few strips of turquoise washi tape, and a cross atop the crown, formed from a section of Laurie Milka's Pilgrimage to the Renaissance.
Here's a video (with music) on the whole process, start to finish. Enjoy!
Stencils used:
Linda Edkins Wyatt, Lemurian Spiral
Gwen Lafluer, Art Deco Borders
Laurie Milka, Four Sacred Hearts
Laurie Milka, Pilgrimage to the Renaissance
Additional resource:
For the jewelry, I incorporated bits of Turkmen Jewelry Parts from Gwen Lafluer's website
Inks, paints and Posca Pens from The Ink Pad NYC
Monday, December 28, 2020
The Year of the Mask
It hardly needs to be said that 2020 has been a challenging year. I, for one, will not be sorry to see it end this week. There were many disappointments for me - including two canceled trips to Europe. I had hoped to visit Amsterdam in March to see the great Dutch master paintings in the Rijksmuseum with my daughter. March? Not so much. Then in September, I was supposed to have gone with MaryBeth Shaw on a stencil-icious art retreat in the Italian lake district. Obviously, that didn't happen either. (Next year, right, MaryBeth?) Of course those disappointments are nothing compared with the terrible losses so many others suffered - in their health and their financial stability, and the loss of loved ones.
And of course, in my state (New York) we have been required to wear masks everywhere in public since spring to control the spread of infection. My daughter complained her mask was causing breakouts. For the first couple of months I had to turn around countless times and go home while setting out on errands because I had forgotten to take a mask with me. I had to order contact lenses so I can take walks in cold weather without the mask fogging up my glasses. Masks. Ugh.
But in the art studio, a mask can be a fascinating tool to experiment with. With a mask/stencil set, you can play with the positive/negative versions of the same image. With my daily walks in the state park and state tree nursery as my inspiration, I decided to have some fun with masks for a change. Like many people, I have found great solace in nature this year. So with a sobering and contemplative mix of grief and hope in my heart I began working with some images in my head, starting with some photos I took on my favorite walk in the tree nursery.
Now, who doesn't have an old canvas board lying around the studio? Clearly this 11x14 was a failure that I had gessoed over, and then used while painting some other, smaller substrates. I grabbed some colored gessoes and a botanical stencil by Rae Missigman and made this ground more interesting to work with. What I had in mind required me to build up a lot of dark values at a horizon line, using Prussian Blue mixed with Burnt Umber to make a good not-quite-black tone, as well a variations of the blue and brown, and a bunch of random scribbles with pencil. The result was much more promising. This stencil also come with masks, but here I was only using the stencil part. What I wanted was a layer of organic texture, which these delicate leafy stencils provided.
 |
| adding botanical texture |
 |
| collaging the images |
 |
| collaged images blended together |
To make it extra moody, I also ran it through an editing app on my Ipad - Distressed FX - to give it a little more atmosphere. Of course the final painting doesn't look like this in person, but if I want to print this digital edit I certainly can.
Stencils and masks used in this project:
 | |||
| Small Deer Antlers Stencils and Mask S513 designed by June Pfaff Daley |
 |
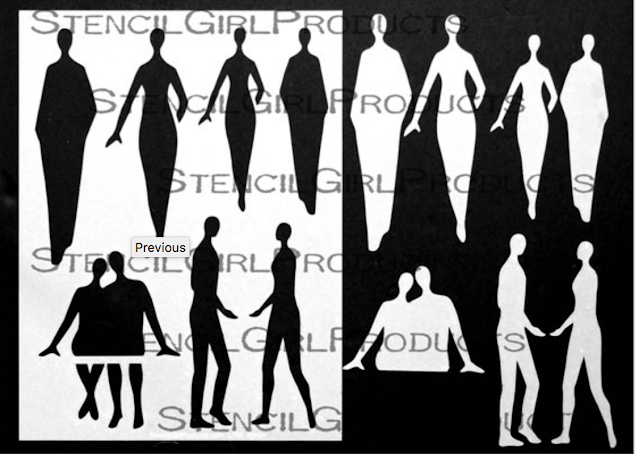
| Figures: Couples Stencil and Masks L730 designed by Valerie Sjodin |
 |
| Botanical Wildflowers Stencils and Masks L774 designed by Rae Missigman |
Friday, December 25, 2020
Thursday, December 24, 2020
Mary Beth's Must Haves
I'm often asked during my Facebook livestreams about art supplies I'm using in my videos.
I keep a list of all my favorite art supplies here.
And today I'm sharing five more of my favorites!


