Friday, February 26, 2021

Book of Birds by Kimberly Baxter Packwood

Supplies:

  • Black Birds in Tree Stencil
  • Three Crows Stencil
  • Craft Paint
  • *Gesso
  • *Stencil brushes
  • Paint Brushes
  • Utility Knife
  • Leather awl or a drill
  • *1/8” round paper punch
  • Cardboard
  • Gel Medium or Glue
  • Pencil
  • *Watercolor Pencils
  • *Leather cord, small diameter for binding the book
  • *Heavy Thread
  • *Paper scraps for embellishing

* Optional

For this project I decided to make an unconventional birdhouse out of recycled cardboard.

You can use my structure design, or make a structure style to your liking. I went with a square hole and doors for my birdhouse, though many have round holes and no doors, I liked the element of surprise the doors give my structure.

SAFETY NOTE: I use a traditional utility knife, I discourage the use of Xacto knives or utility knives with the snap off blades for projects like this one as it is too easy for the blade to get stuck in the cardboard and you could potentially cut yourself.

Using the template, or a design of your choice, cut two pieces of cardboard one for the front of the book and one for the back of the book.

Once they are cut out paint the fronts and back with gesso or white craft paint, allowing to dry thoroughly between layers. I prefer gesso as it prevents the acids in the cardboard from seeping through, which can damage any treatments you add to your covers.

While the gesso was still wet I rubbed moss green and red iron oxide charcoal sticks onto the cardboard, and used a wet paint brush to spread the charcoal around and thinned it down for a more sheer effect.

Lay the Black Birds in Tree stencil on your back cover and trace out a portion of the stencil onto the cardboard. I then filled in my design using watercolor pencils in a dark indigo, sepia, wine, and yellow ochre colors. I filled in the birds using a soft grey color.

Once I had the design filled in I used a #2 round paint brush that I dampened to spread the watercolor around.

Once that side of the cover was dried, I painted the reverse side and added some texture using a sewing pattern marking wheel, and then some color with charcoal sticks, pastel pencils, and watercolor pencils.

For the front of the Birdhouse Book I decided to cut square doors, see dimensions on template.

I used a steel ruler and utility knife when making my cuts. If you should accidentally over shoot your cut lines you can, if desired, glue a decorated sheet of paper or card stock to the front of the book to hide the cut marks.

I gessoed the front of the book cover and applied some charcoal while the gesso was still wet, moving it around with a wet brush. After it dried I added sunflowers and Queen Anne’s lace to add a garden theme to the cover using watercolor pencils. When that was dried I applied one of the birds from the Black Birds in Tree stencil to the top of one of the sunflowers using a dark indigo watercolor pencil.

Once the front of the book cover was dry I gessoed the back of the cover and while wet added some moss green charcoal, I used a wet brush to move the color around while the gesso was still wet. I will probably add a design to the inside of the cover at a later date.

I then cut six more pieces of cardboard, the same shape as the covers, and glued them together using mat gel medium, and added small clamps to keep the cardboard compressed. You could weigh the stack down with some heavy books for the same affect.

Once that was dried I cut a section out of the stack in the same location as the doors on the front cover, I removed four layers of cardboard.

I then painted the back ground using some earth tone colors, with craft paint.

I then added a piece of paper, to which I added a hole the same dimensions as the cardboard piece, and stenciled my Black Birds in Tree design on part of the paper. I then attached it to the cardboard piece using gel medium.

Once that was dried I added paint to the back of the cardboard piece, and then added holes using a needle awl for the binding.

Finally, I added a bird, which I cut out of cardboard and painted with craft paint, from the Three Crows Stencil, to the niche in the cardboard piece, and a small piece of paper rolled up to make a perch for the bird.

To make the bird I traced the stencil design onto two separate pieces of cardboard, and then removed the excess bits from around the bird so that I could easily cut the bird design. Once cut out I glued the two pieces together, and added two pieces of scrap cardboard to the back of the bird so that it wasn’t laying against the niche background.

To bind the book I used a 1/8th inch hole punch and placed holes on the left sides of both covers and the middle section approximately every inch, and ¼ inch in from the edge, yielding four holes. I created the holes in the using a sewing needle awl. If necessary you could use a drill with a 1/8th inch drill bit to create the holes in the middle section.

I bound the sections together using approximately 7 ½ inch pieces of thin leather cord. I pushed the cord through the holes and then tied them together with a slip knot to finish the binding. Trim cord ends if desired, I liked mine long.

Thursday, February 25, 2021

New Portrait, Floral, and Mark-making Stencils by Jeanne Oliver

StencilGirl® is elated to introduce you to our newest stencil designer, Jeanne Oliver!

Jeanne is inspired by personal stories and her new line of six portrait stencils, along with several focused on mark-making and layers, will help you showcase your own mixed media story.


"Simple lines can often be the beginning of beautiful larger works of art and sometimes simple lines are all you need," artist and stencil designer Jean Oliver says. "Each stencil has been created to use in your art journals, in your hand stitching, or even in larger works of art. Let the stencil be the starting point and then see where it takes you."

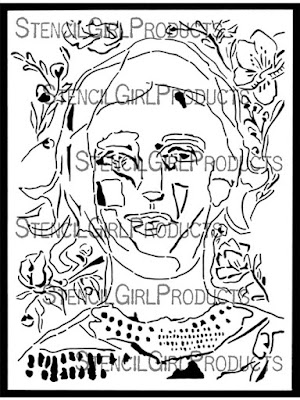
These large 9" x 12" portrait-style stencils give you the perfect layer for spray paint or for a larger portrait piece. With spray paint, charcoal, acrylics, stitching, inks, or more you can begin to add beginning lines into your work. Repeat the portrait for a larger impact or extend the lines into a body for more drama. Don't be afraid to even just use a portion of the stencil and include it in your art journal. 

Sweet Girl Face Large, L838


Hair bobbed and brushed, dress detailed with abstract bows and a striped collar, this young girl with a vintage look is dressed for her portrait in the Sweet Face Girl Large Stencil designed by Jeanne Oliver. Paint drips give this stencil a painterly look.


The woman in the Thoughtful Face Large Stencil is mindful and dreaming. It will be up to you as her portrait painter to decide how those dreams are revealed.


Jeanne Oliver’s Garden Face Stencil depicts a woman as ageless as her blooming garden with unruly hair, kind eyes, and a bit of a smile. 

Jeanne says, "Create the portrait and then consider stitching the floral design in the background! The possibilities are endless." 

The Small Portraits

These 6” x 6” portrait-style stencils are perfect for your art journal and daily practice. With simple marks, you can begin to add layers and texture. 

"This is a fun size to start with charcoal and then with a blending stick start to add those underlayers to your work," Jeanne says. "Come in with acrylics, spray paint, watercolors, Neocolor II, or more and bring your portrait to life." 

Kind Face Small Stencil, S863

Is she a girl or a woman with her unruly hair and the ghost of a smile? You as the painter will decide when you begin with the Kind Face Small Stencil.


Alone with her thoughts, is the woman looking outward or within?


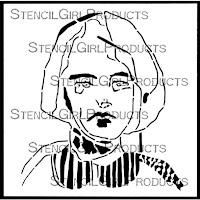
Sweet Face Girl Small Stencil, S859

A young girl dressed up for her portrait in a bygone era when you had to stand still and not smile for the camera.


Taken directly from Jeanne Oliver’s mark-making and abstract work you can use her Abstract Marks Stencil to incorporate these marks into your own art. 

The Garden Spray and Bramble Stencil designed by Jeanne Oliver can become the background of your portraits, still-life works all on their own, or add texture and layers into your current work. Whether you use spray paint, charcoal, acrylic, inks, modeling paste, or your favorite medium each floral element will add simple and loose lines to your work. The floral elements on this stencil may be cut apart for ease of use.


Mark Making with Floral Embellishments Stencil, S860

"Creating repetitive marks within my work is one of my favorite ways to bring line and form," Jeanne says. 

This stencil is wonderful for art journaling or adding to the body or background of a portrait. You may wish to cut this stencil in half for ease of use.

Discover all of Jeanne Oliver's stencils right here.

Gathered is a mixed media class Jeanne is teaching that includes these stencils.


Wednesday, February 24, 2021

Mary Beth Shaw's VLOG: February 2021


We hope you enjoyed this episode of Mary Beth's VLOG!

Stay tuned!
Mary Beth Shaw will be back again next month with another new VLOG post!

Tuesday, February 23, 2021

Circus 19 Dream: A Mixed Media Pastiche Honoring Kim Collister


Hi everyone! Linda Edkins Wyatt here, with a project that I really, really love, inspired by artist Kim Collister

 Were you thinking, like I was, "What the heck is a pastiche?" It sounded like a portion of pasta, or maybe a dish with both pasta and pistachios (wouldn't that be yummy?) But, it's a 25 cent word for tribute, or honor. 

In my mind, in my journal, and in my research, I tried about a dozen artists whose work I love and admire. I kept coming back to Kim, who I have been following for years. She's whimsical, colorful, introspective, creative, and fearless. Her recent series of faces using a vintage phrenology head really captivated me, so I decided to do something similar. I was a little worried about being too much of a clone or copy cat, but the end result, I think, combines both our styles without infringing on Kim's originality.

In addition to the detailed tutorial below, I made a video of my process.


I started with a 12" x 12" canvas, my gel plate, deli paper, and of course, acrylic paints. I made a bunch of prints using an assortment of stencils. Of the many prints, I liked the ones with the large design from Seth Apter's Borderlines December 2017 club set the best.

I cut and tore the section I liked best and set them aside. 

Next, using matte medium, I covered the canvas with pages from an old book and some washi tape with numbers and letters.


On top of the book pages, I arranged the printed pieces of the large Borderlines stencil to my liking then adhered them with matte medium. It had a nice typography look, but I knew it needed more.

I searched The Graphics Fairy for vintage images of a phrenology head, found one I liked, and printed it on good 8.5" x 11" paper with my laser printer. (I didn't want the ink to bleed, so I went with a black laser print rather than a color print from my inkjet printer.)


After positioning the head where I wanted it, and drawing in lines for the neck and shoulders, I added white acrylic and some pink paint as well. Then the real fun began. 


I rummaged through my papers looking for collage elements that I liked, and that was similar to what Kim would have used. After much puttering and switching elements in and out, I added a butterfly, a circus horse under a tent, and a botanical tulip. The "earring" is a small image from Gwen Lafluer's Afraid to Try stencil, done with turquoise paint on yellow cardstock.


The tulip needed leaves, so I stenciled some in using the StencilClub March 2013 set.  I thought circles would add to the circus feel, so I used the irregular circles from Carolyn Dube's August 2018 StencilClub Playtime set, randomly stenciling them around the canvas.

 I also added the small stencil from Tina Walker's October 2020 Vintage Wallpaper set, which felt like pinwheels and added some more whimsy to the canvas.

I added the words PEACE and JOY on the face with stamps, printed on thin tissue paper, and glued to the canvas. I also darkened some of the blacks and whitened the white areas. The last touches were adding depth with a black Aquarellable Stabilo pencil, a black sharpie, and some dots with Posca paint pens.


You can still see the original book pages and washi tape that covered the canvas, along with the deli paper numbers and marks from Seth's stencil. I chose the number 19 because that's my birthday, and the number 7 because that's the age kids are fearless artists. The other numbers around the canvas were random.

Here are some detail shots. I love the way the leaf stencils work with the botanical tulip, and the random numbers from the original phrenology image peeking through. The imperfect circles and pinwheels interact nicely.