Hi everyone!
I often refer to myself as a mixed media artist, yet I tend to work in the same mediums and substrates. For this blog post I decided I would transfer what I do in my journal to another substrate – a plain tote bag, so that I could bring my art with me! It was eye opening – as I realised how easy it is to work between multiple substrates to create different homewares to decorate my place – bags, frames, bookshelves and more.
To begin, insert a craft sheet or newspaper into the
bag so that you can paint onto the surface without leaking through to the other
side. Then mask off the area you would like to work in using painters tape or
masking tape (press down the edges carefully). Gesso the bag so that you have a
primed surface to work on. While this is not necessary, it will help you get
brighter colours on the finished product and let your paint spread more easily
on the surface of the bag.
Once you have done all the prep – it’s onto the fun
part! Choose a selection of stencils you would like to use on your bag. I used
the focal stencils to help me grid up my bag so that they would fit on. You can
also just paint random sized squares/rectangles and use patterned stencils to
fill the gaps instead. Choose a colour palette that works for you (i.e. your
favourite colours) as you will be more likely to enjoy using it when it
represents you. Paint in squares and rectangles with your chosen colours and
dry. Then stencil over the top with a contrasting colour. You may choose to add
in some details with some posca paint pens to highlight the stenciled images.
When you are finished, iron your bag to heat set the design (place a craft sheet or baking paper over the top to protect your image. I have never washed my bags I have created – so I can’t guarantee that they will wash well. If you want to wash your bags, you may like to add in some fabric medium to the acrylic paint as you paint/stencil your images.
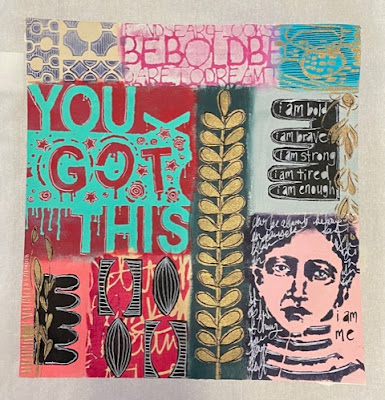
Here are closeup details of this bag:


Here is another version of the bag I created for some Christmas gifts:


Here is a list of the StencilGirl® stencils I have used in these:
- Circular Patterns for Play
- Words to Live By
- Soulful Scribbles
- Create Face
- You Got This
- Monoprint Stencil
- Mark Making with Floral
- Abstract Marks
Thank you so much for stopping by the blog. I hope that my video has inspired you to get your stencils out and create on a different substrate than usual.
Happy Creating,
Niamh
Instagram: @niamhbaly
YouTube
I LOVE your bags, particularly the first one. Thanks for the great video showing you at work. Brilliant!
ReplyDelete