Showing posts with label tote. Show all posts

Friday, January 21, 2022

Creating a Hand Painted Tote Bag with StencilGirl® Stencils

Hi everyone! Niamh Baly here!

I often refer to myself as a mixed media artist, yet I tend to work in the same mediums and substrates. For this blog post I decided I would transfer what I do in my journal to another substrate – a plain tote bag, so that I could bring my art with me! It was eye opening – as I realised how easy it is to work between multiple substrates to create different homewares to decorate my place – bags, frames, bookshelves and more.

To begin, insert a craft sheet or newspaper into the bag so that you can paint onto the surface without leaking through to the other side. Then mask off the area you would like to work in using painters tape or masking tape (press down the edges carefully). Gesso the bag so that you have a primed surface to work on. While this is not necessary, it will help you get brighter colours on the finished product and let your paint spread more easily on the surface of the bag.

Once you have done all the prep – it’s onto the fun part! Choose a selection of stencils you would like to use on your bag. I used the focal stencils to help me grid up my bag so that they would fit on. You can also just paint random sized squares/rectangles and use patterned stencils to fill the gaps instead. Choose a colour palette that works for you (i.e. your favourite colours) as you will be more likely to enjoy using it when it represents you. Paint in squares and rectangles with your chosen colours and dry. Then stencil over the top with a contrasting colour. You may choose to add in some details with some posca paint pens to highlight the stenciled images.

When you are finished, iron your bag to heat set the design (place a craft sheet or baking paper over the top to protect your image. I have never washed my bags I have created – so I can’t guarantee that they will wash well. If you want to wash your bags, you may like to add in some fabric medium to the acrylic paint as you paint/stencil your images.

Here are closeup details of this bag:

Here is another version of the bag I created for some Christmas gifts:

Here is a list of the StencilGirl® stencils I have used in these:  

Thank you so much for stopping by the blog. I hope that my video has inspired you to get your stencils out and create on a different substrate than usual.

Happy Creating,

Niamh
Instagram: @niamhbaly
YouTube


Friday, January 5, 2018

Kymona Tracey: 7 Creations with StencilGirl Products!

Hello everyone!!! I'm over the top excited again today. I'm Guest Designing for StencilGirl today.
I've been a member of StencilClub for a year now, and boy can I tell you I love all of the stencils that are sent to me each month! Stencils allow me to really let go and play with paint all day long with no care in the world. I just play and whatever my hands do, I just go with it!! LOL!!

January brings about changes and new things. For me, January allows me to start over and change the way I see things. This year I want to live a fuller, happier life in everything I do. My projects will show you what I mean!
Let's Jump Right In:
For this page, I used the Jump For Joy Stencil by Jessica Sporn. I paired it with my favorite color purple with a touch of pink. This stencil makes me happy and that is what I wanted to achieve when I was creating this page. 

For my second page, I used my favorite stencil Circles, Circles by Traci Bautista and the 6-inch round Gelpress Plate. I also used Round Here Arrows Stencil by Mary C. Nasser and Now Is The Time Stencil by Carolyn Dube. 
I love this page because it gives a glimpse into what I want for myself in 2018!!  

For my third page, I used the Numbers Stencil by Seth Apter. I let the colors of paint guide me while creating this page. They are warm and bright. I used the number stencil to help me count off the happy moments in my life thus far.  

For my fourth and final page, I wanted to make sure I added family because my family is the most important people in my life. They give me strength, they make me laugh, they make me cry and they are the reason why I work so hard.

I used the March 2017 StencilClub Kit by June Pfaff Daley. I love the clean font she used for the word family. It’s big and creates a bold statement. I also used Deconstructed Della Robbia ClusterMask and Stencil by Traci Bautista, ATC Mixup 1 by Mary Beth Shaw and Urban Outsiders Stencil by Seth Apter. 

Stenciled Hoop Pocket
OMG, I have to say I love this project!! I took a pair of old jeans that ripped and created this super cute Hoop Stencil Pocket! 
To create this:
1.      Cut the pocket of the ripped jeans. 
2.      Stencil the mini sun created by Mary Nasser from the August 2017 StencilClub kit with teal paint. 
3.      Once that dries, place a sentiment sticker in the center of the sun.
4.      Then use a 6-inch embroidery hoop and pulled the jeans through the hoop as tight as I could.  
5.      Add additional embellishments, to give it character. 
6.      Cut off any excess material in the back.
7.      Add your favorite writing or art supplies in the pocket.
Hang this hoop up on the wall right above or next to your desk.  
Let's take a closer look:
This is hanging up in my office at work. My coworkers love it. They think it’s the cutest thing they've ever seen. It tickles me pink.


Repurposed Metal Bookmark
For this project, I used a metal bookmark that I found in my office that was left by the person that retired. So instead of throwing it way, I could paint it and stencil on it and send it to a friend I haven't seen in awhile.
I painted the center of the bookmark and stenciled on it using the August 2017 StencilClub Postcard Image created Mary C. Nasser.

Canvas Tote Bag


For this project, I decorated a canvas tote bag with StencilGirl December 2017 Borderlines stencil by Seth Apter. I used distress inks to create the outline of the young ladies face on the tote bag. I added my one little word "discover" to remind myself what I want to accomplish in 2018.
So what do you think? What are you creating in 2018? I would love to hear from you. 

Thanks again, StencilGirl Products, for having me!!
Kymona
Kymona is a woman who never slows down and loves it. Yes... she is the energizer bunny's sister. She keeps going and going. She is a single mom of two wonderful children, 19 and 10 years of age. Besides running from one activity to another with them, she works full time at a hospital, teaches high school students on the weekends and has a huge love of learning new things. Kymona started scrapbooking when her son was born and has been paper-crafting ever since. Kymona also has a love for card making, photography, knitting and mixed media. Besides being a mom, Kymona thinks crafting has been one of the most rewarding accomplishments. According to her, being able to share with the world community makes life so rewarding!

Thursday, August 31, 2017

Stenciling on Fabric with StencilGirl Stencils!

Hi, everyone! This is Margot Krekeler, and I’m delighted to be here writing a guest post for StencilGirl Talk!
I’m a fabric painter – two years ago, I started blogging about fabric painting, on my website Your Colourful Mind,
and I’ve recently released the first in a series of fabric-painting guide books for beginners.
In my first project, I used Suzi Dennis’ stencil Garden Dreams to play around with various stenciling methods and enjoy experimenting with them.
applied the stencil directly to a T-shirt which I’d already prepared during a shibori-workshop (shibori - a Japanese manual resist-dyeing technique for producing a pattern).
I liked the final result, and the T-shirt became one of my favorites. However, it’s no longer ‘my’ T-shirt, because one of my friends was so excited about it that I gave it to her for her birthday! J
I continued applying the stencil directly, this time to a tote bag. I used adhesive spray to cover the stencil’s reverse side so the stencil would lie flat and evenly on the fabric and so no paint would slip under the stencil’s edges.
I then decided to try something differentcoloring in both the stencil’s cut-out areas and its covering areas.
First, I again used adhesive spray to keep the stencil firmly stuck to my tote bag’s reverse side.
Next, I used a ballpoint pen to trace the outlines of the cut-out holes.
The tracing worked well, so I now had a clear design I could use fabric markers to color in.
I started by coloring in the areas the stencil would’ve covered if I’d done the stenciling directly.
Next, I colored in the areas that would’ve been painted if I’d done the stenciling directly.
The coloring took a while, but I found it quite relaxing.

My next idea  was to use fabric-spray paints on the stencil.
I alighted on the solution of adding another layer, again using the stencil but using it combined with some simple circular shapes I’d cut from an old plastic table mat.
By placing the self-cut round shapes over the stencil, I was able to both use the stencil’s pattern and create circular prints.
This was the final result:
Of course, the reverse side of the second tote bag also required some color.
This time, wanting to test the stencil’s stamping potential, I used fabric paint to cover the stencil.
Then i turned the stencil over and pressed it on to the tote bag.
Next, I  brought a darker and more opaque paint into the game, applying black paint to the stencil and then ‘stamping’ another layer on to the tote bag.
I choose two fabric markers – the colors were grass green and turquoise – and started coloring in the design I’d stenciled:
For my next project, I used Mary Beth Shaw’s Dart Board stencil and three paint applicators: fabric-spray paints, a paintbrush and paint, and fabric markers.
The first step was to place the stencil loosely on a white T-shirt and repeatedly spray over it.
I used the ‘stamping’ technique again, spraying the stencil all over and pressing it face down on to the T-shirt:
I used adhesive spray to cover the stencil’s reverse side so the stencil would stick to the fabric.
I then used the paintbrush to apply the paint:
On the T-shirt’s reverse side, I applied much less paint to each dart board design, spraying only a thin mist of it over the stencil. I then used a fabric marker to color in sections of the stenciled dart boards.
Now let’s have a look at the final results, for the T-shirt’s front side …
… and reverse side …
I had a lot of fun working on these projects!
We can apply stencils in so many ways – actually, in limitless ways – and we always get some surprises when we lift the stencil and see the design we’ve created. I can’t wait to keep fabric stenciling!
Enjoy your own fabric-stenciling!
Margot Krekeler
blogger and non-fiction author

fabric painting - relax creatively!


Friday, December 4, 2015

Guest Designer Jackie P Neal: Art Tote Tutorial!

Hello everyone! My name is Jackie P Neal,
and I am honored as well as Way excited to be a guest designer here on StencilGirl Talk!
For those of you who know me, you know how I love to up-cycle,
recycle, reuse and give new life to"the less than desirable".

When I was asked to be a guest, of course I had to go check my stash aka hoard!
Instead of something from my there, I remembered that I had wanted to re-do my art tote!
and so it began...
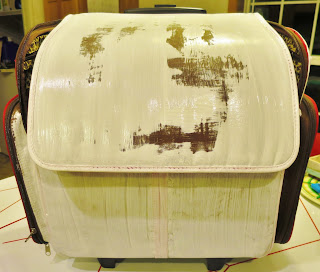
As you can see, my art traveling bag, needed help straight  from the beginning.
When you get something at a good price, you don't always get it in your favorite colors!


Straightaway, cover the whole bag in white gesso:


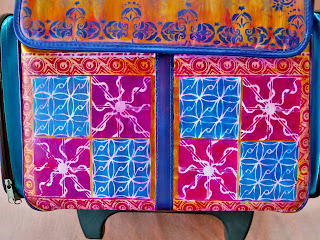
Next, my place of attack was the front bottom section.
Using Maria McGuire's Doodle It Bigger Stencil, I masked off two favorite squares.
  I stenciled these squares and then reversed the order and stenciled again.
  In the white space that was left, I used a portion of Laurie Mika's Pilgrimage To India Stencil. 
This stencil has four unique borders, so I cut it into four pieces to make it easier to use on my project.

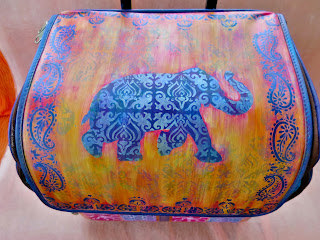
Next came the top portion. 
The Elephant Parade Stencil by Natalie Kalbach was stenciled in the center of the bag.
 And then the stencil part was added using Dazzling Metallics paints to make it stand out.


Next, I faintly stenciled the Elephant Parade around the center elephant,
as though parading across the bag.


Pilgrimage To India was used again, this time the paisley border, on both sides. 


On the bottom what I did was to use one portion of the Pilgrimage To India  stencil, the border with the stars on it, on its edge...

Then flipped the stencil upside down...

and made the stencil appear to be connected into another design.

For the sides, I thought I would be clever and insert this mat to give shape to the pocket
for stenciling (note to oneself, stenciling works better without the mat.)

Here I used the Elephant Parade stencil and the paisley border stencil. What I did was stencil some paisleys under the mask and then change the position and stencil again with this border all the way down the inside of the elephant mask.


My finished Upcycled Art Supply tote-
  Have Art Supplies- Will Travel!


​​


Thank you so much StencilGirl, for inviting me and thank you readers for joining me here today! Hope to see you again soon! 
Jackie ")


Jackie P Neal is a self taught mixed media artist who lives in upstate New York,
on their farmette, with her husband and Golden Retriever. 
Jackie gleans her inspiration from the nature that surrounds her
as well as artists across the internet and around the world.
Her favorites are texture and colors and she loves to try every and any technique.
You can find Jackie on her blog:
As well as on FaceBook
and feel free to join Jackie in her Google+ Community