Showing posts with label earrings. Show all posts

Monday, June 8, 2020

Modern Leather Earrings Embellished with StencilGirl® Stencil Designs


Oh hey my friends are you ready to make some modern leather earrings using StencilGirl® stencils?  I'm Debi Adams and I've been having an absolute blast over in my little craft workshop working up these cute little accessories. It hasn't been that difficult for me to find things to do while being quarantined.  The introvert in me enjoys being told to stay inside, although I will admit, this length of time has been a bit confining.  What about you?  Hard stuff for sure.  Anyway, I'm always on the look out, whether physically shopping or online "researching", for the latest trends. I follow a lot of unique, style-setting leaders on instagram in all areas of designs, not just art.  As my new Columnist title states, I'm officially on the "trendsetter" trail.  From home decor to wedding florals, watercoloring to macrame, I try and open myself up to a bit of each. It is often reflected in my art and sometimes, not so much, but it never goes away void.   Having four grown daughters who continually keep me updated is definitely a perk.   What I have observed is that much of what is being created today is very organic, simple and geometric in design.  When I decided to make these earrings I kept those ideas in mind and lucky for me, my girls loved them!  Though these may not be your look, it is starting place and yet another idea for ways to extend the use of your stencils.   


 It doesn't take a lot of supplies to create these. I bought a package of leather pieces. You can get them from a leather supplier or even at your local hobby store. Although I recommend using leather paint (very reasonably priced btw) on leather for pliability, these earrings are not being used as clothing so chalk paint or acrylic paint will work fine too. Grab some thin permanent pens for mark making. I got a 24 kt. gold metallic pen too. I would seal it all with a leather sealer when finished.


 This little punch tool is a gem.  You can purchase it online. It has an interchangeable tip for different sizes of holes. It's called a Hole Punch Drill.  It slices through leather like butter, perfect for earring making.


As for the circles, you can get some specialty leather scissors and cut your own shapes or you can use steel rule die-cuts, which is what I used here.  I did see some plain shapes, pre-cut at a popular craft store in the jewelry-making section, so there's that. :) Also, you will need whatever earring base you like, studs or hoops, and if choosing the latter,  jump rings and a jump ring tool. 


And lastly, don't forget your favorite stencils.  Although all will work, I found the ones with smaller details were the best.  I used Mary C. Nasser's Mixup stencil, Mary Beth Shaw's ATC Mixup #1 and Seth Apter's Mixup #2.  Most of the Mixups are perfect! 


 I traced some of the images onto the leather first but feel free to start stenciling anyway you want once you have painted your base.  Tip: The paint dries very fast on leather.
Here you can see where I used Mary C. Nasser's stencil. I traced the design then painted in the image. 


And here is how my earrings shaped up.    


Love this color combo.  Totally in.  I used Seth's stencil here. 


Although I didn't do it on these, you can add additional pieces of embellished leather onto your earrings to  make a layering of sorts.  Love that tulip flower on Mary Beth's stencil. 


Of course, you can make a necklace instead of earrings or you can create an entire collection.  It's all up to you.  Feel free to add more and layer it up like you do with any mixed media piece. I cannot wait to see what you create! 


Happy you stopped by.  Hoping you learned something new.  

XO,

Debi Adams
debi-adams.com
debi_adams-instagram
Debi Adams-Facebook
Debi Adams-Pinterest

Tuesday, August 27, 2019

Faux-Leather Stenciled Jewelry by Linda!


Jewelry made from StencilGirl® designs? And embossed onto painted a Lutradur surface that looks surprisingly like leather? Yes and Yes!

While rummaging in an old box of unfinished art quilts, I stumbled upon pieces of a half-finished project made with painted Lutradur and Tyvek. About five years ago, I had a vision of using strips of black and white harlequin painted Lutradur along the edges of my painted Tyvek design. The project never quite worked out, so I decided to try stenciling over the Lutradur to see what would happen. It had been years since I worked with Lutradur, a non-woven fabric that is often used in furniture construction and has been embraced by crafters.

Using a Versamark stamp pad through a stencil, the embossing powder looked perfect before heating.
The beauty of Lutradur is that it takes paint well, is lightweight, and can be easily stitched through by hand or machine. The downside is that it melts and becomes lace-like when you use a heat gun or blow dryer on it. My first attempt, on the partially painted harlequin design was a fail: the Lutradur melted away in the unpainted section and stayed put on the black painted areas.

Once I blasted the design with a heat gun, the unpainted (white) Lutradur melted. The areas painted with black gesso, however, were perfectly intact.
So, I decided to paint the whole strip of Lutradur, and covered it generously with Golden's black gesso. When dry, I tested various favorite StencilGirl® stencils using a variety of embossing powders. The fiber had more weight with the addition of the black gesso, and the paint prevented the Lutradur from melting when I heated the embossing powder. Gold, pale blue, and white looked great against the black. It looked surprisingly like black leather, but since Lutradur is vegan, lighter weight, and less expensive than leather, it was a win/win.


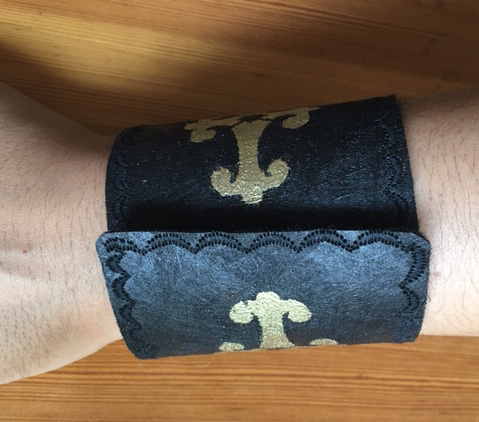
I set about stenciling some of my favorite StencilGirl® design on the black strips of painted Lutradur. I had a vision of making a cuff bracelet. I combined one of Jill McDowell's circular Japanese-inspired Crest stencils with a cross from Laurie Milka's Pilgrimage to the Renaissance.


After the stenciling was done, using a rotary cutter, I cut the design to the length I wanted for a cuff.

The painted Lutradur was a little scratchy, so I also cut some black felt (to use as a lining) to the same size. After some deliberation, I selected a decorative stitch on my sewing machine and carefully stitched along all edges.


The finished, stitched cuff.
I needed a closure of some kind, and decided to use Velcro. I carefully lined up three pieces of the Velcro on each end of the cuff.


The finished cuff is easy to put on and take off with the Velcro closure.
I was pretty excited about the success of the cuff bracelet, so I decided to make more jewelry. (It was kind of addictive!)

I used another one of Jill's Crest medallions for a pendant. I made two, and glued them together with Golden heavy gel gloss. I used Jill's full 2.5" circle as a template, traced around it with a pencil, and cut each shape so they would match perfectly. A small hole was punched with an awl, and a small jewelry ring inserted through the hole. I hung it from a piece of black cording that I found at my local bead store.


Clips held the two sides together while the glue dried. Be sure to cover the edges with waxed paper or parchment paper so the clip doesn't stick to the surface.
Some of my favorite India-inspired shapes from Gwen Lafluer's Not Afraid to Try design became earrings, as well as one of the shapes from Laurie Milka's Pilgrimage to the Renaissance.


Each earring shape was carefully cut out with small, sharp scissors.
I used a piece of wood behind the stenciled Lutradur to avoid poking holes in my worktable.
Two sets of the finished earrings.
I decided to make a more delicate, feminine cuff with a floral shape using pale blue embossing powder. I chose a section of Laurie Milka's Pilgrimage to Mexico. I tried adding white dots to the edges but they smeared so I used only the blue area. After trimming away the excess, I cut a piece of black felt for a lining, and used a machine stitched floral design along the edges. Again, I used Velcro for the closure.


Last, I took some triangular shapes from Laurie Milka's Pilgrimage to India, cut them carefully, and attached them to wide black grosgrain ribbon with Golden heavy gel gloss and brass brads.


Each diamond was backed with black felt.


Here are all of the embossed design that I experimented with. A few of the embossed shapes are being saved for future projects.
 

Finally, here's the finished collection of my handmade, faux-leather jewelry, ready to be worn.


Tips:
* Lutradur is fibrous, so if it is humid, extra embossing powder can stick where you don't want it. The excess powder can be brushed away with a fine paintbrush before heating. 

* Any extra embossed powder that ends up in the wrong place can be covered over with a black sharpie. 

* It doesn't really matter if your embossing powder isn't perfect; the edges are going to be trimmed away so only the center of the design shows.


Stencils used:
Laurie Milka, Pilgrimage to Mexico 
Laurie Milka, Pilgrimage to India
Laurie Milka, Pilgrimage to the Renaissance 
Gwen Lafluer, Not Afraid to Try
Jill McDowell, Crests

Monday, April 9, 2018

StencilGuts are ON SALE right now - ONLY while supplies last!

StencilGuts are ON SALE from now, April 9th until they sell out.

First come, first served!

Your freaky fun StencilGuts choices:

Flourishes  SOLD OUT
Cats Rabbits SOLD OUT
Hands  SOLD OUT


Most stencil companies discard the parts that fall out of the mylar when stencils and masks are cut.

Mary Beth could never discard anything so beset with possibilities!


Our CreativeTeam used them and you can too!


On a mixed media canvas as Tina Walker made:


To create a mixed media project on a wood substrate as Debi Adams used StencilGuts:


You can nest StencilGuts within your art journal:


Torrie Gass of Fox and Hazel writes: "Inspired by the bird illustration at the bottom of this page, I used these fun little bird StencilGuts to create two new & fun elements in my art journal. On the left page I used the little birds as masks and stenciled some bird images, then drew over them with a fine black pen. On the right, I decided to paint some of the birds with a paint pen, then stitch them onto my page as an embellishment. I love the extra texture the stitched birds add, and these StencilGuts can be used in so many more ways!"


Uh oh!


These art journals better not get together. Belen's Art & Whimsy StencilGut cats look PAWsitively curious!


You can use StencilGuts to make earrings with tassels like Louise Nelson did:


You can make an embellished bookmark out of StencilGuts and some scrap collage paper:


You can use them to get silly with greeting cards like Carol Baxter did:


You could use guts on an art tag, on a box, as the base for a necklace focal, or even pour-on the embossing powder and make elements to use in your art later.


Your absolutely cool StencilGuts choices - available until we sell out:


StencilGuts trivia: One of Mary Beth's students, Anne Holliday, gets the credit for the name.

More creativity with StencilGuts:


As components of a necklace
Painted on the covers of an art journal
Within the pages of an art journal
Covered with washi tape
Collaged on a book cover