Sunday, November 28, 2021

SAVE 25% or more on StencilGirl Stencils Nov. 28 through 30, 2021

We don’t want you to miss out on StencilGirl's ONLY STENCIL SALE in 2021. 

Now is your chance to save 25% (or more) on the best Designed by Artists for Artists stencils! 

NO DISCOUNT CODE IS NECESSARY 

now through November 30th!

SHOP & SAVE


PLUS! If you buy 6 stencils of the same size StencilGirl’s 10% everyday discount is automatically applied to those stencils. This discount is taken before your 25% off.

The best part: FREEBIES!

  • $100+ the Exclusive 4-Pattern Stencil by Mary Beth Shaw
  • $300+ a StencilGirl Studio class by Mary Beth Shaw & the exclusive stencil

SAVE 25% or more SHOP NOW

Please note: 

  • Freebies are calculated after the discounts are applied. 
  • Sorry, the International shipping fee does not apply toward the $100.
  • 25% off does not apply to wholesale orders or StencilClub subscriptions.
  • StencilClub loyalty coupon does not apply during the sale.
  • Sale does not apply to wholesale-priced orders.

The sale begins Sunday, November 28th. You can take advantage of the colossal stencil savings until Tuesday, December 1, 2021, at 11:59 p.m. CST.


25% OFF STENCILS 

Shipping
StencilGirl has speedy (not to mention handsome and lovely) shipping elves so please, double-check your order.

Changes to Your Order
If you need to make a change to your order email carol@stencilgirlproducts.com and we'll do our best to handle the update. All changes to orders will be addressed the week of Dec 6th. Thank you for understanding.

Postage
  • USA: $50+ orders (after discounts) ship FREE, otherwise $5
  • Canadian postage: $8
  • International postage: $12. 
International shipping may take longer than usual to go through the United States Postal System and that of the destination country. Australia & New Zealand customers, please see our FAQ page (towards the bottom).

SHOP the Best Stencil SALE


Friday, November 26, 2021

CJS22 is all about Creating Connections!

Five weeks to a creative habit for 2022.

Feel like tapping your creative side but judging, time constraints, and over-thinking are getting in the way of your sparkle?

Whether you’re just getting started in the mixed media world or are a mixed media veteran, CJS is a magical and interactive experience created just for you.

Early birds get the BEST DEAL of $45 on November 29th. SIGN UP HERE.


Creative JumpStart was created by Nathalie Kalbach for hobbyists and artists alike to learn from the most amazing teachers and take action to achieve their creative goals.

Whether you’re just getting started in the mixed media world or are a mixed media veteran, CJS is a magical and interactive experience created just for you. 

You can expect to:
  • Connect with others
  • Be challenged on your journey
  • Take action on your goals
  • Get the support you need from the most wonderful mixed media artists around
  • Discover how your artmaking creates connections with people, places, and things
  • Understand how you connect with certain materials
  • Gain access to a plethora of artistic techniques to learn and get better at them
Remember, early birds get the BEST DEAL on November 29th although there are other deals to be had right up through December 31.

November 30 - December 3rd - Cyber Week Sale $55

December 4-31st- Early Bird Pricing $69

January 1st- Regular Price $79

"I love the concise nature of CJS videos, especially at the beginning of the year," Mary Beth says. "For me, that is the perfect time when I need a wee jumpstart." 


You are sure to be inspired by the range of tips and projects as you move forward with mixed media art.

Even though Mary Beth is teaching she is also a CJS student each year. She says, "The videos energize me to get in the studio and play."


Build layers in a delicate way with patterns, tone on tone, and adding a grunge factor during Mary Beth's class, Between the Pages. 


Learn even more from the best of the best!

No doubt you'll recognize Carolyn, Gwen, Kristin, Marsha, Martice, Nancy, Nathalie, Rae, Seth, and Tina from the StencilGir®l family.


JUMPSTART YOUR CREATIVITY!


Thursday, November 25, 2021

Happy Thanksgiving from StencilGirl!

Happy Thanksgiving from all of us at StencilGirl!
We are so grateful for YOU!

Wednesday, November 24, 2021

Mary Beth Shaw's VLOG: November 2021

StencilGirl® Products' BIGGEST sale of the year is November 28-30,
and Mary Beth is sharing some of her favorite StencilGirl® stencils:
Wonky Eyes by Carolyn Dube
Metro Map by Mary C. Nasser
Love Story by Cathy Nichols 
We hope you enjoyed this episode of Mary Beth's VLOG!

Stay tuned!
Mary Beth Shaw will be back again next month with another new VLOG post!

Tuesday, November 23, 2021

Piano Hinge Book with Kirsten Varga


Hi!  Kirsten with you today.

I hope you have taken the Layers of Stencils: Opposites Really Do Attract class by Mary Beth because it is inspiring and the results are beautiful! You only use two colors of paint (complementary colors) to create a range of hues that make the layers you create with stencils dynamic and interesting. 


I found it very satisfying to create a beautiful range of colors that worked so well together just by using two complementary colors. To me, the resulting decorative papers were the perfect start for another handmade book.


Piano Hinge is not a binding I usually make but when I was rummaging through my studio and found a package of small wooden dowels I knew I needed to shake things up. I added a simple weave to the top and bottom of my books to give the binding permanence but you can leave that off so you can have the freedom to change out the pages.


This binding can be used to make books of all sizes and I don't know about you but I love an easy way to make a chunky book.


Check out the video below to see the process!


Thanks for stopping by the StencilGirl® blog and I hope you have a creative day!

Kirsten

You can find me on Instagram


StencilGirl® Stencils used:


Spoked Wheels Collage Mask by Jennifer Evans - S709


Color Gradient Swatch Wheel Stencil by Rae Missigman - S838


Pixels by Rae Missigman - S509

Other supplies:

9"x12" 140lb Watercolor Paper
Acrylic Paint 
Gesso
Thin Wooden Dowels
Scissors
Paper cutter
Bone Folder
Pencil
Matte Medium
String
Wire Snips


Monday, November 22, 2021

Watercolor Scarabs by Kate Yetter


Hello! Kate here today and I am excited to share with you a project that challenged me. I am one of those artists that gets bored rather quickly. I know I am not the only one, right? I am a creative, always in need of something to create but once boredom hits, I need to switch creative outlets. Hence I have an entire craft room filled to the brim of various materials that I have dabbled in. 

Recently, after 12 years, I decided to pick up watercolor again. It has been quite the challenge and I almost gave up. It is harder than I remembered and has made me question whether or not I ever had control of the medium. Not only is controlling the paint a challenge but the various topics require different techniques. I am finding that this medium could potentially cure my boredom. All I need to do is change the topic of focus.


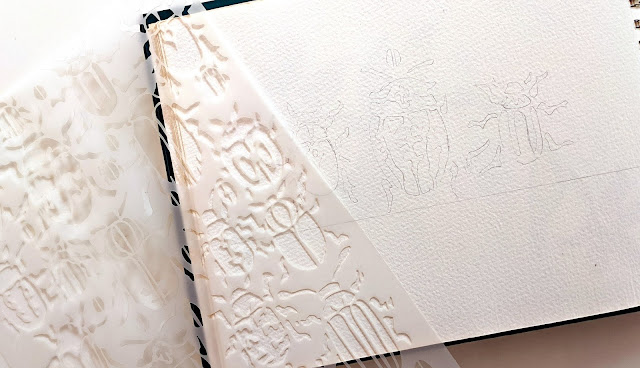
Lately, I have been inspired by all the watercolorist out there that focus on botanicals. When I saw these Scarab Beetles, I knew I wanted to try them in watercolor.


I started out by measuring and tracing my stenciled images onto watercolor paper.


As you can see, I tried a dry-on-dry technique. The result: there isn't much depth. I was very disappointed with the outcome.


Here is a close-up. Unfortunately, the colors didn't blend smoothly. Needing more instruction, I went online and watched several video on YouTube. I learned that wet-on-wet is the desired technique for beetles.

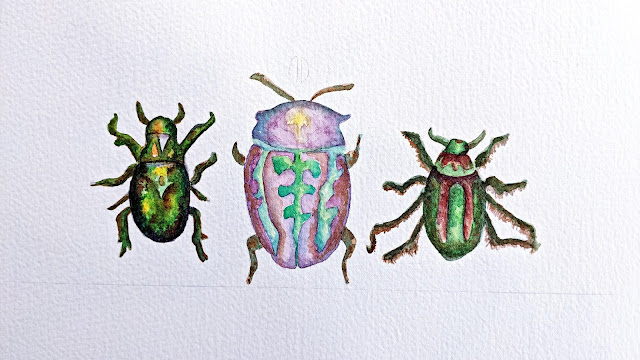
Here is my second attempt using wet-on-wet.


I was much more pleased with the outcome. The colors are more vibrant, smoothly blended and there is a sense of dimension. But it still seemed boring. Since this particular species of beetles originates in Egypt, I thought the Egyptian Hieroglyphics stencil would be the perfect background. I have a love of Ancient Egyptian art so this theme was perfect for me.


Lastly, I added gold accents to the beetles with a POSCA paint pen and painted the hieroglyphics with Kurtake gold watercolor paint. I am pleased with the outcome and plan on framing it.


I love the versatility of stencils and that they can be used with any paint medium.
Thanks for joining me today.

Until Next Time,

Saturday, November 20, 2021

It's nearly time for the biggest, best, and our only Stencil Sale of the Year!


You may begin filling your cart now :)

Thanks for loving stencils like we love stencils!


Friday, November 19, 2021

Kecia Deveney: Two Wrapping Paper Tutorials with StencilGirl® Products!

Hi, everyone! Kecia Deveney here!
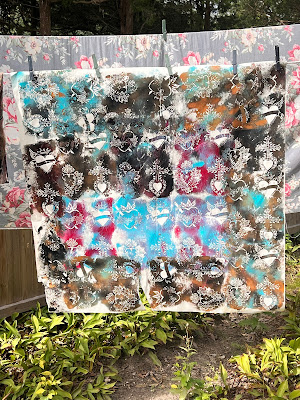
If you are like me, I never seem to have wrapping paper around when I need it. I didn’t have the time to run to the store, so I decided to see what I had on hand and make my own. I got out my stencils, ink sprays and spray paints and some paper. I did a little experimenting as well to see what I liked the best as the end result.

I used two types of paper; brown craft paper (Walmart) and packing paper (Home Depot). I found that the spray paint works really good on the craft paper and packing paper. The ink sprays worked best on the packing paper, although the paper is very thin and the ink can be a tad saturated and wet. But this is a good option because for spray paints, you want to do them outside with good ventilation and wearing a mask and gloves.

Stencils used:

I’d recommended that you do this project in advance of using it as wrapping paper since you do want to let it dry. After I sprayed my papers, I hung them on my clothes line to dry out. The packing paper will dry fast. This will also help remove that spray paint odor.  I also ironed my packing paper when it was dry.

Of course you can make papers like this as well to use in your mixed media art or journaling/collage.

I also made my own ribbon with torn scraps of muslin fabric that I scrunched up and ink sprayed. When they dried (also clip to clothes line), I ironed them and then did some marking making with a black sharpie in spots that I felt needed some interest. You can also mark make on your papers in the same fashion.

Thanks for joining me on StencilGirl® Talk today!
Kecia Deveney
https://www.instagram.com/keciadeveney/

Tuesday, November 16, 2021

Make Your Own Artful Stationery


Hello everyone! I'm so glad to be back with another Creative Team post here on StencilTalk!

We have so many ways to communicate with one another these days and the old-fashioned method of regular mail seems to be forgotten. I mean, I get more junk mail in my mailbox than I do anything I'd actually want to open!

But I am pretty proactive, whenever I can be, to create mail art so that someone somewhere will receive something special in the mail. I've also swapped a lot of art, whether that be postcards or ATCs. This is the kind of happy mail that gets me excited about going to the mailbox!

So when Carol, our Creative Team Director, offered to send me some SrencilGirl® stencils that I could use to create journaling lines or blocks in my art journal, I was immediately inspired to create handmade stationery. I will be using the stationery I create here to write actual letters! I will also scan some of my creations so that I can have them printed out and use them to write with abandon!

Sometimes though, if I'm sending a postcard or an ATC, I like to write a little note to send along with it, and this same process can be used to create notecards or smaller pieces of stationery as well.
Here are the stencils I used:

Journal Notes Stencil by Pam Carriker


Tall Flowers Stencil by Margaret Peot

Other Supplies:
  • Japanese Calligraphy Paper from Daiso
  • Gelli Arts gel printing plate
  • Brayer
  • Cleaning paper (to clean off brayer while printing)
  • Paints (in order of appearance...somewhat:)
    • Paper Artsy Fresco Finish Acrylic - Globe Thistle
    • Charvin Acrylic - Saffron
    • Golden Fluid Acrylic - Green Gold
    • DecoArt Americana Acrylic - Warm White
    • Liquitex Acrylic Gouache - Bright Aqua Green
    • Golden Fluid Acrylic - Quinacridone Magenta
    • Lukas Acrylic - Fluorescent Magenta
    • Liquitex Soft Body Acrylic - Phthalocyanine Blue (Green Shade)
    • Golden Fluid Acrylic - Hansa Yellow Medium
    • DecoArt Americana Acrylic - Baby Pink
    • Blick Matte Acrylic - Blue Violet Light
    • Golden Fluid Acrylic - Quinacridone Nickel Azo Gold
    • Holbein Acrylic - Luminous Rose
    • Liquitex Soft Body Acrylic - Light Pink
    • Golden Heavy Body Acrylic - Phthalo Green Light
    • Holdbein Acrylic - Manganese Blue Nova
    • Golden Heavy Body Acrylic - Iridescent Gold (Fine)
    • Golden Fluid Acrylic - Titan Buff
    • Liquitex Soft Body Acrylic - Indanthrene Blue
    • Paper Artsy Fresco Finish - Nougat
  • Sponge or brush applicator for stenciling
  • Posca Paint Pen in White (fine nib)
  • Graphite pencil (4B)
  • Scissors
  • Standard Legal envelopes
  • Acrylic Inks
    • Raler Downey - Fluorescent Pink & Pearlescent Waterfall Green
    • Liquitex - Yellow Medium Azo
I hope you enjoy watching the process of creating my stationery in this video! I'd love to see what you make if you end up creating your own stationery this way, so if you post, please tag me! I'm @juicy.s.art on Instagram. XOXO, Sarah


Hi I'm Sarah and Juicy*S is my DJ name. I'm not a DJ. I would love to be a DJ. It's one of my fantasy dream jobs, really. I got this name when my sister, my friend, and I were slinging paint and working in our art journals, drinking wine, and keeping track of the funny things we were saying on a "sign-in" sheet...just craziness. We all ended up with a DJ name that day. I started my first art blog with this name, and I've had it ever since.

I have found that being creative, that making stuff, is a very fulfilling and beneficial activity for me. Creative play, and art journaling in particular, has become my self-care practice. It's so exciting for me to share what I'm excited about, and helping others find their own creative practice is one of my goals in life!

You can find me on Instagram @juicy.s.art and my website is: Juicy*S Art
I also have a YouTube Channel and an Etsy Shop.


Monday, November 15, 2021

Stenciling and Stitching on Cabinet Cards

Stenciling and Stitching on Cabinet Cards


As the name of my business implies, I am wildly attracted to Ephemera. 

e·phem·er·a

/əˈfem(ə)rə/ noun - things that exist or are used or enjoyed for only a short time."There were papers, letters, old boxes—all sorts of ephemera"


I chose it as the name of my shop/studio as almost every supply list for art workshops in mixed media I attended had it listed. When visitors come in the shop and ask what it is, I tell them it is items of memorabilia, typically written or printed, originally expected to have a short life, but salvaged and savored by artists in collage. 


When I see stacks of cabinet cards or other old photos in flea markets or garage sales, I feel compelled to rescue them. Although their highest and best use is to be with their family, I rationalize that, when separated from their loved ones or relatives, being in art is better than being in a landfill. I hope they feel the same way. 


We have been stitching quite a bit in the studio lately and someone sent a remarkable “Pin” related to stitching on Cabinet Cards. I dove down that rabbit hole and quickly made a Pinterest Board of my favorites before giving it a spin, myself. And, I added the twist of using stencils with my beloved Daniel Smith Gold Gesso to add a pattern to stitch upon. When stitching through something painted, I always go for non-sticky paint or gesso. 


Here are some things I learned:

  1. I used painters/light masking tape to try and mask the faces on one card. Unfortunately, when I removed it, it took up the delicate photo. After that, I relied upon visuals to avoid stenciling where I wanted no paint and just tacked the top of the stencil to the top of the card. I could have also carefully placed a piece of paper atop parts to keep paint free, sandwiched between the stencil and surface.
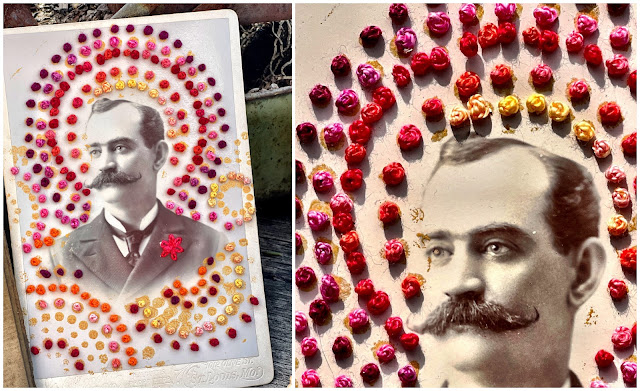
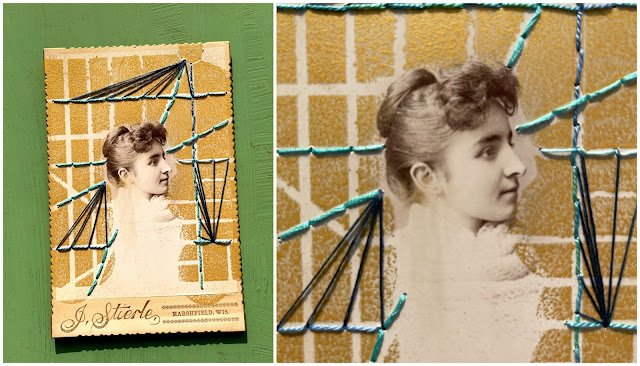
  2. Not having the flexibility of the fabric to stitch on, straight up/down stitches worked the best like Running Stitch, Backstitch, and Straight Stitch. Also, stitches that sit on top of the card like French knots and Lazy Daisys worked well.,
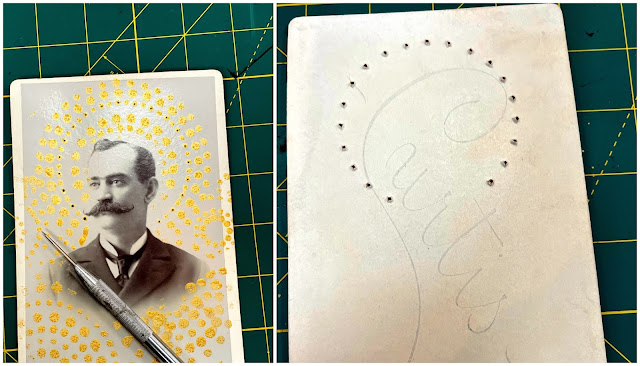
  3. I used an awl and metal ruler to mark my stitch holes on straight lines so that my stitch lengths were consistent. I was extremely careful near the edges of the cards so as not to create a hole on the side. 
  4. The stencils proved to be a great guide as you will see. Although I stayed to more geometric shapes, to begin with, I can now imagine using all kinds of shapes and adapting my stitching to them. 
  5. I used a variety of threads to stitch with including 6-strand embroidery floss and Perle cotton. As the hole you create with the awl is larger than one would usually make in fabric with a needle, use a thick enough thread so your knot won't slip back through it. 


My first go was with this pretty lady where I experimented with a flower in her hair and gussied up her necklace with French Knots. 

Then, I got more adventurous. Out came the Gesso and Stencils. 


I didn't realize it until I started writing and looked up the stencils I used, but both came from StencilClub of which I've been a member for years. The circles on the left were designed by June Pfaff Daley for the June 2021 StencilClub, and the one on the right was in the March 2021 Mary Nasser & Mary Beth Shaw Mash-up - Love those two!


Using an awl and cutting mat I punched through the card where I wanted to place a stitch. 


Mr. Moustachio was begging for tons of French Knots and a dapper flower on his lapel.


This sweet young woman looked a little lost so I gave her a map with lines in Backstitch and long straight stitches 


This project brought back warm memories of the Stitching Cards my mom got for me at Woolworths. Have a great time and if you try it, let me know. I think I am going to get even more adventurous in my next rounds!

Happy Stitching!

Kristin