Showing posts with label Kristie Taylor. Show all posts

Thursday, July 7, 2022

Creating Collage Paper Quilts with StencilGirl® Stencils

Hi, everyone! Jennifer Wilkin Penick here! I have always loved the look of quilts, so it shouldn't be a surprise that as a collage and mixed-media artist, I finally thought of making paper collage quilts. It then took just one more step for me to realize that using stencils with a gel plate could create the most wonderful fabric-like papers to use in my paper quilts.

I'm going to walk you through all the steps of making some gorgeous paper quilts, using "paper fabric" made with StencilGirl® stencils.

Step 1: Gather your materials:
gel printing plate
StencilGirl® stencils
acrylic paint
scissors
glue
optional templates (download here)

Step 2: Print your "paper "fabric". 
I like to use a variety of patterns -- some with big patterns and some smaller ones, that replicate the kinds of fabrics that I may choose if making an actual quilt. You will have fun choosing these or other similar StencilGirl® stencils that make an array of different "paper fabric" that is pleasing to you.

I have used the following six StencilGirl® stencils (you can see the names indicated in the photo, too):
Doodle It Tornado Bloom Stencil
Tapestry
Mermaid Scales
Fishscale Brick Stencil
Stockinette Small Pattern
Lila Stencil

The following photos show how I first print a solid color using my gel plate and then the results of making 4 different prints with each stencil using a second color of acrylic paint on top of the first printing. 

If you are new to gel plate printing with stencils, you can also check out this video to see me printing some papers using these same StencilGirl® stencils. Actually, even if you are NOT new to gel plate printing, you may find my simple two-step printing process interesting to check out. 

Step 3. Assemble your quilt
Now it all comes together, and I will use some gorgeous papers that I have made to assemble my collage paper quilt. To help you get started, I have provided a simple quilt block template in two sizes. 


You can use a large piece of paper and have your quilt block repeat several times (for stunning effect!) or you can start out by making maybe four or six and gluing them into your sketchbook or piece of paper. 

In the three photos below, you first see the result of me using my template to cut out the quilt pieces from my lovely stash of new stencil-printed papers. In the second photo you see me laying out the pieces into a pattern of repeating quilt blocks, and in the last photo you see the pieces glued down into the final collage paper quilt.

Since sometimes a picture is worth a thousand words, but a video tutorial is worth even more, you can see me putting a paper quilt all together in this video:
I hope that you try this tutorial and have fun either using the templates that I have provided OR making up your own quilt block pattern. If you've admired quilts before, you know that they can be made using many (many!) different patterns, and many of these are quite simple to replicate. 

Last of all, please consider sharing your collage paper quilt artwork on social media. On Instagram you can tag both @stencilgirl_products and @jenniferwilkinpenick so that I can see them. 

Thanks for your time,
Jennifer 

Jennifer Wilkin Penick is a practicing collage and mixed media artist. She teaches art for children and adults at her home studio located in a renovated 18th-century carriage house in the Georgetown neighborhood of Washington, DC. She also teaches at the Arlington Arts Center in nearby Virginia, and is an artist-in-residence at the Medstar Georgetown University Hospital in Washington DC.

Friday, September 10, 2021

Frieda Oxenham: Art Journaling with StencilGirl® Stencils

I started this month’s project with 6 A4 (or American letter size if you prefer) paper, a selection of colours of acrylic paints that I really did not like, together with black and white paint, and 4 stencils that I had not used much (judging by the lack of paint on them). The stencils were: the large stencil from the October 2020 StencilClub stencil set, Forest Floor, the large stencil from the June 2018 StencilClub and the large stencil from the March 2021 Club set. And I also used a gelli plate, sized 8 x 10”. All this just to wake up to what I am. Because that is the next line in Ben Okri’s poem that I continue to illustrate: “Wake up to what you are”. For me adding an image of Frida Kahlo to the mix suited the words considering my own name. Frida used to spell her name with the additional e too but dropped it during the First World War

Here is the tutorial:

1.      Add a variety of paint colours to your plate using a brayer and take prints on your 6 pages. Add more paint when needed.

2.      When the pages are dry, again brayer on paint and then put one of the stencils mentioned above on the gelli plate and take whole or partial prints. Just keep adding the layers on those 6 sheets.

3.      Repeat step 2 but this time only using white paint on your plate.

4.      Repeat step 2 but using black paint and Mixed Media Mail stencil.

5.      Use the large stencil from the November 2020 StencilGirl® Club to spray some vintage book pages with a selection of Lindy’s Starburst Sprays or any other sparkly spray paint of your choice. 

6.      Collect all the materials made in the previous steps and collage two facing 8 x 11.5” pages by tearing the collage materials with a ruler (I used the Tim Holtz’s one) and adhering them with a glue stick.

7.      Using some of the paint colours from step 1, lightly add paint to the edges of the papers. I used a baby wipe and a small brush as well as my fingers.

8.      Spray with some of the sprays from step 5.

9.      When dry, rub watered down white gesso over both pages with a sponge

10.  Drip down fluid pink acrylic paint randomly.

11.  Using the medium stencil from the August 2018 StencilGirl® Club, mark out the pieces onto the back of wallpaper samples (mine came from the Designers Guild Coromandel range). Cut them out and arrange them on the pages as shown. Glue on.

12.  Using dark blue paint and the large stencil from the September 2013 StencilGirl® Club, add the Frida Kahlo head as shown.

13.  Glue on the postage stamp (from Mexico) and the cut from magazines words of the Ben Okri quotation. Outline as desired. I used permanent white markers and Stabilo Woody.

14.  Spray on some sparkly spray paint (I used Perfect Pearls Mist Forever Blue) through the small stencil from the January 2020 StencilGirl® Club.

15.  Edge the pages with a permanent inkpad.

© Frieda Oxenham 2021. To see more of Frieda's work, please visit her BLOG.

Monday, May 17, 2021

Coming out of a Rut


Does the phrase, “the cobbler’s children have no shoes” ring a bell with you? That is my jam these days. Owning an art supply shop and workshop studio one would think I would be smart enough to carve out time to play every day. 

Nope.

For the past couple of months, most of my creative time and energy have been focused on getting ready for our fourth granddaughter! Lorelei arrived May 3rd and, as I have done for her three cousins, I knit her a baby blanket and created wall art for her nursery. Well, I am finishing up art for her nursery as I have a few final touches to go. 

Apparently, I cast on a gazillion rows on this blanket as it has taken me months to knit! I am also a pretty lazy knitter so don’t look too closely. My philosophy is it will be covered in spit-up so it’s OK.


To get me going and motivate me to create for fun, I took on a StencilClub Party Call to spur me along. And, since opening back up the shop (YIPPPEEEEEE!!) I have so many new supplies to experiment with, what else, Stencils! I pulled out Kristie's Mumzie Flower, Talavera, Anemone Coronoria, and, of course, Baby Angel Wings and got going! 

My “comfort food” for crafting/making art is card making. I tell everyone my “gateway drug” into this world was a passion for rubber stamps starting over 25 years ago. I have always and still love making and sending handmade cards. When I find myself in a rut, like now, it is an easy default to grab a stack of black cards and start gluing paper, spraying, stamping, painting, and, of course, stenciling, and not worrying about the outcome.

Watercolors through a stencil.

The April StencilClub Party Call was in honor of sweet, talented Kristie Taylor who we lost to Covid earlier this year. She created beautiful stencil designs for StencilGirl Products, and we were to incorporate them using the theme Angel Wings in our swap. 

Bundles of cards wrapped up and ready to mail. 

I ended up playing with Seth Apter’s Aladine Izink Pearly, ICE, and Spray as well as Dina Wakley's Gloss Sprays and Marabu Acrylic Sprays. I also used watercolors and Pixie Spray to secure the stencil, one of my favorite techniques. And, I was anxious to try the new Domed Applicator Ranger came out with so I did with Paper Artsy paints. Oh! and I also played with the Paper Artsy Infusions. All got a big thumb's up!


So much fun! There was not a card I was unhappy with when I was done. And, I pulled out some of those rubber stamps and that was like coming home!
Paper Artsy Infusions through a stencil then spritzed with water.

We are all coming out of a rut. I needed a nudge and the Party Call was the answer to get me doing something just for fun. Thanks, Lisa Dobry for all your hard work keeping us in line! Of course, I was late mailing my to my two swap buddies, but Lisa waved her magic want and granted me a reprieve!

Izink ICE and Pearly through a stencil.

I hope you have a wonderfully creative time making cards the next time you need a kick in the pants!

Oxoxox

Kristin 

One last watercolor as I adore this technique!


Friday, May 14, 2021

Frieda Oxenham: Art Journaling with StencilGirl® Stencils

The future is beginning to look a bit more hopeful now that vaccinations are well on their way and the weather is improving here in the Northern hemisphere. We can begin to dream of summer outings and meeting friends. Coincidentally we have reached the following words in the poem by Ben Okri: “The wise say life is a dream; and soon the dream is done”. But I hope that instead our dreams will linger, so have made this a hopeful spread, colour and image wise.

For this set of pages I wanted to start with a collage, mainly because I had so much material lying around. I have been using my gelli plate a lot for #the100dayproject. As I hate to waste anything I also managed to add paint to deli and copy paper as well as on the gessoed canvas pieces that were my ultimate goal. So I grabbed a handful of those accidentally produced papers to start these two pages with. Of course I used a lot of StencilGirl® stencils during the gelli plate printing process. I can’t remember all but the main ones were Looping Leafy Vines, Trillium Pattern and Circles Circles. I also added some printed tissue paper.

Here is the tutorial:

1.      Cover your pages (mine are 8 x 11.5) with torn pieces of the above mentioned materials using soft matte get, a brush and a credit card (to even out any ripples).

2.      Spray on blue sparkly turquoise paint (I used Lindy’s Starburst one) through stencil Crackle.

3.      Using a gelli plate add Deconstructed Floral Bouquet on top add a variety of acrylic inks on top using a brush to gently move the inks around. Take prints leaving the stencil in place.

4.      Using the same stencil as in step 3 stencil more flowers on top of the previous layer using various colours of acrylic paint, with a cosmetic wedge.

5.      Add vintage postcard to the right hand page, adding a vintage edge to the card with a stamp pad first. Use double sided tape to adhere.

6.      Stencil on birds as shown using the large stencil from the February 2021 StencilClub set, using Titanium White acrylic paint and a cosmetic wedge.

7.      Colour in the birds. I used Jane Davenport Mermaid watercolour markers. Outline them with a permanent black marker.

8.      Glue on postage stamps, text of the Ben Okri poem, and more collage material as used in step 1 (I used copy paper that was gelli plate printed using Looping Leafy Vines).

9.      Soften the edges of the collaged pieces with watered down paint, in a colour matching the background.

10.  Spray on gold paint through Deconstructed Floral Bouquet. (I used Perfect Pearl Mist Sunflower). 

11.  Outline the collaged leave shapes with a white marker and the postage stamps with a black pencil.

12.  Edge the pages with a stamp pad. I used Distress Ink Walnut Stain.

© Frieda Oxenham 2021. To see more of Frieda's work, please visit her BLOG.

Monday, May 10, 2021

Creating a Zine with StencilGirl® Stencils by Marsha Valk


Hi there! It's Marsha here today with a new column!

When you read this, I will be a couple of days away from finishing my '100 day project'.

#The100DayProject is a global art project. Every year, thousands of people all around the world commit to 100 days of creating. Anyone can participate. The idea is to pick something creative, work on it every day for 100 days and share your progress online.

I did not make a big deal out of starting. I did not announce it on social media, and I did not use the hashtag. I did one week of testing on a couple of my close friends, and then I just started posting.

What did I start posting? Little one minute Instagram TV videos of my daily life. I call them 'mini vlogs'.


Remember what people shared on Instagram when the platform just started? That's the best way I can think of to describe it. It's like old school Instagram: all the things I like, plus snippets of my daily life, however, in video format.

I did not think I would be able to keep it up. However, I did! Now, it wasn't always easy. There was one week where I barely left the house because I had so much work to do. And on other days, I felt I had walked around the same block for the seventieth time.

The mini vlogs did motivate me to keep going outside and to keep looking for things to capture. From the middle of winter all the way through spring. Around the neighbourhood. Around the city. On bike rides. In the woods.


I documented lots of things I had never noticed before. Small things. Like the way the sun sets outside my studio window. Or all the birds that like to hang out in the tree in the front yard.

And, I learned a lot about the history of the city I live in.


I'm sure my mini vlogs would have looked totally different if we had not been in lockdown for nearly all of the 100 days. On the other hand: maybe I would have been way too busy to take on a project like this if it hadn't been for the lockdown.

Anyway. What does all of this have to do with art or printmaking, you ask?

I don't know yet. However, I know it will have an effect. Or maybe it already has. Because this is the longest time in years, I haven't travelled, visited other cities, visited museums, or saw family and friends. I haven't read much in the past three months. I haven't watched a lot of films or TV either. I was just concentrating on my work and making the mini vlogs.


It's amusing to me to hear from viewers that they enjoy watching them so much. Because to me, what stands out is the lockdown routine: coffee, work, a walk, more work, dinner and then maybe some more work or a Zoom event or watching something short on YouTube.

So that's what I decided to document in a zine—my current daily routine. Watch the video to see me create the tiny booklet with the help of all the stencils in my stash that I felt needed a little love. Perhaps I can inspire you to make one too!


Enjoy your day! Until next time!

Marsha Valk

StencilGirl® stencils used:

ATC Mixup #1 Art Marks by Rae Missigman
 

Spoked Wheels Collage by Jennifer Evans

Signals by Nathalie Kalbach

Planner Words 4 by Mary Beth Shaw

Planner Spiral Notes 4 by Mary Beth Shaw

Exploded Fan by Mary Beth Shaw


ATC Mixup by Mary C. Nasser

Impressionist Water Lily Background by Margaret Peot

New Orleans 4 by Nathalie Kalbach


Noodles by Daniella Woolf

Moroccan Doily Stencil by Maria McGuire

ATC Mixup #2 Botanical by Rae Missigman

Trapezoid Squared by Mary Beth Shaw


Tapestry by Kristie Taylor


Thursday, April 29, 2021

Guest Designer Anouk Karssen (Creanouk): Intuitive Art Journal Page

Hello you beautiful artist!

One thing I love about art journaling is that it can be very intuitive. It took me a lot of time to let my inner perfectionist go and to create without thinking too much about the result. Today I'm going to show you step by step how I made this intuitive art journal page. You can use this as an inspiration, a guideline, or as a tutorial. It’s up to you! If you decide to play along with me, grab a nice cup of tea, play your favorite song, meditate for a little bit and try to keep an open mind. Let your hands tell you what to do instead of your head because that's when the magic happens!

Using collage is one of my favorite ways to start an art journal page. Tearing and gluing stuff down can feel so satisfying don't you think? It's also great to add texture and layering to your page. For this page, I collaged old book papers with washi tape and some tea bag scraps that were laying around on my desk.

While I was working on the collage I got the idea to make a layer of modeling paste with the Tapestry stencil by Kristie Taylor that I would paint over with acrylics once it dried. I definitely prefer doing to technique with watercolor, but since I'm working on craft paper I decided to do it with acrylics.

This is what I mean by working with your hands instead of your head. My head told me that I should do this on mixed media or watercolor paper. But my hands already applied the modeling paste. No turning back here.

To paint over the pattern with any type of paint, your modeling paste has to be completely dry. Just leave it be for a while or use a heat gun to speed up the process.  Always clean your stencil asap when you are using modeling paste, it dries faster on your stencil than on your page and your stencil will become less usable over time. 

For my first layer of paint, I mixed some Amsterdam Naphthol Red Deep acrylic with a little bit of white gesso for a more transparent and matt look. If this was a pre-planned page I probably would have done this step first. But since I’m following my intuition, mixing your gesso with paint is a great way to prime and adding color at the same time.

In this stage I don't wait for my paint to dry, I like how they blend when they are still a bit wet. I find painting backgrounds very relaxing so I just keep adding tiny bits to the page with Naples Yellow Red Light and Venetian Rose until I’m happy. Sometimes I use a baby wipe to blend in the colors a little bit more and to remove paint on places that I used too much. If your modeling paste pattern is under too much paint you can also use a baby wipe to dab it away.

As you can see I like to work in layers and layers. Especially layers of paint. So for my third layer of paint, I patched up some areas that didn't blend well for my linking with White, Naples Yellow Red, and Naples Yellow Red Light.


I think hidden journaling is such a lovely element in a journal background. Especially when it's all messy and scribbled. Sometimes I use my art journal as my diary and I just write and write until my page is all covered in words. Then I like to paint over it a little bit just so the words are still peeking through. When I was working on this page I was listening to a song that kept repeating the same words. So I wrote it down with a pencil in an almost vintage kind of handwriting.

My obsession with using teabags in my art is real! I just love how it gives your page so much texture and how it blends everything together.


While the tea bags are still wet from the glue I splashed down some gold ink and let everything dry for a little bit.

If you want to you can leave it like this. But I was feeling a little brave when I made this and I stepped out of my comfort zone. Normally I would just add some marks with a black pen, but the Repetition Stencil by Rae Missigman was winking at me on my desk, so I just went for it!


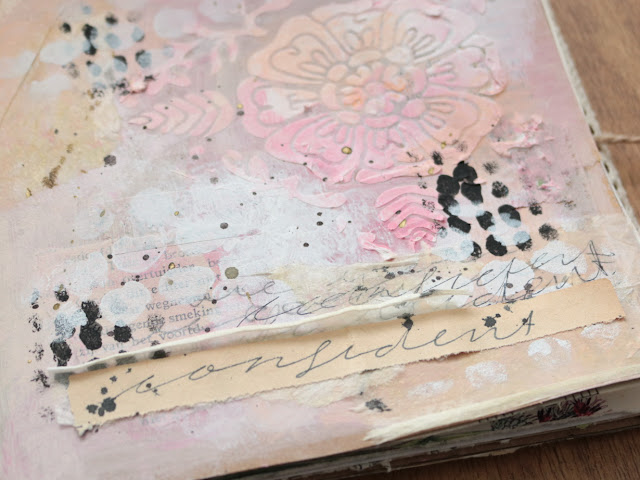
I probably should have gone for a Naples Yellow Red instead of black, because after I applied it my immediate thoughts were: “Where is my white paint? I need to make it soft again.” Your hands are not always right, I can tell you that!  But as I said before: this is where the magic happens! Because after I applied my white paint through the  Interesting Dots stencil by Jennifer Evans everything came together so beautifully.

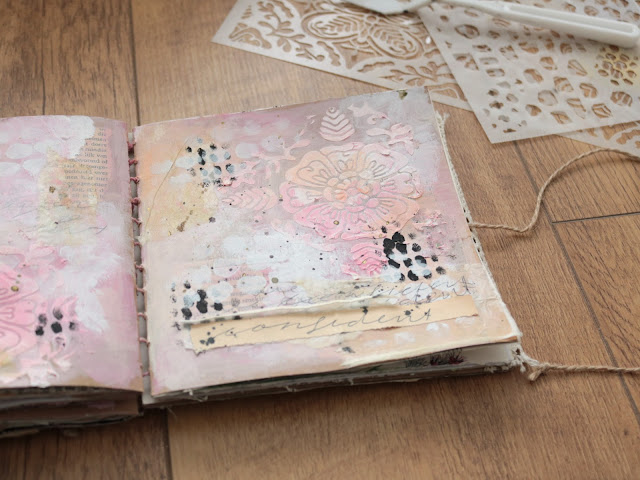
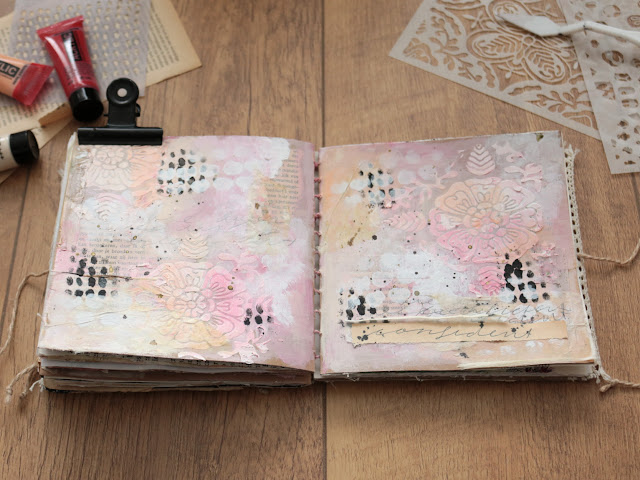
I finished this page off with some black ink splatters and glued down the word confident with a little tea bag underneath.

I chose the word confident because I wanted to remind you to be confident in your art. Just have fun and enjoy the process. Be confident! You can do it!

My name is Anouk, Creanouk on Instagram, and I’m so excited to be back on the blog today. I hope you enjoyed this step by step tutorial and that I’ve inspired you to get creative today.