Showing posts with label beads. Show all posts

Monday, January 21, 2019

Stenciled and Collaged Art Cards with Beads and Fabric


Hi all, it's Gwen back with my quarterly column on using your stencils with paint and textural elements.

This month I decided to go somewhat small and a bit simpler (for me... ha!) with what I like to call an Art Card. I began making small collages on 5" x 7" playing cards a few years ago and I really love them as a format - it's big enough that you can experiment and add plenty of detail, but small enough that it doesn't take forever to complete a project.


Here's the Art Card that I made to share this month and of course there's a tutorial down below.
To make this card, I started by taking a 5" x 7" playing card (although you could obviously use any substrate with this same process) and lightly sanded it to give it some tooth, then coated the background with a layer of background paint. (Essentially colored gesso, but you could use any gesso or even craft paint for this step.)

When the base layer was dry, I coated that with a layer of crackle medium - I like the Americana Weathered Wood crackle from Decorart - it gives you a really nice wood grain pattern (it will also craze in the direction of your brush strokes - something to keep in mind as you apply it to the background.)

When the crackle medium was completely dry I added a layer of paint - I used Toffee from Seth Apter and PaperArtsy and let that dry, crackle, and generally do its thing.


While my background was drying, I went through my stash of collage papers and pulled out a few that I wanted to use - this included some blockprinted and painted collage papers (with stenciling, of course!) When the paint was dry, I tore these into strips and collaged them on with matte medium. When that was done I set the background aside.

Next, I went to work creating my focal image. I took out my Boho Birds stencil and stenciled one of the birds onto a sheet of painted collage paper using black StazOn ink. (I use this because it won't smudge on the non-porous acrylic surface.)

I took a needle and thread and a variety of blue seed beads and started stitching around the outline of my bird, adding beads here and there as I went (I didn't do a solid beaded outline, just enough to add some variety.) I love to use thread and beads as different and interesting ways to add texture to my work.

I added a few vinyl disk beads for the eye and secured them with a French knot that also doubled as the pupil.


When the beading / stitching was complete, I cut out the embellished bird and adhered it onto my background with some Tacky Glue.

I also cut a few embroidered floral elements out of some embellished fabric that I have in my stash - this is another material that I love for getting different types of texture into my work. I glued those on with the Tacky Glue and then ran my Sepia and black Archival ink pads over the surface to take away some of the brightness so they would fit better with the overall feel of the piece.

(I'm frequently asked how I adhere fabric in my collage pieces - I treat it like paper. I use glue or matte / gel medium, and the type that I use depends on how heavy or embellished the fabric is. I'll most frequently adhere it with matte medium, exactly like the rest of my collage papers. This had a lot of embroidery, however, so I went a little more heavy duty on the glue.)

I like to add a bit of shading when I include dimensional elements like this, and my favorite way to do that is with a Stabilo All pencil that I then blend out with a water brush.

With the collage part done, it was time to add some finishing touches. I used the Text and Texture Discovery stencil by Seth Apter to add a title, then outlined with a gold gel pen.

To enhance the contrast and give a bit more shading, I took some Graphite texture paste and added it around some of the dimensional elements.

While the texture paste was still wet, I sprinkled on some Rocky Road Baked Texture embossing powder - another fabulous way to add more layers of texture into your work.

I used my heat gun and melted the embossing powder while the texture paste was still wet - this is one of my favorite techniques as it bubbles the acrylic medium and adds yet more texture to your piece.

VoilĂ ! The finished Art Card!

I hope you enjoyed today's tutorial and picked up a few new ideas for bringing texture into your work - maybe even using some different supplies and materials to do it. If you try this yourself, make sure to link me up so I can see.

Until next time, happy stenciling!
Gwen

Monday, March 19, 2018

Gwen's Gems - Use a Stencil for a Wire Jig Pattern

Hi all, it's Gwen with the March edition of Gwen's Gems! This month I decided to tackle an idea that's been kicking around in the back of my head for quite a while - using a stencil to make a pattern for wire jewelry. Intrigued? I hope so! Here's the pendant that I made with my pattern, and then below is a quick tutorial to show you how it all came together.


About two years ago I took a class at my local bead shop to learn how to make wire-wrapped pendants. I loved it - it's fun and a lot easier than it looks! I've played with the concept on and off since then, and a few months ago I had an idea for a necklace that required a wire jig so I picked one up. As I worked on that piece, it occurred to me that I could probably use a stencil to make a pattern, and I just couldn't get that thought out of my head... I had to give it a try!

Of course, the first shape I wanted to try was a peacock feather, so I used my Ornamental Peacock Feathers stencil to create the pattern. To do this, I laid the stencil over the jig and then inserted the metal pegs into the stencil openings (I secured them on the bottom as well with the little plastic tubes that come with the jig,) and played with how they were laid out until I was happy with the arrangement.


Once I had the positioning down, I took some 20 gauge gold-colored wire and cut a long length (about 18-20,") then started shaping it around the pegs. (I like 20 gauge for this because it's thick enough to hold its shape but not too thick to be workable. I've found that 24 gauge is definitely too thin; 22 gauge could work depending on how soft the wire is.) I used my fingers and pliers to do the shaping - nylon jawed pliers are especially helpful to keep from marking the wire as you work.

I started with just the basic feather shape, leaving the cross pieces to do separately. When I had it shaped, I pulled it off the jig and added some small Christmas beads (African trade beads) into the very center section to jazz it up a bit.

Once the small beads were in place, I used 24 gauge wire and wrapped it, securing the loose end of my feather shape to keep the beads in place. I decided to go with bronze colored wire for a bit of visual interest. I also strung a few more beads on another piece of wire and attached it by wrapping the end so that it would hang down into the center opening of my feather.

I wanted a few more decorative touches, so I used more of the 24 gauge wire in a few places around the feather and wrapped it.


I used these flat blade pliers to tighten up my wrapping - I learned about these in my class and they're incredibly helpful!

For the cross pieces of the feather, I went back and shaped the wires on the jig, then pulled them off and molded them just a bit and wrapped with more 24 gauge wire to secure the loose ends. Then I took another small length to attach each one onto the main feather (you can also see where I added a small wooden bead in between - it's ornamental and functional at the same time since it helps keep the two cross pieces separate.) I went for a kind of rustic look, crossing the wire back and forth so that the wrapping would be secure and a little decorative at the same time. You can see at the very tip where I left the end visible - you want to make sure to do that so that you can hook your pendant onto the chain of your necklace.


Voila! A fun and unique beaded wire pendant made using a stencil for the pattern. It takes a little practice to get used to working with the wire, but I love the effect you get as it all starts to come together. I just added some beads, chains, and metal findings to turn it into a complete necklace and now it's ready to wear!


That's it for this month... I hope you enjoyed this month's project as much as I enjoyed making it! Have you ever used a stencil as a pattern for your own wire jewelry? I'd love to see!

Until next time, happy stenciling!
Gwen


Monday, February 19, 2018

Gwen's Gems: Glam up your Grunge!

Hi all, it's Gwen back again with this month's edition of Gwen's Gems! Usually when I go to start work on the project for each month's post, I have some general idea of what I want to do - a piece of inspiration, a project type... something. This month? Zilch. Nada. Nothing. So what do I do when that happens? In this case I grabbed a canvas - 12" x 24" x 1" and just started collaging and painting and following my instincts to see where they would take me. Not too far into it, I started to have a vision of where I thought I would go. The canvas, however, had other ideas. Fortunately I listened and just went along with what it was telling me, because I really like the results!

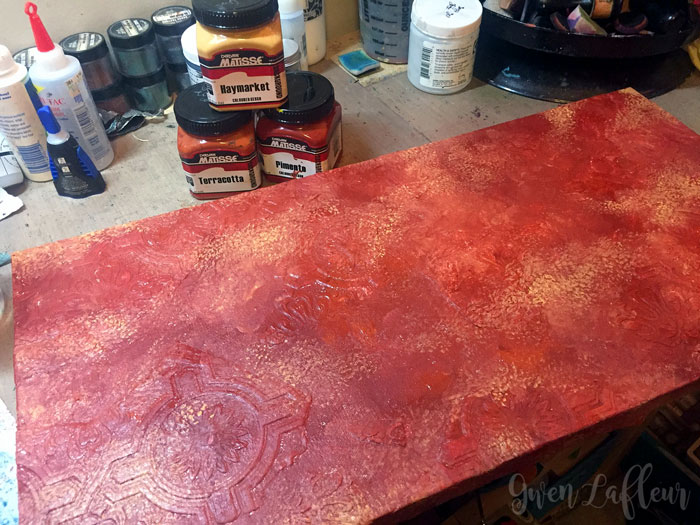
I took some photos of my progress along the way so that you can see how the whole thing evolved from start to finish.

To begin with, I took my canvas and pulled out some paintable textured wallpaper and a few colors of Matisse background paints (basically colored gesso,) and since at this point I had no idea what I where I was going to go next, I just collaged on torn scraps of the wallpaper and then painted over top, blending as I went.


Still unsure of where things were going, I decided to add more texture by stenciling and then heat embossing some words and marks. I used the Unfinished stencil by Seth Apter (his designs are in my pile of go-to stencils whenever I want to add texture and / or text,) and stenciled with embossing ink and then heat embossed with Patina Oxide Baked Texture embossing powder.


From there I decided to collage some papers in place to start creating a foundation for the focal point of the piece... whatever that ended up being. I pulled some of my hand-printed and painted papers out of my file and just started arranging and gluing them down with gel medium. There's stenciling all over these - here you can see my Art Deco Sun Medallion stencil and my Art Deco Sunburst Background stencil along with some hints of the 4x4 from the May 2016 StencilClub kit by Terri Stegmiller, as well as the 9x12 from the January 2014 collection by Jessica Sporn.


Next I thought it would be cool to use some textured acrylic skins. I created a solid clear skin first - working on a silicon mat makes it really easy, then I stenciled on top with texture paste. In this case I used some gold embossing paste from Ranger / Wendy Vecchi and some light molding paste. I didn't know exactly what I was going to do with them - just vague ideas, so I made a variety with my Decorative 6-Petal Flower Stencil and Screen, my Decorative Medallion stencil, and my Ornamental Peacock Feathers stencil.


When the texture paste was dry, I thought it would be good to add in some color. A lot of my work lately has ended up really dark and grungy, so I wanted to mix it up a bit! (You saw the finished piece... the canvas had other thoughts on this matter!) To do that, I got out some Pebeo paints - Vitrail and Moon, in shades of red, orange, turquoise, and green. I just painted those on and then outlined them with a Pebeo relief paste. (Just FYI, these types of glass paints also make fabulous skins on their own, without the texture paste or acrylic skin base!)


I left those to dry overnight and then came back and peeled them off (cutting between sections,) and voila! Textured stained glass skins! I used some gloss medium to start adding these onto the canvas.


It was bright and colorful for a few minutes there, until my instincts were telling me to pull out the paints and start integrating them more into the background. So that's what I did next.

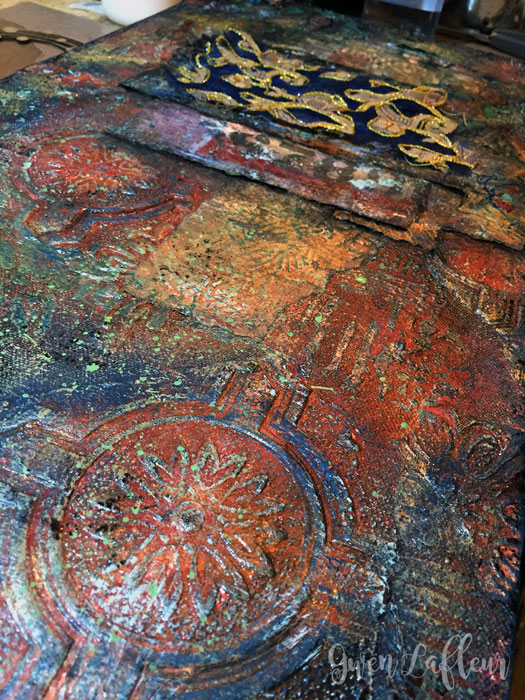
I kept adding layers of paint until I was happy with the depth I was starting to see - you can get a good sense of how that was looking from this close-up:


I added a bit more paint - mostly dry brushing along the tops of the textured areas, and also a brown glaze to add even more depth.


At this point I really felt like I needed to do something that would extend the linear direction of my collaged section in some way, but I didn't want to do that with actual lines or more collage of any type, so I auditioned a few stencils and ended up using Seth's Techno Insiders Circle Stencil along with more gold texture paste to make it more of a cruciform arrangement. Of course, I couldn't resist adding a little rhinestone into the center of each one... I need at least a little bling!


You may also see some new colors showing up above; I had walked away from this piece for several hours and then came back determined to bring in some color somehow. I looked at it, and the canvas said to me, "add pink." Whaaaat? Don't get me wrong... pink is a lovely color. I just don't really use it all that often. But the canvas (aka my gut) had spoken, so I added some pink-ish paints and brought in more with the sequins on one of the embellished sari scraps that I was layering on top for more texture, color, and a fair amount of glam.

I set the piece out of the way on the floor to dry and switched over to work on something else, but as I kept glancing over at it, I felt like those linear lines I'd created with the circles needed to be reinforced even more somehow, and then it came to me... paint splatters! I grabbed my Fineliner bottle with gold paint in it, got down on the floor, and started adding drips and splats all over the the area where I felt it needed it. I was super happy with the results. (It was also a lot of fun.)


Of course, when that was dry, I felt like there needed to be more variety in the size of the circles - they were a bit too uniform and it felt too abrupt going from the collaged area to the smaller circles - it needed to step down more gradually. So after thinking for a moment, I pulled out my Decorative medallion stencil, centered it over top of one of the stenciled circles, and then carefully added more texture paste, matching it up with the existing lines so that it looked like it was all one design.

While that was drying, I started collecting elements to use for my focal point - this is when you can really start to bring that glam to your grunge! Since I was apparently using pink, I pulled out some flowers that I'd made from glass and pink gemstone beads mixed with metal findings and assembled with wire. I also took a Spellbinders diecut frame and a chipboard frame from my stash and painted them both to look like rusted metal, then added some pink glitter glue to the chipboard frame. I found a decorative metal circle, aged it with alcohol inks and Staz-On inks, then glued a piece of mica to the back of the center hole followed by a tiny vintage photo. I was ready to assemble!


I layered all of the pieces over the background and glued them in place with E-6000, then left it to dry overnight.

With that, I was finished! This was absolutely not the bright and colorful piece I'd been planning to make, but I was happy that I followed my instincts and ended up with something totally unexpected and yet completely right. And of course, I still have plenty of glam layered over all that grunge!

Here are a few close-up photos so that you can better see some of the details of the finished piece: 


That's it for now... I hope you enjoyed this month's project! If you try making your own stenciled skins at home, I'd love to see how you use them!

Until next time, happy stenciling!
Gwen

Monday, December 19, 2016

Gwen's Gems - Stenciled Mixed Media Door Signs

Hi Everyone! It's Gwen back again with the December edition of Gwen's Gems! This month I was back to playing with stencils and cardboard as I made a fun personalized sign to go on the door of my studio.


I love the idea of a personalized piece of art that I can hang - you could customize the shapes, colors, and embellishments to do something for holidays, for childrens' rooms, even to designate a guest restroom!

If you're interested in making your own mixed media door sign, here's a little overview of how this one came together.

First, I took cardboard from a package that came in the mail and cut it into circles. I used my Curvy Cutter (very old scrapbooking tool) to cut the top layer of the circles, and then I finished cutting through with a sharp x-acto knife. I knew that I wanted a layered design, so I cut several different sizes.

When the circles were cut, I used stencils with molding paste to add dimensional designs to each circle. For the largest one I used Crop Circles by Mary Beth Shaw, for the medium one I used my Decorative Medallion stencil, and for the smallest I used the 6x6 from the March 2016 StencilClub collection by Suzi Dennis.


Once all of the molding paste had dried, I painted over top. For the large one I used Dina Wakley's Umber, then I used her Gilt (gold) paint or a combination of the two for the others. I also cut 4 isosceles triangles that were going to turn it into kind of a compass shape and gesso'd those.

Next up, I started embellishing. I used Glossy Accents and micro beads in the openings of the stencil design on the large circle, then edged it with some gold plastic bead trim.


I went back in with Gilt paint and a small paintbrush and painted the raised areas from the stenciled design so that they would show through a bit more.

That done, I attached some gold bead trim to the underside of the circle - this gives a nice embellishment, and also covers up the raw edge of the cardboard. I also decided that you couldn't see the microbeads well enough for those to be the only beads, so I used polymer medium and pearl beads and sprinkled some on top in the open areas.


While that was drying, I took the medium circle and coated the edge in white glue, then dipped it in embossing powder. I used my finger to rub some umber paint over the raised areas of the design and then set it aside to let the glue dry. (I also painted the triangles gold and did the same thing to the edges of those.) When the glue was pretty much dry, I used my heat gun to melt all the embossing powder. This gives it sort of a soldered look, and at the same time it covers up those raw cardboard edges.

Once everything was dry, I started assembly. First I put the triangles in place in the north, south, east, and west locations on the circle, using a small piece of cardboard underneath to prop them up to the height of the beads so that they would glue down flat and sturdy.


Next I glued the medium circle on top, then put another small piece of cardboard in the middle before gluing down the small circle. Finally, for the part that makes it a room sign, I just wanted my initial in the middle. As a former (and maybe once again future) scrapbooker, I have a TON of these alphabets in my stash, so I took one in a fun font and painted the surface gold, then went over it with gold glitter glue and stuck it in the very middle.

Finally, once all of the glue was dry, I flipped the whole thing over and added a picture hanger Command Strip to the back so I could hang it on my door without having to put in any nails (this also makes it easy to swap out different designs if I want.)


Voila! It's ready to hang!


A closer view...


I like the final project even better than I thought I would! I may have to go and make some seasonal versions of this, just for fun, or just label all the doors in my house!


That's it for this month's post, I hope you enjoyed it! Have you ever used your stencils to make a door sign or a door hanger? We'd love to see it!

Until next time, happy stenciling!
Gwen