Showing posts with label peacock. Show all posts

Sunday, July 18, 2021

Printmaking with Stencils


Hello all! It's Gwen back again with another project tutorial focusing on paint and texture. This month I wanted to share a quick and easy way to create a layered mixed media piece by doing some printmaking with several of my stencil designs and a gelatin plate.

Printmaking with Stencils - Mixed Media Project - Gwen Lafleur

To start, I took a piece of 9" x 9" watercolor paper (140lb / 300 gsm) and covered the background with two colors of PaperArtsy Fresco Acrylic Paint (Twilight and Azure,) let it dry, and then stenciled layered patterns from three of my stencils using ink and a blender brush. 

I started with my Collage Textures & Patterns - Medieval Cyrillic stencil (with Cobalt Archival Ink,) then added sections of one of the designs from my Art Deco Borders stencil (Sepia Archival Ink,) and in the top layer I repeated my Suzani Circle Flowers stencil (Jet Black Archival Ink.) 

I was just looking for layers of pattern to create a sense of texture since this was just going to be the background and a lot would get covered up. 

Printmaking with Stencils - Tutorial Step 1 - Gwen Lafleur

Now for the printmaking part... you can do this with a stencil, but for the effect I wanted on this piece I chose to use a mask (you paint or ink around the design rather than through it.) 

I pulled out my Ornamental Peacock mask and positioned it where I wanted the shape to show up on my piece and then used my brayer to coat an 8" round gelatin plate with paint (I used PaperArtsy Fresco Acrylic Paint in Truffle.) I left one of the acetate sheets on the plate to use as kind of a stamp mount for printing.

Printmaking with Stencils - Tutorial Step 2 - Gwen Lafleur

With the paint still wet I quickly but carefully flipped the gelatin plate upside down (holding the acetate as much as possible to keep my fingers out of the paint,) and laid it down over my mask centered on the page. I rubbed firmly all over to make sure the plate completely printed before carefully peeling it back off.

Printmaking with Stencils - Tutorial Step 3 - Gwen Lafleur

I stamped the gelatin plate again on a piece of black cardstock (why waste the paint?) and got a bit of a peacock design that I can use later in another piece and then lifted my peacock mask off of the background. (If you do that quickly enough and the paint is still wet, you can print that too.)

If you have any details that didn't completely print (like the wing on my peacock,) you can always replace the mask and go back over the details with more paint and a stencil brush or sponge.

Printmaking with Stencils - Tutorial Step 3A - Gwen Lafleur

When my print was dry, I pulled out my Chinese Garden Buddha stencil, my Palmistry Hand stencil, and the 4" x 4" from my February 2021 StencilClub Feathered Tribe set and added some marks onto the printed circle.

Printmaking with Stencils - Tutorial Step 4 - Gwen Lafleur

For the final details I took one of the designs from my EGL-10 stamp set from PaperArtsy (I call this my Japanese Patterns set,) and stamped a bit of a cruciform pattern to fill in and anchor the design and then used a pen and colored pencil to outline and add a few more details. 

Last but not least, I edged the borders with brown and black ink to frame and finish the piece. 

Printmaking with Stencils - Tutorial Step 5 - Gwen Lafleur

I really love the deceptive simplicity of this project - it's quick and easy, but the layers and details made with a few basic tools and supplies make it look a lot more complicated than it actually is... one of my favorite types of projects!

Printmaking with Stencils - Mixed Media Project Closeup - Gwen Lafleur

Here's another peek at the finished project... you could follow the same process on a canvas or panel, in an art journal, or even on a handmade card or tag just using different sizes of gelatin plates and masks. 

Printmaking with Stencils - Mixed Media Project - Gwen Lafleur

Hopefully you enjoyed today's project and tutorial as much as I did! And if you try this yourself, make sure to link me up so I can see how it turns out.

Until next time, happy stenciling!
Photo of Gwen Lafleur


Tuesday, July 10, 2018

Honoring Mother Nature (including video tutorial!) by Cheetarah Cheda


Hi everyone! It's Cheetarah here and I'm so excited to share with you my first post ever for StencilGirl® Talk as part of the creative team! This month we let ourselves be inspired by a theme which is "In honor of" and I have made a watercolor Art Journal page inspired by Mother Nature and honoring her. We as women can have a really strong connection to mother nature, the moon phases and all that comes with it. When we honor our goddess within that connects to it all, we serve mother nature as well. This sentiment has inspired me to make the above art journal page and I have recorded it for your viewing pleasure! 

It's about 20 minutes long and sped up (but you can adjust the speed at the settings) and I'm showing you the process of this page. So get a drink/snack and watch the tutorial at your leisure :)


Most of my art journals are intuitive, so there was no real plan in the beginning. I was mostly experimenting and all I knew was that I wanted to use the gorgeous Celestial Grove Stencil and waterproof inks mixed with watercolor and create some kind of forest setting for my goddess. I have to tell you, and you will see this in the video, I really struggled with the leaves to get them just right! Perhaps it's because I used the gorgeous Art Deco Peacock Feather as a leaf base and I just kept thinking "but this is a feather! not leaf!" LOL! But it was also good to push yourself to use the stencils in other ways than designed for, right? In the end I did get the leaves to look the way I wanted! Though - and oops here-  I forgot to press record when I added finishing touches on the page - but no worries, in the video I explain what I have done to get to the end result. And if you have any questions on the process or materials I used, feel absolutely free to ask, here or on YT  and I'll do my best to answer them.

Here are a couple of process shots for you:


The waterproof ink seeped through my stencil, but that just gives it a lush forest look and the whimsy of nature! The Magical shaker colors are super saturated colors so a little goes a long way to make the colors just pop! 


After I traced the feminine images from the Sacred Feminine stencil with the waterproof ink in my Pilot Parallell pen, I then added a light layer of grey waterproof ink mixed with a bit of water. The sheer effect you get is just awesome!


Added some white highlights/accents with a gel pen. 


In the end I added bolder accents with a semi waterproof black lettering marker (the Saruka pigment marker- semi waterproof because when it's wet you can move it a little bit with water. When dried it's completely waterproof.) and the Jane Davenport white paint over pen. 


Did the same for the lettering in the sentiment and added little highlight dots with the sakura gelly roll white gel pen. 


After trimming the piece I used double sided tape to adhere it in my mixed media letter sized art journal. This picture was made during sunset and somehow the color variation and shimmer at the bottom just popped in that light :) In the video you can see the shimmer and under layers a lot better. 

The StencilGirl® Stencils I used: 
Celestial Grove Stencil
Celestial Grove by Kae Pea

Sacred Feminine Stencil by Carol Wiebe
Sacred Feminine by Carol Wiebe

Art Deco Peacock Feathers Stencil by Gwen Lafleur
Art Deco Peacock Feather by Gwen LaFleur

Other materials I used: 

The watercolors were decanted in pans, which you will see in the video. The distress ink and blending tool I used to edge the piece after trimming so it blended the stark white edges to a softer grey. Oh, and on top is the Tombow eraser which I erased the pencil sketch lines with. 


Thanks so much for stopping by today! I hope you liked watching the process of this art journal page. Have a wonderful creative day and catch you on the next blog post!


Wednesday, March 21, 2018

Stencil in springtime with new stencils from Cathy Taylor and Gwen Lafleur

Plum blossoms and stylized peackock feathers, a paint tin and flower stamens - these new stencils by Cathy Taylor and Gwen Lafleur herald springtime.

Paint Tin and Butterflies stencil by Cathy Taylor illustrates butterflies taking their colors from tins of paint. This design would be lovely gracing the cover of an art journal or as the focal point of a piece of mixed media artwork, or you could make a large, cheerful greeting card for a friend. Use it with watercolors (as Cathy has done), Inktense pencils, acrylics, encaustic paints, and much more!


We'll let Gwen tell you all about her new stencils:


Not Afraid to Try: In 2009 I went back to school to get my MBA and during my second year I took an elective called Business Judgment, which was my favorite class of the entire program (it was much more interesting than it sounds!) One of the books we read in class focused on the concept that our own fears are our biggest impediments to making decisions and moving forward and with achieving success in both our professional and personal lives. 

This really stuck with me, and I ended up making it the subject of my final project for the class (which I aced, by the way!) I've continued to keep that as a mantra in the years since, and have long wanted to have a version of that concept as a phrase on a stencil so that I, and others, could use it for art journaling and other projects. 

The words are all hand-drawn, and you can also mask off individual letters to form other words and phrases like I did with the sample that reads, "Doubt Not, Fear Not." (I stenciled just part of the "o" and then drew in the horizontal line to make an "e.")
Of course, I couldn't have a quote without some decorative elements, so I added two borders which were inspired by traditional Indian woodblock designs, as well as a fun ornamental motif that's a combination of inspiration from a vintage metal finding and architectural elements. You can repeat the borders to make them longer, or turn them into backgrounds!


Scribble X Mask: I've been a doodler for as long as I can remember - I doodled in my classes all the way from elementary school through college, and then as an adult I've continued; I think that's the reason I continue to take notes in a notebook instead of on my computer! It helps keep my hands busy and my brain focused. 

This particular design was inspired by a series of doodles that showed up in my notebook during meetings at work last Fall. I had the idea to turn a few of my doodles - including this one, into a hand-carved rubber stamps, and I loved this particular design so much that I knew it just had to be enlarged and become a mask that could be used for even more applications in my artwork.


Chinese Garden Plum Blossoms: This stencil was inspired by my first two visits to China where I explored the Yu Garden in Shanghai and also learned about the symbolism of the plum blossoms during a Chinese watercolor painting demonstration - these trees flower in late winter and have come to embody the ideas of perseverance and hope, as well as beauty and purity. I also added Chinese characters for beauty (top,) harmony (middle,) and tranquility (bottom,) to describe the feeling while visiting those stunning traditional gardens.
The design of the plum blossom branch was deliberately created as an outline to allow you to color the flowers with whatever color combinations and mediums you choose.


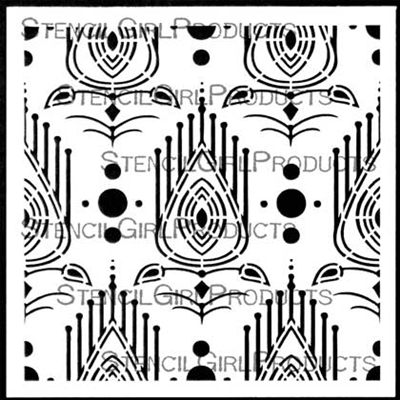
Art Deco Peacock Feathers: It's no secret that I love peacock feathers and Art Deco - I've already created stencils aplenty for both of these themes! 

I have a particular fondness for Egyptian Art Deco designs, and have wanted to do something along those lines for quite a while now. While visiting my family in the DC area last year, I spotted a pillow in a shop that immediately sparked the idea in my head to make Egyptian Art Deco peacock feathers. I drew it out and carved it as a stamp to see how it would work, and I loved it so much that it was the first thing I worked on when I started this round of stencil designs. 

The hand-drawn pattern was created to repeat, so all you have to do is line the stencil up along any of the edges to create seamless backgrounds as large or as small as you want. You can also mask off a single feather to use as a stand-alone motif in your work.


Decorative Flower Stamen Medallion: Like the Scribble X Mask, this design started off as a doodle in my work notebook. I had these organic elements that looked like the stamens of a flower growing out of the margins of my pages, so I went home and turned them into a quarter-repeat hand-carved rubber stamp. When I printed and repeated the stamp, the results were so much cooler than I'd anticipated! I knew immediately that it would make a fabulous addition to my collection of medallion stencils. 

It's perfect for creating background textures and patterns (it worked great with texture paste in my sample canvas!) Like all of my medallions, it's also ideal for layering... try using smaller circular designs and objects layered over the center and build up from there to create a really cool and unique focal point in your art!


Discover more stencils by Gwen Lafleur HERE and more by Cathy Taylor HERE.