Showing posts with label Kae Pea. Show all posts

Monday, February 8, 2021

Mixed Media Gel Printing with StencilGirl® Stencils and PanPastel by Marsha Valk


Hi there! It's Marsha Valk here today, and I'm excited to share a new StencilGirl® Column and video with you!

I often share something about my latest little solo expedition or something that I've seen or read recently in this column. However, it's been months since my last visit to a museum, and by now I'm kind of bored of just strolling around the neighbourhood. 


All I want to do is to create. Something. Anything!

Luckily for me, there are online courses and events to help and inspire me. I'm still able to fill my 'creative well' even in lockdown.


One of my favourite past-times right now is Creative JumpStart. If you are reading this blog, you've probably heard of it before, and you may even be one of the participants!

If not, Creative JumpStart is an annual online event that is hosted by StencilGirl® designer Nathalie Kalbach. This years edition is even bigger and better than ever because of its tenth anniversary.

I'm lucky to be one of the 45 teachers this year, along with Mary Beth Shaw, Seth Apter, Nancy Curry, Carolyn Dube, Rae Missigman, Gwen Lafleur, and Jane Lafazio, Kae Pea, Kristin Reese Williams and Tina Walker.

I always try to create along with at least some of the daily video lessons. Some years I fill a whole journal, other editions I only manage to do a couple of projects. And, that's totally OK. CJS isn't a challenge. Its purpose is to spark inspiration!


This year's theme is 'Storyteller', and for some reason that prompted me to dive into some of the art, I created as a child. So for my video lesson, I kind of did a collab with my younger self.

The fun thing is that my childhood art came in handy for the embroidery project Kristin Reese Williams shared in her CJS lesson too.


So with the StencilGirl® Creative Team theme 'Mixed Media Pastiche' in mind, I could not help but wonder what would happen if instead of looking at the style or character of the work of one or more other artists, I would look at the style or character of my art as a kid.


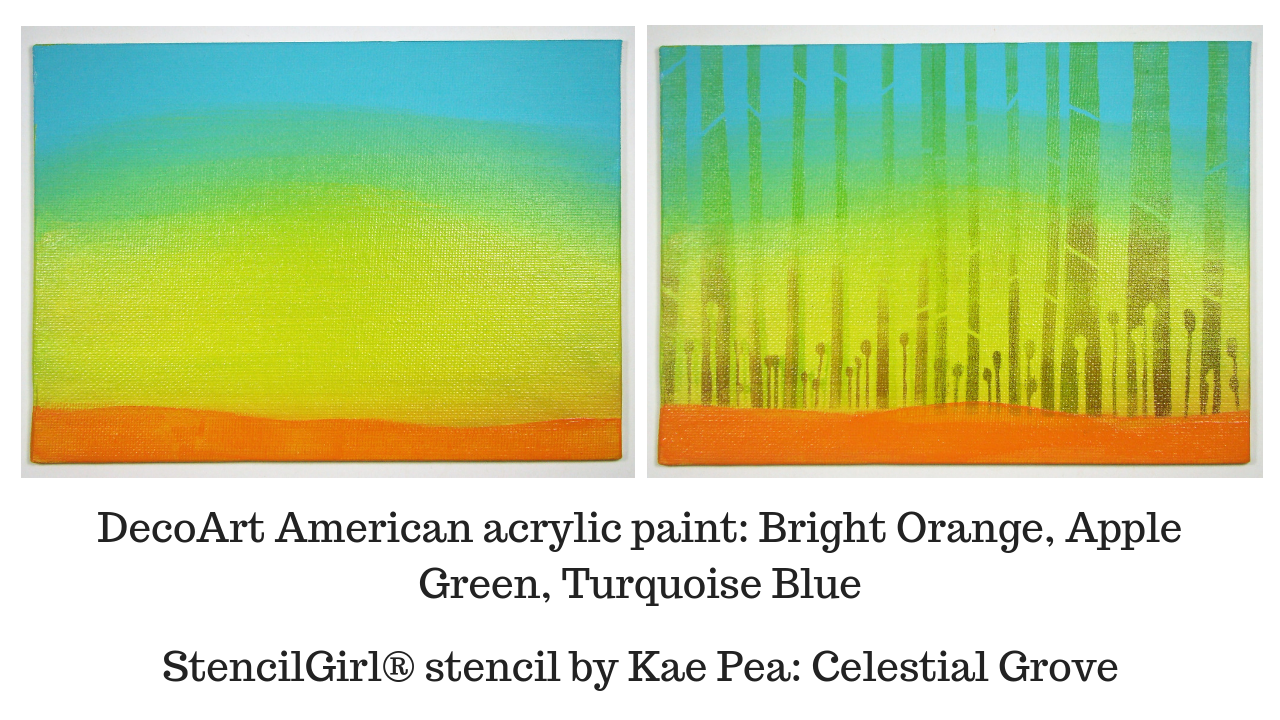
Watch the video to see me create a mixed media gel print using a technique I learned from my friend Birgit Koopsen, combining lots of StencilGirl® stencils and PanPastel.


I realise I'm super lucky to have access to the art I created as a child. However, I feel the need to stress that even though I'm happy that my mom kept these, I don't want you to feel sad because you haven't hung onto every single item of kids artwork you've ever made or received.

Most of my childhood art only exists in digital form these days. The physical artworks are long gone. I did not enjoy them half as much when they were collecting dust and taking up space in my attic!


You can always use your (grand) children's art or create something new in the spirit of your younger self instead! Have fun!

Until next time!

Marsha Valk


Stencils used:
Interesting Dots Repeating Pattern by Jennifer Evans
Oval Grate Stencil by Mary Beth Shaw
Fragmented Line Columns stencil by Cynthia Silveri
Mid Century Modern Rocks and Leaves stencil by Jennifer Evans
Stone and Mortar Version 2 by Mary Beth Shaw
Ornamental Floral Screen stencil by Gwen Lafleur
Deconstructed Cabbage Rose, designed by Traci Bautista

Stitch a Doily Stencil by Maria McGuire
Midcentury Modern Elements #1 by Kae Pea
Central Ave stencil by Nathalie Kalbach
Teardrop Doily Stencil by Maria McGuire
Seeds Doily Stencil by Maria McGuire

Friday, November 6, 2020

Mixed Media Painting Tutorial by Sam Bracegirdle

Hello! My name’s Sam Bracegirdle, and I’m delighted to have been asked to create this collage piece for the StencilGirl® blog.

I first discovered StencilGirl® stencils, and Mary Beth Shaw, in an online class last year. I’d been stuck in a bit of a creative rut, but I can honestly say that Mary Beth’s way of working has reinvigorated me! I’ve been art journaling for over a decade, and amassed an array of art journals – all mostly empty. But the Strathmore journal I bought for that class in November is now just one page away from being finished. I keep flipping through it and marveling at how productive I’ve become!

I’ve learned that it’s OK to start off without a clue of where something is going to go. Better to just get stuck in, than never to have started at all. And that was the case with this project.

My starting point was a picture of some banisters, torn from a book on English country houses. It has my favourite colour combination (aqua, sand, cream) plus a strong repeated pattern that I thought could be echoed in the wider piece. I picked out stencils that I knew contained similar elements. Beyond that, I didn’t really have any idea about style, or meaning, or composition.

StencilGirl® stencils used:
I took an 9x12 inch wooden artist’s panel and sealed it with white gesso. Then I placed some collage pieces – vintage book pages (“Wendy and Jinx and the Missing Scientist.” How thrilling!) and needlepoint canvas offcuts - around the edges, to create texture.

When I came to glue the needlepoint canvas down with gel medium, I lifted the first piece to move it, and found that I liked the dimpled texture the gel medium left behind. So I decided to use the canvas as a stencil for the gel medium, rather than stick it down.

I placed the Illegible Stencil over the bottom left section of the panel and sponged Cosmic Shimmer Prussian Blue paint through it. When dry, I painted Fresco Finish paint in Heavy Cream over it, to knock it back into the background. I also painted it in random points over the rest of the panel, and blended in some Mermaid, using my fingers. I find Fresco Finish paints blend really well with fingers, and it’s one less brush to wash!

To echo some of the spindles of the banisters, I used the Open Buildings  stencil like a stamp. I dipped a marine Scribble Stick in water and applied it direct to a section of the stencil which has a bar-like pattern. Then I placed the stencil where I wanted the pattern to transfer and carefully pressed down. I did this a few times, to get a repeat pattern. I concentrated mostly on the lower right section of the panel, as I felt this was where the focus of the piece was developing. To balance it out, I decided to leave the top right quadrant as white space.

Next, I took the Opera House Empress stencil and sponged black paint through parts of the roof sections, to frame the photo. I also picked out a window and a statue from it, to create the linear element on the far right. When finished, my sponge had very little paint on it, so I lightly swiped it across some of the textured points on the panel, and also round the edges. Then I warmed things up a bit with some Golden Quinacridone Nickel Azo Gold which I watered down a bit and dabbed in points around the picture and in other areas.

Next, I placed the Sidewalk of Puerto Rico stencil over the left side of the panel and drew through it with the Stabilo All pencil in black, and a few strokes in yellow.

I removed the stencil and spritzed water on it. The Stabilo All pencil is water soluble, so the pigment moves around in really interesting ways. Once dry, I repeated it, taking the pattern to the top left of the panel.

Finally, I applied a couple of old rub on transfers from my stash – some text and an architectural pillar. I also applied some thin lines of Izink Ice in gold to accent parts of the picture and the statue & window. To finish, I added the word Missing!, a chapter title from the vintage book pages, and swiped round the sides of the panel with some black paint, to create definition.

Hope you like the finished effect. For more pictures, do check out my blog and Instagram.
Sam Bracegirdle


Friday, August 9, 2019

Guest Designer: Mary Sanders Lazenby

Hey everyone, I’m Mary Sanders Lazenby of Blue Goose Studios.
This video shows how I utilize StencilGirl® Products to add texture, depth, and impact to my painting.
On this piece, I have used them to help me create my background with a Barred Owl in the foreground.
I hope you enjoy watching this video and hope it inspires you to create!

StencilGirl® Products used:

Tuesday, October 23, 2018

The art of being grateful - a mixed media canvas by Sandee Setliff


The art of being grateful is an easily practiced skill and, I believe, can have nothing but positive effects. Practicing gratefulness can help put you in a positive mindset, a mindset that will give you a stronger foundation to face daily challenges and be more present with the things and people you love. So keeping that in mind, I made a small canvas to hang up to remind me daily to cultivate the art of being grateful every day.


I knew what I had in mind for my canvas to become so I began by cutting a piece of deli paper to the size of my canvas to create a mask by using a craft knife to cut circles for where I wanted flowers. I am doing this because the stencil I am going to use to create the flowers has nothing to do with ... well, flowers!


And as usual, for me....one idea is always ahead of another idea so I have to backtrack and prep my canvas. I began to build layers by adding some background paint and using a dry brush to blend the colors together and then let that dry before adding my next layer which was the bottom half of the Celestial Grove stencil. I used a sponge to apply the Moonlight Duo Tint & Hue ink pad in Asteroid Umber ink through the stencil giving it a light but distinctive marking.


I don't know about you but I love to try and look at stencils differently like this Stylized Fireworks stencil by  June Pfaff Daley. Once you look past the firework motif you will see all sorts of wonderful designs that can be used to enhance your projects.
Now comes the part that I really enjoy which is making doodles on top of the 
stenciled patterns with my pens and adding in some rubber stamping like I did with the stems for the flowers with the Stampstacts 2 stamps by Kae Pea.


I wanted one more layer so I used Andrew Borloz's Wheel Spokes Set #2 stencil to create a bokea effect. (  Bokeh has been defined as "the way the lens renders out-of-focus points of light". ) And I used white and blue ink to create this soft effect.


My last step is adding a sentiment or quote to my piece. This is an important step for me as words always seem to tie a piece together. I know there are a lot of people out there who dislike using their handwriting and if you are one of them ( I know I am ) then embrace any flaws and make it whimsical!


Gratitude strengthens relationships, improves health, reduces stress, and, in general, makes us happier. So it doesn't hurt to make a project that you can hang up somewhere to help you to remember...

there is always something to be grateful for.


Tuesday, July 10, 2018

Honoring Mother Nature (including video tutorial!) by Cheetarah Cheda


Hi everyone! It's Cheetarah here and I'm so excited to share with you my first post ever for StencilGirl® Talk as part of the creative team! This month we let ourselves be inspired by a theme which is "In honor of" and I have made a watercolor Art Journal page inspired by Mother Nature and honoring her. We as women can have a really strong connection to mother nature, the moon phases and all that comes with it. When we honor our goddess within that connects to it all, we serve mother nature as well. This sentiment has inspired me to make the above art journal page and I have recorded it for your viewing pleasure! 

It's about 20 minutes long and sped up (but you can adjust the speed at the settings) and I'm showing you the process of this page. So get a drink/snack and watch the tutorial at your leisure :)


Most of my art journals are intuitive, so there was no real plan in the beginning. I was mostly experimenting and all I knew was that I wanted to use the gorgeous Celestial Grove Stencil and waterproof inks mixed with watercolor and create some kind of forest setting for my goddess. I have to tell you, and you will see this in the video, I really struggled with the leaves to get them just right! Perhaps it's because I used the gorgeous Art Deco Peacock Feather as a leaf base and I just kept thinking "but this is a feather! not leaf!" LOL! But it was also good to push yourself to use the stencils in other ways than designed for, right? In the end I did get the leaves to look the way I wanted! Though - and oops here-  I forgot to press record when I added finishing touches on the page - but no worries, in the video I explain what I have done to get to the end result. And if you have any questions on the process or materials I used, feel absolutely free to ask, here or on YT  and I'll do my best to answer them.

Here are a couple of process shots for you:


The waterproof ink seeped through my stencil, but that just gives it a lush forest look and the whimsy of nature! The Magical shaker colors are super saturated colors so a little goes a long way to make the colors just pop! 


After I traced the feminine images from the Sacred Feminine stencil with the waterproof ink in my Pilot Parallell pen, I then added a light layer of grey waterproof ink mixed with a bit of water. The sheer effect you get is just awesome!


Added some white highlights/accents with a gel pen. 


In the end I added bolder accents with a semi waterproof black lettering marker (the Saruka pigment marker- semi waterproof because when it's wet you can move it a little bit with water. When dried it's completely waterproof.) and the Jane Davenport white paint over pen. 


Did the same for the lettering in the sentiment and added little highlight dots with the sakura gelly roll white gel pen. 


After trimming the piece I used double sided tape to adhere it in my mixed media letter sized art journal. This picture was made during sunset and somehow the color variation and shimmer at the bottom just popped in that light :) In the video you can see the shimmer and under layers a lot better. 

The StencilGirl® Stencils I used: 
Celestial Grove Stencil
Celestial Grove by Kae Pea

Sacred Feminine Stencil by Carol Wiebe
Sacred Feminine by Carol Wiebe

Art Deco Peacock Feathers Stencil by Gwen Lafleur
Art Deco Peacock Feather by Gwen LaFleur

Other materials I used: 

The watercolors were decanted in pans, which you will see in the video. The distress ink and blending tool I used to edge the piece after trimming so it blended the stark white edges to a softer grey. Oh, and on top is the Tombow eraser which I erased the pencil sketch lines with. 


Thanks so much for stopping by today! I hope you liked watching the process of this art journal page. Have a wonderful creative day and catch you on the next blog post!


Friday, May 4, 2018

Lynne Moncrieff: Seek Stillness

Hello! This is Lynne Moncrieff, and I’m thrilled and honored to be a Guest Designer for StencilGirl®! This invitation was such a beautiful artful surprise.

Although I did not know what form my project would take, I instinctively knew it would be with a nature theme. StencilGirl® has a vast range within the theme of nature; I was spoilt for choice!
On receiving the stencils, as I studied the designs, I had thoughts of creating a handmade journal. However, I take a very fluid approach to creating and the initial thought of a journal transpired into more. As I allowed the project to find its own path, the outcome was a handmade folder containing three scrappy journals and I couldn’t help myself, I also made a pouch.
The style of the stencils also determined the other supplies I worked with. When working with a nature theme, it is close to my heart to incorporate recycling and other “Green” options. For this project, I incorporated eco dyed elements, used teabags and recycled paper.  
This project “Seek Stillness” is a nod to the serenity found within nature and of course, within creating. 

StencilGirl® Supplies

Seek Stillness by Lynne Moncrieff with StencilGirl® stencils
Red Rosin Paper was measured to approx. 13” x 6”. On one side only, white Gesso was applied followed with watercolors, applied in a very loose manner. This panel was machine stitched to eco dyed unperforated teabag paper. By folding the bottom edge of the teabag paper, almost half-way up and machine stitching down the center fold, to form two interior pockets.
For the front cover, a trio of leaves from the Leaf Poetry stencil was stenciled onto a used teabag, with contents disposed off (!) with a combination of Stabilo black water-soluble pencil and Distress Crayons, working with the minimum amount of water to blend the media. Stamped PaperArtsy grasses and a partially stamped, That’s Crafty!  Lynne’s Affirmation stamp, were the only additions to the front cover, with the backside of the machine stitching providing extra detail and a textural quality.

Seek Stillness by Lynne Moncrieff with StencilGirl® stencils
Opening the folder, the contents of a pocket with a handful of eco dyed teabags and a trio of journals.

Seek Stillness by Lynne Moncrieff with StencilGirl® stencils
The gorgeously evocative Thicket Background was stenciled onto the lower half, again working with Distress Crayons, applied with my fingertips, barely wetting a paintbrush with water to blend the colors. This resulted in a slightly diffused appearance which I found appealing, beautifully organic.

Seek Stillness by Lynne Moncrieff with StencilGirl® stencils
At this stage, I turned my attention to creating journals. Inside the right side pocket nestles one of the journals. 
To create a journal, I layered various found papers, some tea/coffee stained and others eco dyed. This bundle was machine stitched down the left side. To this I layered a small bundle of eco dyed large, self-fill teabags. Each journal has stenciled leaves as a focal, again with the combination of water-soluble pencil and crayons.

Seek Stillness by Lynne Moncrieff with StencilGirl® stencilsWhen I have a tea/coffee staining session or creating bundles for Eco dying, I like to gather a variety of papers and textiles, which provide me with the freedom to dip into when a creative session is underway. 

To bring interest to the pages, I randomly stamped, textural style stamps, focusing on the page edges.

Seek Stillness by Lynne Moncrieff with StencilGirl® stencils
The feeling I wanted to create with the stenciled leaves was that of old, dried crumbling leaves, leaves towards the end of their lives. Fragments of handmade paper which had been Eco dyed, layered onto the stenciled leaf helps to tell this story which is strengthened by the stamped words (PaperArtsy).

Seek Stillness by Lynne Moncrieff with StencilGirl® stencils
Leaf Poetry is a beautifully designed stencil, easily allowing the artist to isolate individual leaf designs to stencil yet there is also the option to work with this generously sized stencil as a whole.

Seek Stillness by Lynne Moncrieff with StencilGirl® stencils
On completion of the inside of the folder, including the journals, I decided to return my attention to the outside of the folder, this time the rear.  Focusing on the circular element on the Celestial Grove stencil, I stenciled directly onto the rear cover. Onto another used teabag, the stenciling of another of the Leaf Poetry leaves with quick machine stitching prior to adhering to the stenciled circular element. Selected areas of the stylized trees from Celestial Grove were also stenciled. Finally, another partially stamped, that’s Crafty! Lynne’s Affirmation.
A torn length of eco dyed calico was machine stitched to front flap of folder, long enough to wrap around the closed folder, tucking the end in to bind it.

Seek Stillness by Lynne Moncrieff with StencilGirl® stencils
Recycled brown packing paper, easily transformed into a pouch. After applying white Gesso followed with watercolors, the bottom edge was folded upwards, machine stitching the sides with more machine stitching, this time to the upper flap, a length of re-cycled calico, painted with watercolors and stenciled with leaves from Leaf Poetry.

It has been a joy to create and share this project with you. I hope it will inspire you to create your own nature inspired journals and folder, rooting around your home for recycled elements to incorporate into your project.
Lynne Moncrieff
Lynne Moncrieff lives in Scotland.
She embraces this creative life and any new art adventures that might come her way.

She welcomes visitors to the following sites:

That’s Crafty Lynne’s Affirmations stamps available @ http://www.thatscrafty.co.uk/