Monday, May 30, 2022

Bokeh Technique with StencilGirl® Stencils

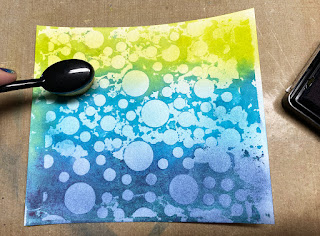
I LOVE techniques and being able to use my stencils and supplies in a variety of ways. Today I am going to share a Bokeh Technique using Stencils, Ink and Water…it is oh so easy!

What is bokeh? Bokeh is a background without hard edges or sharpness. Nothing in the background should be distracting. The blurry area should have circles of light that are round and smooth. The lines are out-of-focus and should be blurred and the points that intersect should blur into each other. I believe this technique does just that.

Supplies:


Step 1: Grab the Random Assorted Dots Stencil and ink colors.
Note: Pick any three colors of ink that you like and will blend well together.

Step 2: Place the stencil in the tray and ink up the top third of the stencil with Key Lime.

Step 3: Ink the middle of the stencil with Tranquil Teal.
 
Step 4: Ink the bottom third of the stencil with In the Navy.
 
Step 5: Spray the inked stencil with water. NOTE: The water should come out as a mist not a stream.
 
Step 6: Shows how the water looks on the stencil in the tray.
Step 7: Move the stencil off the tray and onto the clean craft sheet.
Step 8: Place cardstock onto stencil.

Step 9: Rub gently over the cardstock.

Step 10: Pull the cardstock off the stencil.
See that great effect. You could stop here but then it would not be a Bokeh look…but it is still fabulous!

Heat set the front…

and back to dry the cardstock.

Ink up a blending brush with Key Lime and blend the ink onto the top third of the cardstock.

Ink up a blending brush with Tranquil Teal and blend the ink onto the middle of the cardstock, going up into the Key Lime to blend and create another color.

Ink up a blending brush with In the Navy and blend the ink onto the bottom third of the cardstock, going up into the Tranquil Teal to blend and create another color.

Continue to blend adding more ink if necessary to have a smooth blending of the colors.

A completed Bokeh piece of cardstock.


BONUS:


Here is the tray with the leftover ink…why not use it…

Place the stencil into the tray to pick up the ink.
There will be no reason to spray it with water as this ink is already sprayed down quite a bit.
Place a piece of cardstock over the stencil and press.

Here is a picture of the first impression and the second impression side by side.

Ink the second impression with all three colors or just one, depending upon what it turned out like.
In this one I used all three: Key Lime at the very top edge coming down about ¼ of the way.
Then used In the Navy along the bottom edge and filled in the rest with the Tranquil Teal.
I think it was a great way to use up the rest of the ink
and come up with a totally different look from the first one.

Have fun creating with this Bokeh Technique for fabulous background papers that can be used for cards, journaling and more.
In the hero shot I show the results from all three of the stencils mentioned in the supply list.

Ann Butler

Thursday, May 26, 2022

New Abstract Florals and Landscapes from Jennifer Evans


Paperwhites are delicate flowers that can be grown indoors from bulbs. Similar to daffodils in structure, they are tiny blooms that appear in clusters. This stencil is reminiscent of looking closely into a gathering of blooms (upper right square shape) with a close-up of a leaf on the left and a border of stems underneath.  Experiment with using the negative space (areas around the main images) to see what kind of new designs will inspire your art.


When sketching a flower, I always examine it from all angles. This stencil looks at a sunflower 3 ways: from the side, straight on into the bloom, and underneath the bloom where the greens look like a crown before it attaches to the stem. You can experiment with different color blooms. I imagine the final product being cut apart to be utilized in other projects, or to make bookmarks.


A common carnation gets the star treatment in this stencil, which features a single bloom over a background of stems and leaves. Try your hand at lending texture to the petals with any type of collage elements, or just sketch them in with a colored pencil.


Nature lovers and landscape artists will recognize how to put this stencil to good use. The horizontal and vertical lines in this design allow for close-up studies of different terrain: rocks, hills, grasses, puddles, trails, evergreens, mountains and plains.... Or, you can combine them all into one design (see example). 


This landscape with a building structure is open to many interpretations: as a waterscape (see example). Or, turn the water into rocky terrain or grassy hills. The greenery behind the building can be interpreted as hills/mountains if you prefer.


Monday, May 23, 2022

Mythical Illustration in Watercolor


Mythical creatures have always intrigued me, some of my favorite being mermaids, dragons and unicorns. The Little Mermaid was my favorite movie from childhood. Being able to talk and sing underwater while sporting an iridescent tail seemed like the ultimate fantasy. And then I grew up and had a daughter.
My daughter has an incredible imagination. She has a pet tiger that lives under her bed, along with a unicorn that we found in an egg on one of our bedtime adventures. One night she asked me to tell her a story. Unlike her, I am not very good at using the imagination area of my brain. I draw all my inspiration from others and what is around me. I desperately wanted to be one of those parents in story books that make up tales that come to life for their children. I made up a story about a little girl that had her own pirate ship (she was into pirates), and her brothers were her first mates. On her very first adventure, she found an egg that she brought back to her pirate ship. After several days, the egg hatched, and a tiny pink unicorn with emerald colored eyes emerged. She was named "Em', short for Emerald. And from that day on, they would go on many adventures, sailing their ship and meeting all sorts of people and mythical creatures.
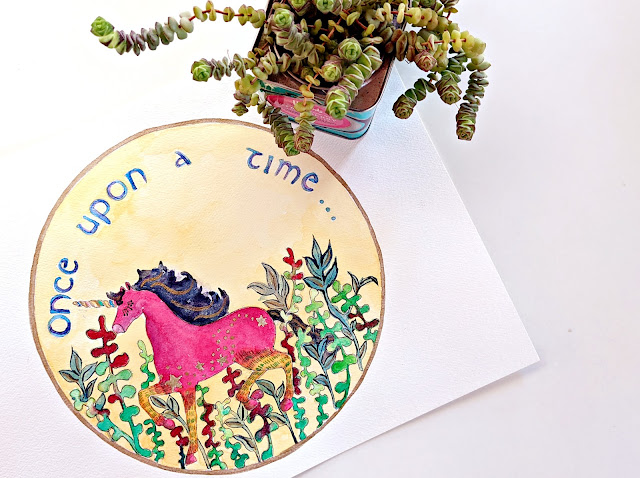
My painting today is one interpretation of "Em, the Unicorn." 

I started off using Unicorn Magic to stencil my unicorn.


I made a few color swatches of paints that I wanted to use. I used Kuretake Watercolors.


I added text using Celtic Alphabet Stencil and then tried adding a girl.


On this version, I made some proportional changes to the girl but decided to try embellishing the unicorn using the Botanical Wildflowers Stencil.


At this point, I still wasn't sure about free-handing a girl so I traced a plate and started filling in foliage around the unicorn. Here is my basic sketch.


I transferred my sketch to 300gm watercolor paper, using graphite paper and a pencil. I like to paint in my recliner so this is my set-up, otherwise known as my lap.


I recently purchased some masking fluid and here I am trying it out on the stars and dots on the unicorn body.


Painting in progress.


At the end, I added a few touches of gold paint to make it sparkle.


I had a lot of fun stretching my imagination to put together this illustration of "Em." I can't wait to try it again with different modifications and adding my daughter. Thanks for following along with my process and if you have any tips about illustration, I would love to hear them.

Until Next Time,
Kate


Friday, May 20, 2022

Roxanne Padgett: How many ways can you use one stencil?

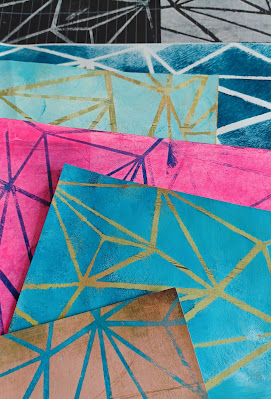
Join Guest Designer Roxanne Padgett as she demonstrates how many ways you can use one stencil!
Roxanne is using Geometric Sky Stencil by Mary C. Nasser.

Roxanne Padgett is a mixed-media artist, with a passion for painted papers, mark-making, textiles, collage, book-making, journaling and how to explore methods to connect these separate media through the art-making process. Roxanne teaches a variety of art classes for adults throughout the Bay Area and at art retreats around the country. In addition, Roxanne is the Creative Director for the Museum of Children's Art in Oakland, California. Is the author of “Acrylic Techniques in Mixed Media” published by North Light books. She lives in Hayward, CA with her husband and one rowdy pup. Follow her on Instagram @roxpadgett.

Thursday, May 19, 2022

Get the Set that Started It All!


The Original Six Stencils Set. The group that started it all at StencilGirl. 

Includes 9x12 stencils:
 Rafters
 Web
Gears
Greek Key
River Rocks
Trees.

Discount Priced (Buy 5 get the 6th free)!! 


Product Details:
- 9" x 12"
- 7 mil mylar is thick enough to be durable, yet thin enough for a seamless look in your art
- Made in the USA

Tuesday, May 17, 2022

Creanouk (Anouk) - Sketches and Mixed Media


Hello you beautiful artist,

I don’t know about you, but after a while less creating I always feel a bit rusty when it comes to my art journaling practise. Right now, while I’m writing this blogpost, I’m 28 weeks pregnant. And for the past six months my head has been filled with… babies! Now that the end is near and we are all set for our baby boy to arrive, I finally feel more space in my head to create again. 

To prevent the fear of the blank page I grabbed a journal from my shelf of unfinished journals that has a mix of floral drawings with mixed media in it. I came across a floral drawing that I sketched in my first trimester and I decided to use it as my starting point.

My drawing is inspired by the book: How to draw modern flowers by Alli Koch. I like to draw my flowers with a waterproof fineliner by Strathmore, but you can always sketch it out with pencil first. The paper in this journal isn’t the best quality, so I applied a thin layer of Amsterdam Clear Gesso on top of the drawing so that I work on it with wet mediums later on.


The journal that I’m working in has a specific theme going on. I used it last summer to sketch flowers while I was outside or resting on the couch. Another thing that occur to me while I was flipping through the pages, was that I used a lot of messy collages next to a stenciled book page. So I grabbed Dripping Spanish Moss and my beloved Amsterdam Modeling paste and stenciled it on an old book page.

I usually have a few of these papers ready to go in my stash. I hate waiting for modeling paste to dry, so having a few papers of these lying around always saves a lot of time.

At this stage I wasn’t sure if I wanted to colour my flowers in. So I used a small brush and some Amsterdam Sky Blue Light mixed with a tiny bit of white to colour outside the lines of my drawing and to create a base for the right and messy side of my page. I only painted a small part of the page, because I knew I wanted to collage and use the stenciled book paper that I just made.

Once everything was dry I glued down the book paper and the rest of the collage pieces with Mod Podge Matt. I always find collaging with tiny scraps super satisfying and relaxing! I think this tiny piece took me half an hour just because I was listening to some lo-fi beats and enjoyed the moment with my art journal.

To make my collage ready for my ‘messy’ stage I used a little bit of white gesso and applied it randomly with a pallet knife. If you feel like you’ve applied too much gesso, you can always use a baby wipe to soften it up.

Next I used Tangled Beach Grass with Amsterdam Titan Buff Dark on top of my collage and blue background to make it blend in with each other a little more.

I’m absolutely in LOVE with this stencil! I saw it on Laura Horn's Instagram and I’ve been in love with it ever since! The whole range of Trish MicKinney stencils are just absolutely beautiful I highly recommend checking them out.

It’s time to get messy! If you’ve been following my blogposts you know that I love using ecoline when I want to make an intuitive and messy spread. To be honest I was a little bit nervous using it at first. It has been awhile since I got so messy and I was afraid to literally mess it up. But I’ve learned that it can’t go wrong if you have a baby wipe and a cup of water beside you!

My initial thoughts were to combine the Prussian Blue ecoline with Burned Sienna, but in the end I thought it would be a bit too much. Thankfully instant coffee is always there to help! I sprinkled some directly on to the page and then sprayed it with a little bit of water.

At this point I decided to leave my drawing just as it is. I just love the look of the messy and colourful side combined with the more minimal black and white sketch. 

I always like to fancy up my pages by gluing or stapling down pieces of fabric. I think it’s just that piece of extra that can make your page really good!

Okay, so I hear you thinking! No modeling paste as the final layer?

Let me introduce you to a new product that I’ve been using. It’s called Stencil Butter and it literally feels like butter! And it’s gold! Okay, I need to contain my excitement and not use it on every single page that I make. I used this utterly gold piece of medium with the Lacy Spanish Moss stencil placing it randomly across the page.

As always I finished off the page with some ink splatters and a cheesy quote sticker from my Tim Holtz sticker book because I didn’t feel like journaling on my own. Sometimes the process of making a page is enough. 

And just like that there’s a page that’s the perfect mix of mixed media art journaling and a minimalistic flower drawing! What I like the most about this combination is that you can use your sketches in your art journal without drawing them on separate paper. You can just take your journal with you, sketch whenever you want to and take it back to your desk whenever you want to play!


Product List:
Handmade Journal
Amsterdam - Modeling Paste Matt
Vintage Music and Book Paper
Dried Tea Bags and Fabrics
Mod Podge - Matt
Amsterdam - White Gesso
Amsterdam - Clear Gesso
Amsterdam - Sky Blue Light
Amsterdam - Titan Buff Dark
Amsterdam - Ecoline Prussian Blue
Instant Coffee
Ranger - Spray Ink White
Faber Castell - Art Grip Aquarelle
Strathmore - Waterproof Fineliners
TCW - Stencil Butter Champagne Gold
TIm Holtz - Sticker Book

Stencils:


Thank you so much for reading my blog post. I hope that I have inspired you to create today! My name is Anouk or Creanouk on social media, and I'm an all-round creative from the Netherlands. I love art journaling because I can put my heart and soul into it. You can find my work on Instagram and Youtube.