Showing posts with label stamping. Show all posts

Thursday, February 21, 2019

The humble paper bag! Carry It :) :) :)


Hello, Hello, fellow StencilGirl Fan :) :) :)

Today I would like to share with you my creative take on our new theme, 'Carry It!' 

Do you remember using a paper bag to carry your lunch to school in???  I do! :) 


Recently I have been using paper bags in my Junk Journals and I have been absolutely LOVING IT! 

So, with that in mind, I would like to share with you 3 arty brown paper bags that I have created using the fabulous StencilGirl stencils with!!! :) The inspiration for these arty paper bags comes from an incredible artist, Brooke Wandall,  The Original Terrarium Painter.

I have used 2 fabulous StencilGirl Stencils:

The Layers of Scallop Stencil by Mary Beth Shaw
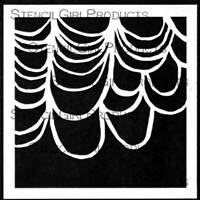


And, the Ladders Stencil by Carolyn Dube


Whilst it is probably easy to see how I created these arty paper bags, I have created 2 step-out photo collages to briefly depict the basic creative process of creating the backgrounds before stamping on the flower images and the final embellishment tweaks.

  • To begin with, I gathered the following supplies; brown paper bags, acrylic paint, StencilGirl stencils, Stamps, black ink pad, black embossing powder, Embossit pen, black Stabilo pencil, Fude ball journal pen, Posca paint pens, Gel printing plate, brayers, heat tool, and acrylic stamping blocks.
  • I used the gel printing plate to lay down the 2 color blocks of paint onto the paper bags.
  • I also used the brown paper bags to create a vase shape that I could transfer onto the paper bag backgrounds.
  • As you can see from the above photo collage, and the images of the actual finished paper bags, I used the stencil and vase mask 2 different ways to transfer the stencil patterns, first onto the vase, and then to the surrounding space around the vase.

Here are some close-up photos of the finished arty paper bags :) :) :)


Well, that is it from me for this fabulous themed challenge, I have so loved creating these arty paper bags for my junk journal.

Cheers and Happy Stenciling!!!!

Louise :) :) :)

Tuesday, November 22, 2016

November Blooms in my unPlanner


Hi, everyone! Anna here with my latest update in my unPlanner. I love how the artsy stencils by StencilGirl give me so many options of how I can decorate the different elements in my unPlanner. From the monthly dividers, to the spine, to the tags I include, the monthly pockets I put in, etc. Today I'll show you how I decorate the November divider. On the opposite side of this piece is my homemade month-at-a-glance calendar.

I use an 8"x12" piece of watercolour paper as the substrate. 


I missed a few photos for the step-out here.

I start by painting the background black with smudges of white as well, using  cosmetic sponges and blending.

 Next, for starting the layers, using white paint, I stencil grids on the right side and lower left with MB's Grid Stencils. 

Then, I randomly paint white circles across the pages, as the base for flowers, as the paint might not show up as bright as I want with such a dark painted base.

I add a few more layers of white once the first coat is dry. I occasionally go in with a triangular sponge, which creates some texture on some of them.

Then I stencil in the floral mosaic with Cecilia Swatton's newest stencil Blooming Where Planted.

CAN I SAY THESE ARE THIS STENCIL HAS THE MOST GORGEOUS ARTSY FLOWER DESIGN EVER?!? ;)

I smudge the edges stenciled, so that it blends in with the background.


I add some lower left as well, over the grids. Some more areas on lower right too.  (But I first add some more black to this area.)

I just love the open loopy shapes in this stencil!


Loving the ghostly effect middle left...


Next, I stencil in white on white with the Decorative 6-Petal Flower Screen by Gwen Lafleur to create more texture.


Next, I stamp loopy flowers - Boxy Blooms by Rae Missigman over each white circle and on background. I punch some circles to mask off some areas for stamping so the flowers don't stamp over each other.

I also paint in blue dots with a paint pen on one of the circles but decide that issn't going to work, so I paint it over with white.

Start to add in blues on the flowers. I do this very randomly, taking time to stare at it quite a long time, as I'm very stuck at this point. Not sure where to go from here.


White dots surrounding some of the flowers are next, using a white Daler Rowney acrylic paint pen.

Also, add in some Golden Paynes Gray and Permanent Violet Dark Fluid acrylic touches with the Blooming Where Planted stencil again lower left.

Different blues to add more dimension to the flowers. 

Add in blue paint and more grid stencil layers middle right.


"Draw" in some blue to the stamped images with various blues and green-blues.

Add shadow with a very small amount of black fluid paint to flower upper left.


:) :) POP! :) :)


More stamping upper left, stamping off initial ink from stamp so that the flowers kind of blend into background.


More blue paint (Amsterdam Standard Series Brilliant Blue) mixed with black to make a blue-black colour. Stencil more grid layers to right side.

Paint in a different styled flower on flower middle left. (Didn't like how it looked stamped.)

More white paint dots. Some black dots too around one of the flowers.


Mixtures of black and blue around flower, lower left-ish...

I'm done now! 


The page closed in my 6x8" binder with the month tab glued on.


The spine throughout the month of November in my unPlanner also features the Bloom Where Planted stencil.


To see more of my unPlanner, visit my blog at www.artfulstories.blogspot.com

Thanks so much for visiting! 

♥♥♥  Anna  ♥♥♥


Friday, August 19, 2016

Master Boards in Multiple Ways!

Hi, everyone! Peg Robinson here! When asked if I would like to do another blog post for StencilGirl I jumped at the chance! I love the stencils, designers and everything about the company!
I have been playing with a variety of stencils from various StencilGirl designers and enjoying the wide variety of stencil designs they have to offer.
Today I will share with you how I make a master board.
This is a great place to use a variety of designs in layers. You may ask "what is a master board?"
Well it really is just making a nice background. And you can do this on just about any surface.
They can become all kinds of art. You can glue them in a journal or on a collage.
You can cut them up for ATCs. It can be used for making bookmarks and in quick cards.
You can even use them to wrap a gift. So now I think you see where I'm going with this.

When I first started stamping, there were not that many wonderful papers to choose from in the stamp and scrapbook stores. We had to make our own. This really is a lot of fun. I remember taking some classes with stamp companies and really enjoying learning how to create decorated papers. And let's face it, there is something really satisfying in putting your own hand to a piece or art and making it your own. So let's get started. You can use a brayer to apply paint to a background or just slap some paint on a page. It really is all about layers.  A fun technique to use is a gesso resist. Anyway you slice it, it is fun.

You may want to try some color swatches just to see how the colors blend together.
Try colors next to each other on the color wheel. Green and blue, blue and purple, orange and yellow.
Or mix it up, but remember this is a bit trickier. Try pink and turquoise.
Where they blend you get a nice purple. Straw and plum. Pink purple and orange.
Think about using some transparent layers over the top of other colors. Turquoise orange and red.  Well, I could go on about color combinations but we want to create.
To start my first layer I will stencil on a design with gesso.
Once that layer is dry, I can add my first layer of ink or paint.
It just becomes layer on layer. I even make my own stamps to use to add to my layers.
So you get a better idea of how all of this works, I have created a video for you:

like to work in multiples and allow layers to dry. This way I can create more in one session.

Well, now I have some awesome master boards ready for the next step. Let’s see what we can create.
You can get a lot of projects from one Master Board. But remember you now have awesome stamps to use on any project and you made it with your incredible StencilGirl stencil!
So, I cut my boards into several shapes.
I have greeting cards, gift cards and artist trades all from these sheets. Once I have my boards cut up, I like to go back and add some images or words to the surface. I hope you enjoy my project and try it out for yourself soon. Be sure to tag StencilGirl with the hashtag #stencilgirl when you do. We would all like to see what awesomeness you are creating. Thanks again to StencilGirl for allowing me to share.
And as a final note, here are some closeups:
Products used:
Peg head.jpg
Peg’s media links:

Friday, March 13, 2015

Stitching With Stencils


Hello Stencil Lovers!
Janet here from Happy Reminders.

I wanted to share with you a stitchery project I made for my first grandbaby...

The thing with stitchery is that it is real simple to do...
But it is not for anyone who desires instant gratification....
You can get real fancy with your stitchwork or you can stick to something easy. 
Every stitch you could possibly want to learn is a 'google' search away
with how to videos and tutorials around every corner.


For this project I kept it simple.
I used the banner section from the Vintage Camper Stencil by Jamie Fingal
and the Vintage Typewriter Alphabet Stencil by Carolyn Dube.

I used a sponge dauber and Permanent StazOn Ink for the marking the banner 
and a Micron Pigma Pen to trace the letters of the baby's name.
A lightbox underneath helped me get good placement for the design.
The stem stitch, the back stitch and the chain stitch are the basic stiches I used.


I drew the little boy running with his two dogs...
I was trying to capture the essence of a carefree childhood...
I outlined everything and then used Tsukineko Fabrico Markers to loosely fill in.


I stamped the scripture directly onto the cloth...
I knew the potential was there to wreck the whole thing...
It turned out okay...not perfect...but I wasn't going for perfect.
To tell the truth...
The project hit a standstill, waiting for me to do something with the middle section.
I knew I wanted a saying or a scripture...not knowing how I was going to pull it off.

Finally I had to just GO for it!


All in all, I love how that middle section turned out!
Heck, I love how the whole thing turned out!


Thanks for peeking in!
Till next time!